The Ariston washing machine does not spin.
 Ariston washing machines are renowned for their excellent spinning performance—owners often cite this feature as a key advantage of this brand's washing machines. However, sometimes they encounter a problem: their Ariston washing machine doesn't spin. Often, the drum even spins, but not fast enough to achieve the desired effect and thoroughly spin out the washed items. What causes this? How can this problem be avoided and resolved if it occurs?
When it's not a breakdown
If your washing machine doesn't spin, it's not always a sign of a breakdown. Don't panic and start planning for major repairs. Among the main causes of poor spinning (or no spin at all) is a pinched or kinked drain hose. This prevents water from draining into the sewer. You just need to check the hose and the outlet lines.
Some washing modes don't include a spin cycle. For example, if you select a delicate or wool cycle, the spin cycle won't be activated. If you need to spin your items, you'll need to turn it on manually.
The laundry will remain wet if the spin program is set to a low speed. The spin cycle will still work, but the results will be unsatisfactory. A separate spin program at a higher speed will be necessary.
If the machine isn't loaded with laundry optimally, it won't spin properly. Almost all modern models have a smart weighing feature. If the machine weighs the laundry and determines that its weight isn't optimal for spinning, it won't start the spin cycle. The load could be too heavy or too light. Remove excess items from the drum or, conversely, add more items to achieve the optimal spin cycle weight.
If, after checking all the above, the machine still isn't spinning, there may be a problem. Minor repairs will be necessary. Let's look at the main points.
The fault is a malfunction
A subtle malfunction could be to blame for this problem. What should you do? Where can you look for the cause? The most common malfunctions that lead to a malfunction in the spin cycle are:
- problems with the drain pump;
- pressure switch failure;
- incorrect operation of the tachometer sensor;
- engine malfunctions;
- Error in the control module.
Here are the most common causes of spin cycle failures. There are others, but experts generally indicate that their frequency is negligible. When performing DIY repairs, first inspect each of the listed components.
We check and repair the pump
 Things are much simpler if the F11 code appears on the washing machine's display. This indicates a problem with the drain pump. First, locate the corresponding component. Lay the machine on its side. Before doing this, lay a soft cloth on the floor to protect the body. After removing the screws, remove the bottom panel (if your model has one). Then, proceed as follows.
- Carefully examine the drain hose. If you feel any blockages, remove it from the pump.
- Loosen the clamp holding the part.
- After unscrewing the bolts that hold the part, you need to disconnect the electrical wires.
- Remove the pump.
- Disconnect the hose from the tank and rinse it under running water. This will thoroughly clean it.
Visually inspect the pump. Often the pump simply becomes clogged with dirt, which is why it doesn’t work. Rinse it. Then, replace it in its original location and test it with a multimeter. If there's no signal, the pump needs to be replaced. The same applies to a broken impeller.
Checking and replacing the level sensor
The described spin problems can also occur due to malfunctions in other units. Before replacing the pressure switch, you need to be absolutely sure the old one is not working. To check, you need to remove it. To remove the pressure switch (also known as the water level sensor), follow these simple steps.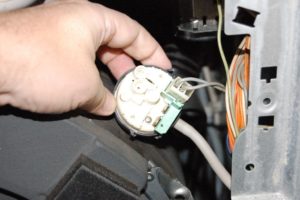
- Remove the top cover of the machine by sliding it back. The pressure switch is located on the side wall and is secured with special screws.
- You need to disconnect the wires and remove the hose from the pressure switch. Loosen the bolts securing the unit and remove it.
- Inspect the part and rinse it with water if you suspect contamination. The connectors should be free of oxidation. If they are, carefully clean them.
- Check the unit's functionality.
Next, attach the hose to the fitting, hold it to your ear, and blow into the free end of the hose. You should hear a distinct clicking sound from the unit. This indicates contact. There may be several clicks, depending on the model.
The absence of clicking sounds is the worst sign. It indicates a faulty component. If clicking sounds are present, check the reliability of the contacts with an ohmmeter. Connect the measuring device to the corresponding sockets on the unit's input. When the contacts are closed and opened, a voltage surge will be observed. If there is no surge, the component is faulty. If these steps reveal that the pressure switch is not working, it must be replaced.
It's worth checking the Hall sensor.
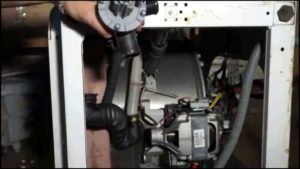
If the pressure switch is OK, we move on to the engine. Before checking the engine, however, it's important to ensure the tachometer is working properly. It can often also be the cause of the problem. To check this component, the washing machine will need to be disassembled. The procedure is as follows:
- disconnect the equipment from the power supply, as well as from communication outputs and inputs;
- On the back wall of the case, you need to remove all the screws and remove the wall itself;
- remove the drive belt by pulling it slightly towards you and simultaneously turning the pulley.
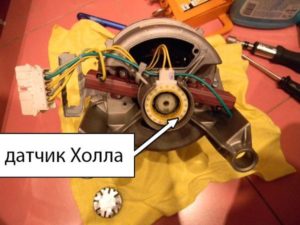 Now you need to remove the engine from the car. Beforehand, it's important to remember to label all the wires leading to the engine. Next, remove the bolts holding the motor in place. Gently rock the motor as you remove it from the car. After removing the engine, you can clearly see the Hall sensor. Possible causes of its malfunction include loose fasteners and disconnected contacts. These may all be related to strong vibrations. Tighten the bolt and check the contacts. The resistance on the tachogenerator is checked using the following method:
- set the tester to resistance measurement mode;
- you need to unclamp the wire connectors and move them away from the sensor contacts;
- We check the resistance by connecting the probes to the contacts.
The resistance standard for a tachogenerator is 60-70 Ohm.
Set the tester to voltage reading mode to determine whether current is being generated. If so, the problem isn't with the tachogenerator. Apply the tester's probes to the sensor contacts. Crank the engine by hand and monitor the readings. If the readings change, current is being generated. Normally, the device should show a voltage of around 0.2 volts. Finally, be sure to check all the wiring. It's extremely rare for a tachogenerator to fail on its own. If a problem with the Hall sensor is detected, it will need to be replaced.
Let's open the engine
Since Ariston washing machines use commutator motors, they frequently experience motor failure. The following may fail in such a motor: brushes; fins; rotor winding; and stator winding.
The brushes are located on the sides of the motor housing. There are two of them. They are made of a relatively soft metal, which is why they tend to wear out quickly. Replace them if you notice any mechanical wear. This is usually visible to the naked eye. If wear is not visible, it is recommended to start the engine and observe its operation. If the brushes spark, they need to be replaced.
New brushes can be purchased at any store that sells parts for Ariston washing machines.
Problems with the fins arise due to the way they are attached to the shaft with glue. This is why they can often peel off if the motor seizes. If the damage is minor, turning the commutators on a lathe will solve the problem. Any metal shavings should be sanded off.
The slats should be carefully inspected visually. Pay particular attention to any delamination. Any burrs can cause malfunctions in the washing machine's "heart."
If there's a problem directly in the winding, it will manifest itself as a decrease in motor power, eventually stopping completely. A short circuit will trigger an emergency shutdown of the motor. The operation of the windings is checked with a multimeter. Set it to resistance mode. Next, apply the probes to the fins. A normal reading should be between 20 and 200 ohms. A lower reading indicates a short circuit, while a higher reading indicates an open winding.
To check the stator's functionality, set the multimeter to "buzzer" mode. Apply the probes individually to the ends of the wire. The absence of sounds will indicate that there are no problems. If the device makes a sound, then there is a problem.
Next, place one probe on the wiring and the other on the housing. There shouldn't be any noise. Any noise would indicate a problem. If the fault is found in the winding, you won't be able to repair it yourself. You'll have to replace the entire motor.
It might be a problem with the electronic board.
If the display shows error code F18, this indicates the electronic board needs to be reprogrammed. This repair cannot be performed independently. It requires specialized knowledge of electronics and programming. It's also important to understand the specific features of specific washing machine models.
If you discover such a malfunction, it is best to immediately contact the customer support center.
Repairing an Ariston washing machine isn't as complicated as it might seem at first glance. As we can see, understanding the causes of poor or no spinning is straightforward. Only in the most complex cases involving the washing machine's "brains" will you truly need to contact a specialist. In other situations, you can fix the problem yourself with minimal time.
Interesting:


Readers' comments
Headings
Washing machine repair


For buyers


For users


Dishwasher


Add a comment