Beko washing machine does not spin
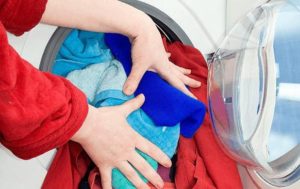
 If the cycle ends with water or completely wet items remaining in the drum, there's only one conclusion: the washing machine isn't spinning. This issue is common with BEKO washing machines, and it's not always a sign of a larger problem. Our article will help you determine whether the problem is due to simple carelessness or a more serious issue. We'll explore possible causes of insufficient spinning and provide instructions for troubleshooting.
List of possible problems
You shouldn't tolerate wet laundry. Not only is it unpleasant and time-consuming to finish the thankless job of washing, but what's worse, an unfixed problem can worsen the problem, leading to a disastrous outcome. To know where to look for the problem, it's important to understand the range of possible causes for a failed spin cycle. For Beko models, this applies to the following situations:
- a program without spinning is selected;
- the drum is out of balance;
- the drain does not function;
- the tachogenerator is out of order;
- the electric motor broke down;
- the drum bearings are worn out;
- the control board is not working;
- A foreign object has entered the tank, preventing the drum from rotating.
In 99% of cases, the problem can be resolved independently. A professional repairman will only be needed if the control module is burned out. All that's left to do is properly diagnose the source of the problem, which requires checking each possible solution in sequence. Step-by-step instructions are provided below.
Let's check the washing program
First, it's recommended to eliminate non-failure situations. Often, there's no problem at all because the user mistakenly selects a mode that doesn't involve intensive drum rotation. For example, spinning isn't included in delicate wash cycles or in wool, silk, and down programs.
To confirm your suspicions, you need to remember the selected button and read its description in the factory instructions. Next time, just change the mode or additionally turn on the spin cycle. The second thing we do is check whether the spin cycle has been accidentally cancelled in the standard program.
Important! Don't neglect to lock the dashboard, which will help prevent accidental switching.
Many modern models allow you to vary the drum speed, even turning it off completely. It's best to test it: select a mode, set the spin speed to maximum, and run the machine again. Wet items will prompt further testing.
Let's look at the laundry in the drum
A Beko washing machine's spin cycle often fails due to an imbalance in the drum. This imbalance is caused by overloading, underloading, or uneven distribution of laundry across the drum. This problem is common in older models, as modern machines are equipped with a special function that monitors the balance during washing and spinning.
It's easy to suspect something is wrong: the machine repeatedly tries to spin up, but fails. As a result, the cycle ends 7-15 minutes early, leaving the laundry wet. You can fix the problem as follows:
- Wait until the hatch is unlocked and open the door.
- Take out half of the laundry (if there was an overload), untangle the twisted “ball” or add more items (if there is a shortage).
- Close the hatch tightly.
- Start the spin cycle.
- Check the laundry for dryness.
Imbalance has a detrimental effect on shock absorbers, bearing assembly and shaft, so it is best to avoid it. It is important to control the amount of laundry loaded and remember both the upper and lower limits. So, in a machine with a capacity of up to 5 kg, you need to wash at least 1 kg, and in washing machines with a maximum of 8-9 kg - 2.5 kg.
The waste water is not removed
If at the end of the cycle, the drum not only contains wet items but also a full tank of water, you should check the drainage system. It's quite possible that the machine is simply unable to drain the waste water due to a burnt-out pump, a blocked impeller, or clogged hoses or pipes. To determine the specific cause and solution, follow these steps:
- Disconnect the drain hose from the drain and probe it along its length for blockages. If any foreign objects are found, unscrew the pipe completely and flush it with high-pressure water.
Caution! Sometimes the main drain can become clogged, so insert the disconnected end of the drain hose into the sink or bathtub, run the drain or spin cycle, and wait for water to flow.
- Locate the drain hatch in the lower right corner of the washing machine and pry it open with a screwdriver. Place a container underneath to catch the water and unscrew the debris filter. Clean the part and its connecting pipes. If everything is clean, test the contacts with a multimeter.
- We check the pump's integrity. We remove any hair or fur from the impeller, clean the pump body, and measure the resistance.
The pump and filter are not repairable and must be replaced if damaged. After all these steps, run the machine on the fastest wash cycle and monitor the water drainage. An empty drum will rule out the possibility of a faulty drainage system.
The Hall sensor is not functioning
 The spin cycle also fails if the tachogenerator is faulty. This device, also known as a Hall sensor, monitors the engine's RPM and transmits information to the control board. If it breaks, the connection with the module is lost, the system stops receiving information and, for safety reasons, reduces the motor power.
The breakdown is caused by improper operation of the machine, in particular:
- Regular overloading of the machine with laundry.
- Long-term use of the machine without stopping.
- Loose fasteners.
- Loose contacts or damaged wiring.
- Strong power surge or short circuit.
First, we inspect the wires and, if necessary, tighten the terminals, clean and insulate the conductors. Next, we test the sensor with a multimeter and evaluate the results. If there are any deviations from the norm, we replace it with an equivalent.
The motor does not spin the drum
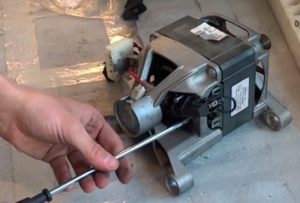 Another situation arises when the motor is unable to accelerate to the required power. With brushed motors, slowdown can occur if the brushes are worn: washing and rinsing cycles proceed normally, but spinning becomes impossible. If other cycle stages also struggle, the motor itself may be faulty. This hypothesis can be verified as follows:
- We disconnect the machine from all communications.
- Unscrew the back cover.
- We remove the drive belt.
- We disconnect all connected places.
- We loosen the retaining fasteners.
- We rock the engine and take it out of the grooves.
Next, wipe the housing with a cloth and inspect it for damage. A burnt-out motor will have an unpleasant burning smell, stains, and charred wires. Then, pay attention to the brushes: remove them from both sides of the motor, open them, and measure the length of the tip. If it is less than 0.7 mm, you will have to replace the pair with a new one. At the same time, we ring the coils.
Electronic unit malfunction
The worst case scenario is when the electronics fail. In this case, the spin-control triac burns out, the motor doesn't receive the command to accelerate, and is unable to spin the drum. Only a specialist can determine whether the module is the culprit, so at the slightest suspicion, it's best to contact a service center.
Repairing the module yourself is not recommended. There's a high risk that a lack of experience, equipment, and professionalism will result in permanent damage to the board. A replacement part is expensive, and hiring a technician is cheaper.
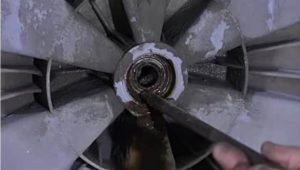
Foreign object in the tank
A foreign object lodged in the tank can also prevent the drum from spinning. This requires immediate action: the foreign object can damage the tank walls and cause the entire system to jam. Replacing the tank is very expensive, so at the slightest suspicion it is recommended to stop the machine and remove the dangerous element.
Removing the item isn't easy, so it's best to confirm the diagnosis first. To do this, unplug the machine, drain the water, open the door, and spin the drum in both directions. The resistance you encounter clearly indicates an obstruction, so let's get to it:
- We check that the unit is disconnected from the power supply.
- We turn off the water and disconnect the drain hose.
- We provide free access to the machine from all sides.
- We unscrew the bolts at the back and remove the back wall.
Important! Check the instructions in advance to determine which side of your VEKO model the heating element is located on.
- We find the location of the heating element.
- We take a photo of the heater so as not to mix up the wires when returning.
- We loosen the retaining bolts and remove the heating element.
- We insert our fingers or long pliers into the freed space and pull out the object that fell into the tank.
Once the problem has cleared up, it's time to give the heating element a quick cleaning. Scrape off any scale and dirt from its surface, and don't forget to clean the contacts. Then, put everything back in place and test the drum rotation.
Bearing problems
 You can suspect that a faulty bearing assembly is to blame for poor spin results by the sounds emanating from the machine while it's running. Unusual noises, creaking, and knocking indicate that the seals have reached the end of their seven-year lifespan and have leaked, damaging the bearings with washed-out grease and corrosion. These components cannot be restored to their factory condition; the only way to do this is to replace both the bearings and seals with identical parts.
The instructions here won't be short and simple. First, you need to find suitable replacement parts based on the BEKO model's serial number. Second, you need to disassemble almost the entire machine, right down to removing the counterweights and the drum. Third, you need to carefully knock out the rusted rings without damaging the shaft or the drum walls. The lack of a special puller, as well as a number of other tools and consumables, complicates the job for the amateur repairman.
Before starting work, you should weigh all the pros and cons and decide exactly whether you have enough strength and experience for such work. There is a high risk of damaging the wiring, ruining the pipes or puncturing the tank. But it's also worth considering the high cost of such repairs: on average, replacing the bearing assembly and seals costs a third of the price of a new washing machine.
But no one is stopping you from getting to know the process yourself first and assessing your abilities. The key is to carefully consider all the steps, prepare everything you need, and enlist the help of an extra pair of hands. Step-by-step instructions for changing bearings yourself are provided in this article.
Interesting:


Readers' comments
Headings
Washing machine repair


For buyers


For users


Dishwasher


Add a comment