Homemade wood splitter with an electric motor from a washing machine
 Even in the 21st century, full gasification in Russia remains a distant prospect. Not only remote villages, but many small towns are forced to rely on wood-burning stoves, which require large quantities of fuel each year due to long and cold winters.
If you're strong and healthy, you can swing an axe. But what if you're short on energy or don't want to waste it on the dull, monotonous work of splitting knotty logs? You can use your brain, watch a video, or read our article and build a wood splitter using a washing machine motor.
Selecting a design
Compared to chopping firewood by hand, working with a log splitter is a joy. You don't have to waste energy splitting logs, lifting a heavy cleaver, sweating, or cursing your stove. With a log splitter, you simply feed it the logs, and the entire process of splitting them is transferred to the mechanism. Before assembling your own homemade log splitter, you need to decide on the design you want to use. There are at least three designs of wood splitters, which are fundamentally different from each other:
- wood splitter with hydraulic mechanism;
- rack and pinion wood splitter;
- step-screw wood splitter.
After reviewing all the options, our specialists concluded that it was best to begin with the design of a screw-type log splitter. Its design is simpler, more compact, has fewer components, and is therefore less expensive. A screw-type log splitter significantly speeds up the process of splitting firewood. What is a screw-type log splitter?
 This unit consists of several main elements:
- frames;
- washing machine motor;
- drive mechanism;
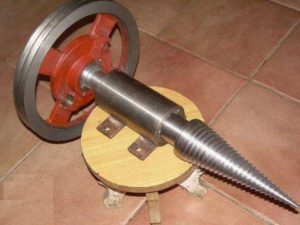
- special cone.
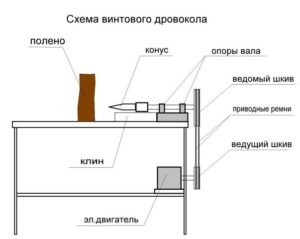
The basic idea is as follows: a washing machine motor rotates a small pulley. A belt drive transmits power to a larger pulley mounted on a shaft. The other end of the shaft is fitted with a special, sharp, threaded cone. The shaft and cone are parallel to the ground and rotate. The log is pushed onto a rotating cone strictly sideways, the cone screws into the log from the side, quickly splitting it in half. This is the design we are about to create with our own hands, but first let's select the necessary tools and materials.
Important! If you feed a log into the cone end-on, the wood will get caught between the frame and the cone, jamming and breaking it, rendering the splitter useless.
We select everything necessary
To assemble a homemade screw-type log splitter, you'll need a relatively small set of tools, basic welding and multimeter skills, and some materials. What tools are needed?
- Electric welding with a set of 3 mm electrodes.
- Drill.
- Bulgarian.
- Pliers.
- Grinding wheel.
- Vice, anvil.
- Various screwdrivers, files.
- Ruler, pencil.
Materials are more complicated. There are currently quite a few videos online demonstrating the operation of a screw-type log splitter. These videos demonstrate at least several assembly options, but the basic idea is the same. First, you need to find the main part—the cone. You can't buy such a thing in a store, and making it yourself is very difficult, as the cone is first machined and threaded with a short pitch. Next, the cone is heated to red-hot and maintained in a furnace for half an hour, then rapidly cooled in warm, salted water.
Making the cone can be a challenge, but don't despair; there are online stores where you can buy ready-made, hardened cones specifically designed for homemade wood splitters at relatively low prices. You can also buy all the necessary gearbox parts there, including the shaft, small and large pulleys, belt, and bearings. If you're experienced in making gearboxes and have spare parts, you can get away with just buying a cone. Otherwise, our specialists recommend purchasing a "homemade screw log splitter kit."
In addition to the gearbox and cone, we'll need a strong and reliable frame. We'll weld it together from steel angles, sheet metal, and some parts from an old Soviet car. Prepare in advance approximately 4.5 m of 40 mm steel angle, a rectangular sheet of metal measuring 900 x 450 mm, and a driveshaft mount from a VAZ 2101, 2102, 2103, 2104, 2105, 2106, or 2107. If you don't have any parts from such cars in your garage, you can scavenge everything you need for next to nothing. For ease of movement, you can also weld two wheels from a medical gurney, a children's bicycle, or similar items to the frame.
Note! For our purposes, we can use a driveshaft section from any rear-wheel drive Soviet or Russian car.
There's one more component required for our screw-type log splitter to work: the motor. We're building a log splitter with a washing machine motor, so we'll need to disassemble any old washing machine with a brushed motor, remove it, verify it works with a multimeter, and prepare it. Well, that's basically it. Besides all of the above, we'll need various fasteners, but we don't need to go into that separately. Let's move on to the fun part: making the cone-type log splitter.
Assembling the product
Let's build a cone-shaped log splitter that will transform firewood preparation from torture into pleasure. We'll start by making the frame. Using a grinder, we'll cut two 1400 mm pieces of angle iron, four 200 mm pieces, and one 450 mm piece. We'll lay two 1400 mm angle irons parallel, 450 mm apart, and connect the ends of the long angle irons in a U-shape with a short 450 mm angle iron and weld the joint. Next, we'll step back 900 mm from the weld joint and weld the gimbal suspension element between the angle irons. We'll place our rectangular steel sheet (it's a perfect size) between the suspension element and the first weld joint and weld it in place.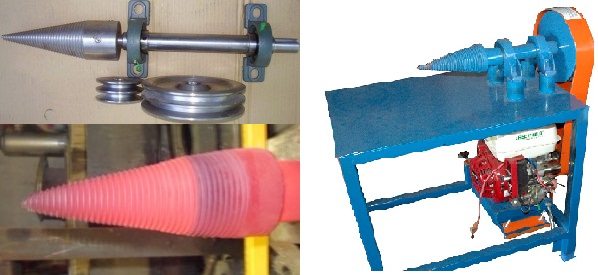
Now we just need to weld four legs (four pieces of 200 mm each) to the ends of the structure, attach wheels to two of the legs, and the frame is ready. Next, we'll work on the gearbox. We insert the shaft into the suspension element and slide a large pulley onto it on one end.
Important! To press the cone and pulley onto the shaft, the shaft will need to be heated strongly with a blowtorch.
The next step is crucial. You need to place the small pulley on the motor shaft and secure the motor under the welded hanger so that the small pulley is directly under the large pulley. Mount the engine as securely as possible, as the structure will vibrate heavily during operation. We connect the pulleys with a belt. The free end of the shaft (intended for the cone) is fitted with "eared" bearings, which must be securely bolted to the metal sheet.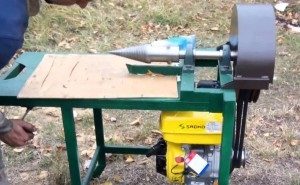
Next, we manually connect the two motor wires to the circuit breaker, then connect the power cord to it and test how the motor and gearbox operate, checking for slippage or jamming. If everything is OK, we install the cone and test the operation of our new log splitter. The job is complete. If for some reason the motor isn't working or there are problems connecting it, read the article. How to connect a washing machine motorEverything is explained there, and if it’s still not clear, watch the explanatory video.
Please note! Before using your new screw-type log splitter, watch the video to learn how to do it correctly. You don't want to ruin your painstakingly crafted piece.
In conclusion, we've just shared another great way to use a washing machine motor. We hope you'll be able to bring this idea to life and build a wonderful screw-type log splitter. After reading this post, be sure to watch the video below. Good luck!
Interesting:


2 reader comments
Add a comment
Headings
Washing machine repair


For buyers


For users


Dishwasher


The video shows a 4 kW motor, but will it handle 180 W with a washing machine?
A washing machine with a brushed motor has a shaft speed of 15,000 RPM. The gear ratio is incorrect, just to write an article. I'm tired of illiterate schoolchildren who don't know what they're talking about.