Homemade milling machine from a washing machine motor
 A router helps DIYers complete a variety of woodworking projects faster and more accurately, but not everyone can afford a factory-built device like this. There's a solution: you can build a fully functional stationary router from a washing machine motor and some scrap materials. This article explains in detail what you need to find and how to proceed.
We collect tools and materials
To build a machine yourself, you'll need to find all the components, perform calculations, assemble, and securely fasten the structure. Let's start the process with preparation. It's easy to guess that the "heart" of a homemade milling machine will be the motor of an automatic washing machine. A brushed or asynchronous motor will do; carefully remove it from the machine and clean it. In addition to the motor, you'll need:
- thick plywood or laminated chipboard;
- motor shaft adapter (best to order from a turner);
- two metal pipes;
- threaded stud;
- screwdriver;
- hacksaw for metal;
- self-tapping screws;
- swivel wheel;
- metal corners;
- foam rubber.
For more precise work, it's recommended to find a speed controller from an electric chipping hammer with a Hall sensor attached. This makes it easier to control the intensity of the woodworking process and gradually increase the motor power. A measuring tape, electrical tape, screwdrivers, and pliers will come in handy. Once everything is prepared, you can begin assembly.
We are making a machine
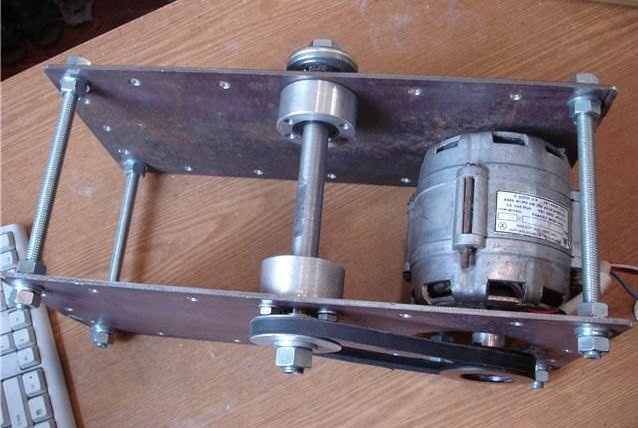
The dimensions of the future homemade wood milling machine made from an automatic sewing machine motor are determined by the dimensions of the existing motor. Therefore, we measure the part from all sides and begin assembling a three-wall table out of plywood or laminated chipboard. The height of the frame should be 3-4 times the length of the motor, the bottom should be raised 5-7 cm above floor level, and a hole should be pre-drilled in the lid to accommodate the motor clearance. We securely fasten the entire structure with screws and brackets. Let's begin assembly.
- We install a collet to clamp the cutters.
- We fix it on the shaft with a special adapter.
- We install a nut into the bottom of the box.
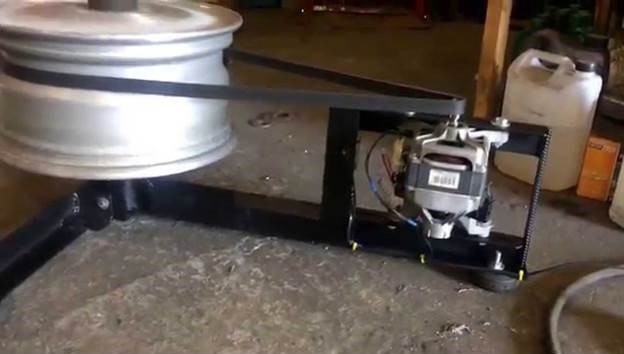
- We fix two pipe stands on the back wall.
- We place the threaded rod so that one end “fits” into the nut on the bottom, and the other rests against the bottom of the engine (more precisely, against the T-shaped metal sheet screwed to the base of the engine).
- We supplement the device with a swivel wheel and a pair of springs, which are necessary for raising/lowering and cushioning the motor.
- We connect the speed controller with a Hall sensor.
- We isolate all contacts.
- We cover the engine with a piece of foam rubber on top to protect it from wood dust.
Important! For more convenient use, special panels can be installed on the work surface to adjust the thickness of the edges and recesses being made.
Next, we test the unit's functionality. We put on safety glasses and gloves, screw in a suitable cutter, adjust the motor height, and test the machine. The main thing is to remember safety precautions and exercise extra caution.
How effective is the homemade product?
Despite the apparent flimsiness of its design, the milling machine itself rivals industrial equipment. A speed controller maintains the washing machine motor at a preset speed, allowing for precise execution of the intended work. With this simple device, you can:
- carry out simple processing;
- create various grooves;
- cut out technological recesses;
- round off the edge edges.
There are no restrictions on the type of wood that can be processed.Even hard wood species, such as beech, oak, ash or walnut, can be processed by a homemade machine.So the conclusion is clear: turning a washing machine into a multifunctional router for home use is entirely possible, provided you approach the assembly responsibly, paying attention to calculations and safety.
Interesting:


2 reader comments
Add a comment
Headings
Washing machine repair


For buyers


For users


Dishwasher


Where did you see the Hall sensor there? It's the tacho.
Gloves when working with a router, but you have extra fingers.