Homemade generator from a washing machine engine
 Power outages and exorbitant electricity bills are increasingly forcing people to consider an independent power source. While a generator may be low-power and only serve as a backup, it can still be a lifesaver when it matters most.
We also decided not to stand aside and offer a “workable version” of converting an asynchronous motor from an old washing machine into a fairly powerful 1.5 kW generator.
Getting ready to make a generator
If you've decided to "quickly cobble together" your own homemade electric generator by repurposing a washing machine motor, it's best to cast aside any illusions, as it won't work "quickly." First, you'll need to solve three main problems:
- How to partially remove the core of an old working washing machine motor and prepare grooves for magnets on it;
- Where can I get neodymium magnets for a generator rotor?
- What can I use to make a template for attaching magnets?
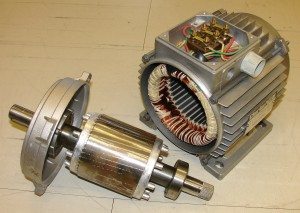
 Let's solve the first problem. Let's take an asynchronous motor from an old washing machine, disassemble its casing, and then, using a lathe, cut off part of the core to a depth of about 2 mm. Let's put the engine aside for now. Next, we need to purchase a set of neodymium magnets; the easiest way to order them is online. Let's wait for the magnets to arrive.
Next, we use a lathe to cut 5mm-deep grooves in the motor core for the magnets. This requires masterful use of a lathe; it's best to ask a lathe expert to help. Once the motor core is prepared, we'll need to figure out what to use to make a template for mounting the magnets. We used a strip of tin, although we suspect that other materials with similar properties might work. We cut the strip to the correct length and width so that it fits snugly on the core surface.
The tin strip also needs to be prepared, namely, it needs to be marked along its entire length to accommodate 2 rows of magnets so that the magnets are located at the same distance. Next, to convert a washing machine's electric motor into a generator, we'll need superglue, cold welding (you can use epoxy resin instead of welding), and sandpaper.
Note! It's better to use cold welding; it's easier to work with, and it will immediately help secure the magnets better, making it easier to glue them on.
Assembly and testing of the generator
 We've prepared everything we need to make a generator from a washing machine motor, and now we can begin the assembly process. It's important to note that only a very patient person can attempt this project by hand. Magnets constantly slip and stick together, and glue flies everywhere, getting not only on your hands but also on your face. Therefore, be extremely careful and observe safety precautions when working with potentially hazardous chemicals. Here's what to do:
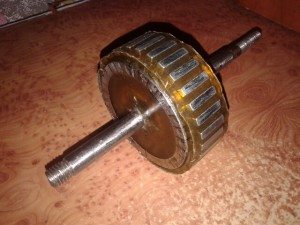
- We'll begin making the motor's magnetic rotor to turn it into a generator. We'll glue our tin magnet template across the motor.
- The homemade generator requires magnets, so we glue the magnets in two rows using superglue, following the previously marked lines.
Important! The distance between the magnets and the angle must be the same; otherwise, the generator will frequently jam during operation, resulting in a drop in power.
- Carefully fill the space between the magnets with thoroughly kneaded cold welding paste. It has the consistency of plasticine, so there shouldn't be any problems.
- We sanded a generator made from a washing machine motor with sandpaper. To speed up the process, you can clamp the housing in a drill press, but doing it yourself without any tools will take a little longer.
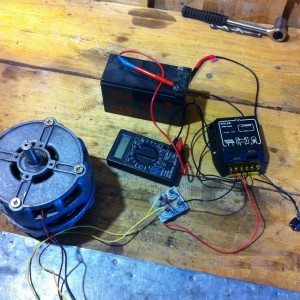 We've finished making an electric generator from a washing machine motor, and now we can begin the long-awaited testing. To test the electric generator, we'll need:
- rectifier;
- Solar type charge controller;
- multimeter;
- motorcycle battery;
- the electric generator itself.
You also need to consider what you'll use to spin the generator. Using your fingers isn't an option; you won't be able to generate enough RPM. A screwdriver or electric drill is best. Find the two wires of the generator's operating winding and cut the rest. Connect these wires through a rectifier to the charge controller, which in turn connects to the battery. Attach the alligator clips from the multimeter to the battery terminals—and you're ready to test the generator.
We load the alternator pulley into the chuck of an electric drill (or a screwdriver) and spin it to 800-1000 rpm. The output is 270 volts with moderate magnet sticking—not a bad result.
Prospects for using such a generator
Many people ask, so we made this generator, so what, how can we use it in the home so that it brings benefits? We personally made this generator with the goal of independently producing a gasoline power plant from an outdated, but functional, Soviet Druzhba chainsaw. According to our calculations, the design should have been cheap, which cannot be said about factory-made petrol stations.
Ultimately, we were able to implement our idea. We connected the chainsaw engine to our generator via a drive belt, securing everything to the chainsaw frame. We didn't even have to weld a separate frame. Our generator has been operating reliably for two years now, supplying all the energy consumers in the country house. It has enough power to light two rooms, run a computer, and power a TV.
There are other uses for a homemade generator. In the article wind generator from a washing machine motor The process of constructing a system that harnesses the natural power of the wind to power a summer house or garage is eloquently described. Some suggest using this generator to power a ski lift. So, use your imagination, and you'll find a couple of other options.
In conclusion, building a homemade generator is not without its challenges. The main difficulty lies in gluing the magnets to create the rotor. However, you can take the easy route and order a ready-made magnetic rotor. This will cost you $2 more, but you'll save a ton of time.
Interesting:


Readers' comments
Headings
Washing machine repair


For buyers


For users


Dishwasher


Add a comment