Ardo A600X Washing Machine Manual
 A washing machine's operating instructions not only explain how to operate the appliance but also the intricacies of the machine itself. We offer a short version of the instructions, using the Ardo A600X as an example.
Connection
If calling a technician to connect your washing machine is not feasible for financial reasons, you'll have to do it yourself. However, when connecting the machine yourself, be sure to adhere to safety regulations and precautions. Not only do you risk losing your washing machine, but warranty repairs won't be performed, as the manufacturer is not responsible for your actions.
How do you connect the washing machine? First, remove the shipping bolts. Turn them counterclockwise. Save the bolts, washers, and O-rings in case you need to transport the washing machine again. The Russian-language instructions for this model of machine advise that connection preparation doesn't end there. You'll need to completely remove the back panel of the washing machine to remove the shipping spacers. Then, screw the back panel back in place, and you're done.
Next, we need to move the machine to the prepared installation site. The article explains how to properly prepare a space for any model of washing machine. Instructions for the Indesit WISL 85 washing machine, we will not repeat ourselves.
Using a standard spirit level, level the body by alternately tightening all four feet. Next, screw one end of the inlet hose to the outlet of the inlet valve, which is located in the upper right corner at the rear of the machine, and the other end to the outlet of the water pipe. Don't overtighten. Please note that the machine will not fill with water if the water pressure in the water supply is too low.
Don't forget to insert rubber seals into the hose to prevent it from leaking under pressure.
The next step is to attach the drain hose, one end of which is already attached to the washing machine. There are different options for draining wastewater from a washing machine; you can read more about this in the article. How to make a drain into a sewer, and we move on.
Once the two hoses are connected, check again to make sure all connections are tight and there are no leaks. If everything is in order, plug the machine into an electrical outlet and test your "home assistant."
Control panel and dispenser
The Ardo washing machine has a mechanical control panel with two switches and five buttons. The selector on the far right is used to select programs, while the second selector allows you to set the desired water temperature.
In the center of the panel there is a control light that indicates whether the machine is on or off.
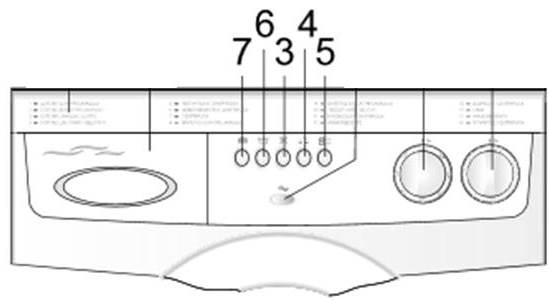
The button marked 7 on the control panel activates an extra rinse. Button 6 is used to pause the wash cycle without draining the drum, for example, to soak the laundry for a while. Button 3 disables the spin cycle, meaning the water will simply be drained at the end of the wash cycle. Button 4 reduces the cycle time, making it more economical. Button 5 turns the machine on and off.
The detergent dispenser in this washing machine is divided into three compartments. The left compartment is for prewash, followed by the main wash. The section on the right is for fabric softener. You can use either powder or liquid detergents, as long as they are designed for automatic washing machines.
Operation
When using a new washing machine, start by running a short cycle without laundry to clean the drum. Before washing, always check that the water supply is open and remember to check pockets and sort the laundry. To start a wash cycle:
- Load the drum with items according to the maximum load for the given cycle. For example, for the cotton cycle, the maximum load is 5 kg of dry laundry, for delicates, 2.5 kg, and for woolens, a maximum of 1 kg can be washed at a time.
- Close the drum door.
- Pour the powder into the powder container according to the dosage.
Do not remove the tray during washing to prevent water leakage.
- Turn the selector clockwise to the desired washing mode; you cannot turn it counterclockwise.
- If necessary, press the additional function button.
- Press the machine's power button. Please note that the power button is pressed only after the program has been selected.
User Tips
 In this section we provide user recommendations and safety notes:
- Use the equipment only for its intended purpose at home;
- Do not attempt to repair the device yourself without certain skills, this may result in damage to the machine, and it is also life-threatening;
- Do not move the device alone, it is very heavy;
- changes to the electrical or plumbing network must be carried out by professionals;
- The machine must be connected only to a grounded outlet;
- After washing, do not forget to unplug the machine and turn off the water;
- do not touch the machine or the cord with wet hands;
- do not overload the drum with laundry, do not wash carpets in it;
- wash only those items and fabrics that are machine washable, as indicated by the manufacturer on the clothing label;
- Check your clothing pockets to ensure that small items or important items such as your phone, bank card or passport do not fall into the drum;
- open the hatch door only one minute after the washing cycle is completed;
- After washing pile items, check and clean the drain filter;
- Leave the machine door and powder dispenser open to prevent mold and odor formation;
- Machine repairs under warranty must be performed only by a service center.
So, we've covered the basics of washing machine operation. For more details, please refer to the full instructions below.
Interesting:


1 reader comment
Add a comment
Headings
Washing machine repair


For buyers


For users


Dishwasher


If the door doesn't work, will water still fill up?