Instructions for the Indesit WISL 105 washing machine
 Your brand new Indesit WISL 105 washing machine should also have its manual handy. At first glance, it might seem pointless to have a manual, as it's so intuitive to know what to press and turn to start a wash cycle or any other function. In fact, washing machine operating instructions help optimize the machine's performance so it's used efficiently, not haphazardly. Below, we've provided an abridged version of this document; we hope you'll find it useful.
Installation Features
Before purchasing the Indesit WISL 105 washing machine, organize a space for it to avoid having to hastily redo everything later. First, consider where you can place your "home helper," where it will fit comfortably, and where there's a potential connection. If you've found a suitable space, take careful measurements. It's important that the washing machine body fits between other furniture and that there's a gap left.
When taking measurements, take into account the protruding parts of the washing machine
- between the rear wall of the machine body and foreign objects – 10 cm;
- between the side walls and the top cover of the machine and objects - 1 cm;
- There should be nothing at all in front of the loading hatch.
Check the floor. Stand in the intended location of the washing machine and move your feet, then jump lightly. If the floor barely creaks or sways under your weight, everything is fine, but if it creaks excessively and is prone to breaking, it needs reinforcement. This is especially true for plank floors. It is also advisable to remove moisture-sensitive flooring from the area where the machine is installed and make the floor more level.
Install a tee valve on the cold (or hot) water pipe in advance. This will require either cutting a spigot into the metal-plastic pipe or installing the valve between the pipe and the hoses feeding the faucet. There are many options for this, so use your best judgment.
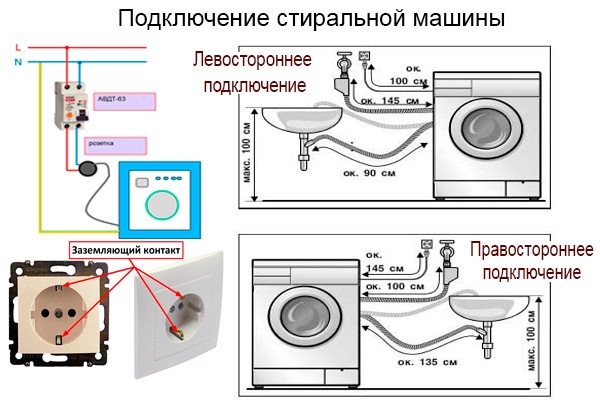
Let's think about where the machine will drain the waste water. There are several options.
- The first option involves draining directly into the toilet, sink, or bathtub. This type of drain is the easiest to install; simply attach the other end of the drain hose to the designated fixture.
- The second option requires connecting the drain hose to the sink's trap. However, this requires purchasing a trap with a special side outlet.
- Finally, the third option involves connecting the machine directly to the sewer pipe. To do this, cut a hole in the pipe, insert a tee, and connect the machine's drain hose to the free end of the tee.
In addition to all of the above, a separate waterproof outlet will need to be installed. The outlet's wiring must be protected. RCD and be grounded. The wiring must be rated for heavy loads, as a washing machine is a major energy consumer. The outlet must have a special, waterproof housing.
If everything is ready, feel free to purchase the Indesit WISL 105 washing machine and begin connecting it. The operating instructions for this brand's washing machine remind us to carefully unpack the washing machine before installation, remove the shipping parts, place them in a separate bag, and put them away for future use. If you ever need to transport the machine, these parts will come in handy. Connect the machine in the following order.
- We screw on the inlet hose, having first installed the gaskets.
- We install the drain hose, connecting it in one of the three ways described above.
- We connect to an electrical outlet.
After connecting the hoses, check that nothing is leaking anywhere.
Description
Getting started with the Indesit WISL 105 washing machine can be challenging. The control panel contains a large number of different elements, from buttons to knobs, whose functions the user has yet to learn. To avoid learning the control panel through trial and error, let's consult the manual, which explains the control panel in considerable detail.
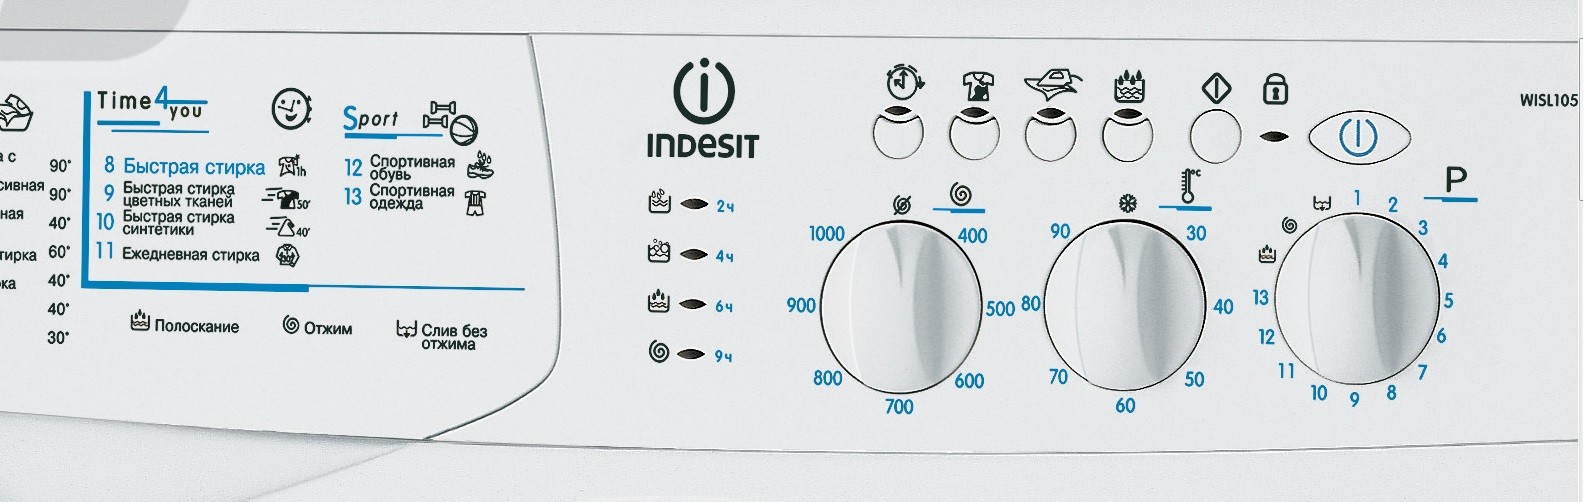
So, the control panel of this brand's washing machine has three rotary knobs. The knob far right selects the wash program, the middle one selects the water temperature, and the leftmost one selects the spin speed. There are also six buttons. Directly above the program selector is a large power button, and to the left is a button to start or reset the program. Then, from right to left.
- The button with a picture of a water container and a droplet above it is the extra rinse cycle. Press this button to thoroughly rinse out the detergent from your laundry.
- The button above which we see a drawing of an iron is the so-called “easy ironing”. This function prevents wrinkles in washed items, which subsequently makes the ironing process easier.
- The button with a picture of a stained T-shirt above it indicates the "bleach" function. It's activated when you need to perform regular or gentle bleaching, provided the appropriate detergent is added to the detergent dispenser.
- The clock button indicates a delayed start. This feature allows you to delay the machine's start for a period of your choosing.
In addition to buttons and knobs, the control panel also has lights. These indicate the current stage of the washing program. There are also lights that show whether the machine is running and which functions are enabled.
How to launch?
To start the wash cycle, you also need to figure out where and how to add the detergent and other cleaning products. Open the detergent drawer and take a look. The middle compartment is for regular washing; you should always add detergent there if you're just doing a wash. The far left compartment is for prewash; you should add detergent there if the wash cycle you're activating includes a soak.
The far right compartment is for adding fabric softener. There's also a fourth compartment. It needs to be inserted into the far left compartment if you've activated the "bleach" mode. Now that we've sorted out the dispenser, we know which compartment to put what in. Let's talk about the washing machine's start procedure.
- Press the on/off button.
- We push the pre-sorted laundry into the hatch and distribute it evenly inside.
- We turn the knob to select the washing modes and select a program.
- We turn the thermostat knob and set the water temperature.
- We turn the speed control knob and set the spin speed.
- Open the dispenser and add the product.
- Click on the button located to the left of the on/off button.
When the wash cycle is finished and the machine signals this, you won't be able to open the door immediately. This isn't a malfunction, but a completely normal occurrence. Wait a couple of minutes, the lock will unlock itself and the hatch can be opened.
Machine maintenance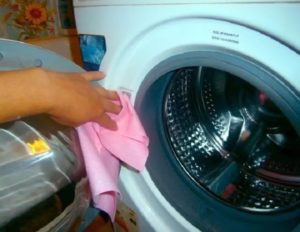
A few words about caring for the Indesit WISL 105 washing machine. Although this machine is designed to require minimal maintenance, it does require some attention. Don't allow moisture to accumulate, let alone stagnant water, in the machine. Make it a rule: after finishing a wash cycle, wipe down everything you can with a cloth and leave the door and drawer open. Clean the drain filter, and about once a year, inspect the flow-through filter located on the inlet valve.
That's basically it for this brief instruction manual. We've tried to cover only the most important points. If that's not enough, please refer to the manufacturer's instructions below. Good luck!
Interesting:


Readers' comments
Headings
Washing machine repair


For buyers


For users


Dishwasher


Add a comment