Installing and connecting a washing machine yourself
 After reading this article, you'll learn how to install and connect a washing machine yourself. But before we get down to it, it's important to mention one important detail. Before installing your washing machine, you should check whether the manufacturer of your appliance model prohibits DIY installation and connection.
In some cases, the warranty may be voided. Therefore, be sure to check with the manufacturer or retailer for more details.
Most people prefer to order washing machines with home delivery. In this case, it's important to carefully inspect your purchase before confirming receipt by signing the paperwork. Be sure to unpack the box or ask the delivery staff to do so. Carefully inspect the washing machine body for any damage or scratches.
Some careless employees may hit the washing machine during transport or while lifting it upstairs. If you notice dents, chipped paint, or other signs of improper handling, you can safely request a replacement. You paid for a new appliance, so you should receive one that's new and undamaged.
But most often, purchases arrive in good condition. If everything is in order, you can sign for the delivery and send the delivery people on their way. If something happens, make sure you have the phone number of the store where you purchased your car. Calling this number will resolve any issues that may arise.
The first stage of installing a washing machine
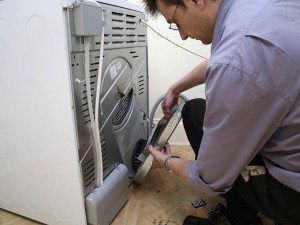
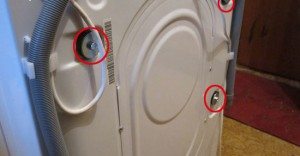 So, we've already sent the delivery guys off, and now we move on to the next part of our work. Namely, removing the shipping bolts. They are located on the back of the washing machine body.
These bolts are necessary for securing the drum. They prevent the drum from dangling during transport and damaging anything inside the machine. Until they are removed, the drum will not rotate. Furthermore, turning the machine on in this position could cause damage!
So, we can easily remove them using a wrench or pliers. We plug the resulting holes with plastic plugs. They're included in the kit, along with the instructions and other accessories. You can save the bolts. You might need them if you decide to move or transport the washing machine. In that case, you can screw them back in and protect the machine from possible damage during transport.
We strongly recommend that you carefully read the instructions included with your washing machine before using it for the first time. This will help you avoid potential accidental damage and extend the life of your appliance.
Choosing a suitable location
Whether you're installing the washing machine yourself or hiring a professional, you'll need to prepare the space. The machine must be sized to fit the chosen location. Simply put, it must fit. In some cases, choosing a washing machine based on the amount of available space is crucial. If space is tight, you should measure all the dimensions of the prepared space in advance and use those as a guide. If you have plenty of space, you can rest assured and buy any model you like.
Connecting the washing machine to the network
 This issue must be approached with great care. For safety reasons, you must have a separate outlet for your washing machine. The outlet must be specially protected against water damage. It must also be grounded. Modern appliances typically have both protection against current and grounding. However, it's better to be on the safe side. The washing machine's cord is usually about one and a half meters long. Therefore, the outlet should be located fairly close. Of course, you can also use a special extension cord with a waterproof connector, but it's considered less safe than a wall outlet.
Some models may emit a small voltage to the machine body (if it's not grounded). Most often, mild electric shocks are harmless. However, they can still be very unpleasant. Therefore, we recommend protecting yourself and using grounding.
Do I need to connect hot water or is cold water enough?
If your model allows it, you can also connect hot water. However, experts say there are few benefits to using it. After all, every automatic washing machine has a heating element that will easily raise the water temperature to the required level. However, using hot water does have its downsides:
- Firstly, in many cities, hot water is more polluted than cold water. This means you'll need to clean the filter yourself or call a professional more often.
- Secondly, due to the increased hardness of this water, you'll need to use more washing powder. Otherwise, your clothes won't wash properly.
If your washing machine does not have the ability to connect to hot water, then you don’t have to worry about this issue.
Connecting to water
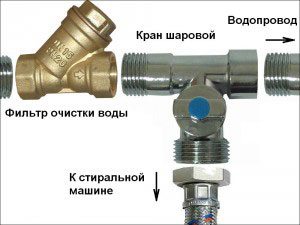 The simplest way to connect a washing machine is to connect it to the old location. This applies if you already had a washing machine but replaced it with a newer one. In this case, you already have a pre-installed pipe connection with a shut-off valve. Simply attach the included hose to it and turn the valve to the open position. This will check the quality of the connection and prepare the machine for washing.
If there are no ready-made elbows, things will be a little more complicated. You'll first have to make the necessary cut-in, install the elbow, and then screw on the inlet hose. Incidentally, if your inlet hose is short, don't worry—you can easily find a longer one at plumbing supply stores. And they're quite inexpensive.
Experts recommend keeping the drain valve closed and turning on the water only during washing. This will prevent potential leaks.
Connecting the washing machine to the sewer system
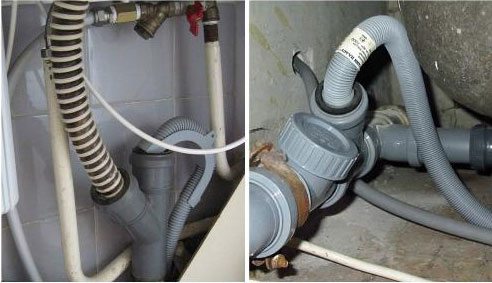
To connect the washing machine to the sewer system, you need to purchase a trap. Once the trap is installed, we'll attach the drain hose to it. The hose must be securely attached to prevent leakage.
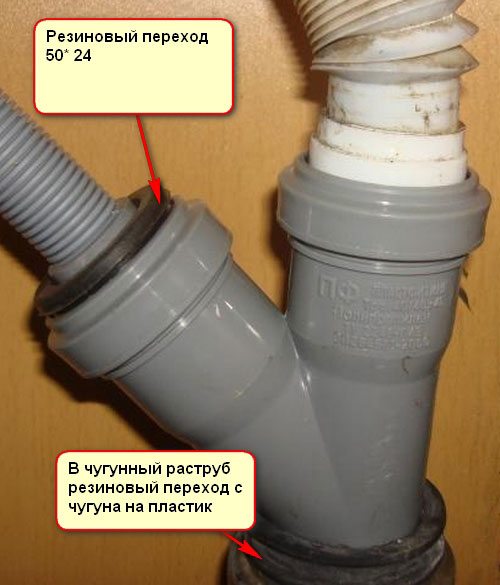
You can also connect the drain to a cast iron pipe. You can see how to do this in the photo below.
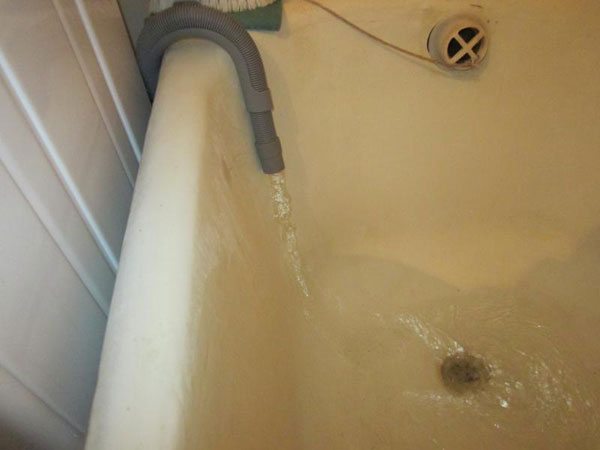
Another option is to drain the water into the bathtub. See photo:
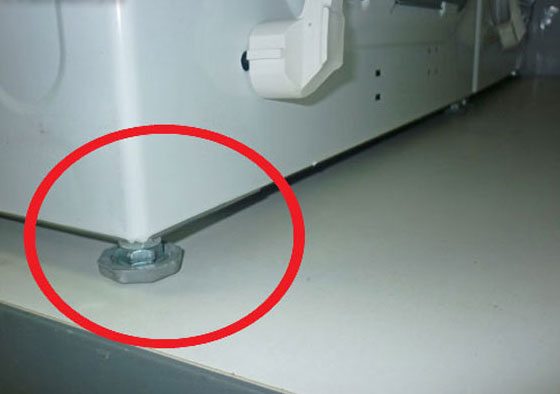
Once you've connected your washing machine to all the necessary utilities, it needs to be leveled. To do this, you'll need a level.
The whole process is quite simple. Place a level on the machine, check which way the machine is tilted, and adjust it. To adjust the tilt of the machine, you need to increase or decrease the height of the feet. To do this, simply turn them in one direction or the other.
Once our machine is installed, it's time for a test wash "empty." That is, without any items. Add some detergent and run the wash. Once the cycle is complete, you can safely toss in your dirty laundry and enjoy the fruits of your new washing machine's labor.
Below you can watch the entire process in video format. Happy installation!
Interesting:


5 reader comments
Add a comment
Headings
Washing machine repair


For buyers


For users


Dishwasher


This is definitely the best website among similar ones on this topic.
There is an answer to any question, and even a step-by-step video instruction.
Well done guys, thank you for being there.
Well done! Helpful articles on using washing machines.
Something's unclear. The article says a trap is required for drainage, but in the video, everything is connected directly to the sewer system without any extra equipment. Plus, the washing machine manual states that the drain hose should be installed at a certain height from the floor, but the video seems to ignore this. Overall, I have a lot of questions about installing the washing machine.
If you have eyes and a brain, it's not difficult to figure out the installation. If you're looking for reasons not to connect it, you'll find them.
Where can I find the dimensions between the support elements and the dimensions on the bottom of the washing machine?