What tools are needed to repair a washing machine?
 An experienced technician who has been repairing washing machines for a long time has a certain set of tools. While these tools typically include standard equipment, they are sure to have a few homemade, unique "devices" that make working with washing machines much easier. Let's look at what washing machine repair tools a novice should have to easily disassemble the machine, troubleshoot the problem, and reassemble it.
Required set
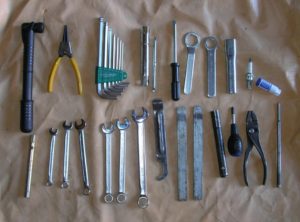
Let's start by discussing a tool kit for a DIYer who isn't looking to make a serious living from repairs, but simply wants to fix problems with their washing machine. In this case, you'll need the following kit:
- a pair of screwdrivers (Phillips and flathead);
- pliers;
- set of wrenches;
- pliers;
- tweezers-nippers;
- clamp pliers;
- small hammer;
- metal service hook.
Don't buy expensive ready-made kits that are more suitable for repairing a car than a washing machine. Assembling your own from individual components is more effective and cost-effective.
With this set of tools, it's possible to disassemble a washing machine and access the faulty component. However, if, for example, bearings need to be replaced, the list will need to be expanded with specialized tools: a drill, a hacksaw (if the washing machine's tub is non-detachable), and a drift.
Tips for beginners
If, after assessing the problem with your automatic washing machine and your own abilities, you've decided to repair it yourself instead of taking it to a repair shop, consider these basic tips for beginners. These practical tips will help you avoid wasting your time and making embarrassing mistakes.
- Take your time and think through all the steps ahead. If you see a specific error code on the display, don't immediately start disassembling the machine. Assess the appearance of the washing machine and check its basic functions: how it fills and drains water, and how it spins the laundry. Rotate the drum by hand and listen to the noise it makes.
- Before working, disconnect the equipment from the power source. Safety comes first. Be sure to unplug the power cord from the outlet! Also, handle the disassembled device carefully—removing the housing may expose sharp edges that can easily cause cuts.
- Before moving the washing machine, make sure the drain and inlet hoses are secure. The pipes connecting the machine to the water supply and sewer lines must be long enough to allow for movement. If you need to tilt the machine, do so carefully to avoid it falling sharply onto its side.
If, after diagnostics, you've identified the cause of the machine's malfunction, proceed with repairs. Only the faulty part needs to be repaired. Disassembling and disconnecting all other fully functioning components is not recommended, as this could cause further damage to your "home assistant." Once the repair is complete, check the hose connections to the house utilities, plug the machine into the power outlet, and ensure it is working properly.
Tools and accessories for professionals
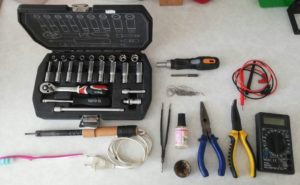
Seasoned technicians, who have been resuscitating appliances for a long time, don't limit themselves to the bare minimum of tools for washing machine repair. The scope of work can vary widely, from simply replacing a seal to troubleshooting the main control module. That's why professionals need tools capable of handling any task, no matter how specific. A technician's kit, in addition to the aforementioned list, may also include:
- soldering iron;
- a powerful flashlight or portable lamp;
- small gas burner;
- a long rod with a mirror at the end (allows you to inspect hard-to-reach areas of the machine);
- pliers used for pressing contacts into connectors;
- long metal ruler;
- multimeter for measuring the resistance of the main elements of the system;
- magnet;
- screwdriver with indicator;
- SMA bearing puller;
- wooden or rubber mallet;
- screwdriver;
- drill.
By collecting the maximum set of tools, you can cope with almost any breakdown in the system. Some defects can be repaired directly at the customer's home by a repairman, taking with him a complete "suitcase." Certain types of work require transporting the equipment to a workshop, where it can be tested with specialized equipment.
Repair materials
In addition to a set of tools, washing machine repair requires consumables and spare parts. In some cases, simply removing the faulty part and replacing it with a new one may be sufficient, but sometimes repairing the original component is essential. Depending on the scope of the work, you may need the following materials:
- adhesive with super-fixation;
- waterproof silicone sealant;
- thermosetting polymer resin (compound);
- special lubricant for processing seals and bearings of washing machines;
- rosin (if soldering is required);
- heat shrink tubing of the required size;
- clamps;
- insulating tape;
- set of contact tips;
- wires;
- rubber gaskets of various diameters;
- fuse, etc.
It wouldn't hurt to have WD40 aerosol lubricant in your arsenal, which will help remove stuck or partially damaged parts of your washing machine.
A true professional won't show up to a call without the proper equipment. A complete set of tools and consumables allows the technician to save time and the client's. A beginner should also first assess the scope of the work and purchase the necessary tools in advance to avoid constantly having to search for the right tools later.
Interesting:


Readers' comments
Headings
Washing machine repair


For buyers


For users


Dishwasher


Add a comment