How to connect a washing machine motor
 If you have a washing machine motor left over, you can figure out how to use it. For example, you could turn it into a sharpening machine. Attaching a special round whetstone attachment to it will allow you to sharpen knives, scissors, axes, and other tools.
You can also use a washing machine motor in construction. For example, when laying the foundation for a future house, you can turn it into a "vibrator" to help with concrete shrinkage. It can also be used for other purposes. The motor can rotate various attachments and drive various mechanisms.
Using your imagination and skills in such matters, you can come up with a wide variety of uses for an electric motor. And of course, to implement any use for this motor, you'll need to connect it.
How to connect the electric motor of a modern washing machine?
If you need to connect the electric motor of a modern washing machine to a 220-volt AC power source, you should consider the specific features of this component. These include:
- They do not require a starting winding.
- No starting capacitor is required for starting.
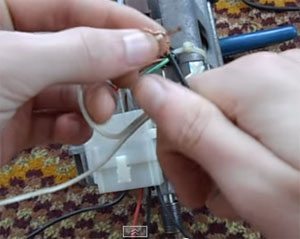
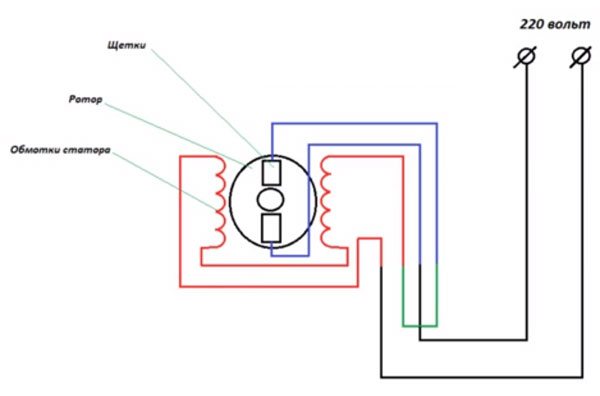
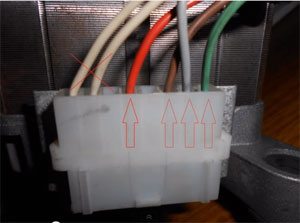 To start the motor, we need to properly connect the wires on the motor. We won't use the two white wires on the left. They are needed to measure the motor's RPM. Next in line is the red wire. It goes to the stator winding. Next is the brown wire. It also goes to one of the stator windings. The gray and green wires are connected to the motor brushes.
To present the connection diagram to you more clearly, we have prepared the following diagram:
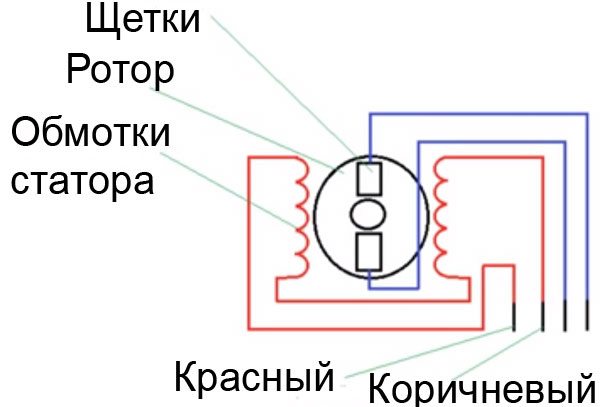
We'll connect one 220-volt wire to one of the winding terminals. We'll connect one of the brushes to the next terminal. We'll connect the second 220-volt wire to the remaining brush on the washing machine motor. As shown in the diagram below:
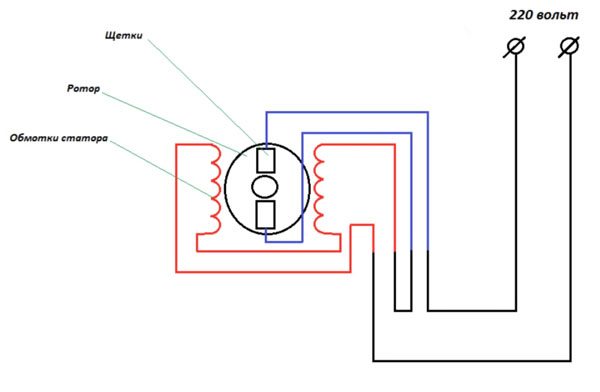
After this, you can connect the motor to a 220V power source and test its operation. If you've done everything correctly, you'll see the motor's moving part rotating and hear its operating noise. If everything went well, the motor is ready for use. By the way, when connected this way, it rotates in one direction. What needs to be done to change the direction of rotation? See the diagram:
As you can see from the schematic diagram above, to change the direction of rotation, we had to swap the motor brush connections. After reconnecting the motor, test its operation again by connecting it to a 220-volt power source.
By the way, to make things easier for you, we've added a video tutorial that describes the entire process of connecting your washing machine's motor to the power supply.
The method for connecting a motor from a modern washing machine in this article is based on the material presented in this video. Therefore, we thank the author of this video and watch it very carefully:
How to connect the motor of an old washing machine?
Properly connecting a washing machine's electric motor isn't easy. But if you know how, it shouldn't be a problem.
First we need to find two pairs of output. To figure out where they are, we can use a multimeter (tester). Select one of the winding terminals and connect the tester probe to it. Use the remaining multimeter probe to check the other terminals to find the paired one.
This way, we'll find the first pair. The two remaining leads form another pair. Now we need to figure out where the starting and running windings are. To do this, we need to measure the resistance. The starting winding will have a higher resistance.
Scheme
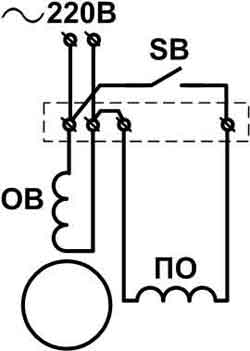 So, we've already found the operating and starting windings. Now we can connect the motor using the schematic diagram you see nearby. The diagram shows:
- PO – starting winding. It is needed to create an initial torque in one direction or another.
- ОВ – excitation winding. Also called the working winding. It is needed to create a rotating magnetic field.
- SB – switch (button) for short-term connection of the software to a two hundred and twenty volt electrical network.
If you need to change the motor's direction of rotation, you'll need to swap the software pins. This will reverse the direction of rotation.
When performing a test connection and starting the motor, remember to ensure your safety and the safety of others. Be sure to secure the electric motor. This will prevent strong vibrations and unnecessary movement.
We hope this post helped you connect your washing machine motor yourself. Continue reading our site and have a great day!
Interesting:


27 reader comments
Add a comment
Headings
Washing machine repair


For buyers


For users


Dishwasher


Everything would be fine, but the ARDO motor has 8 terminals, 4 of which are from the stator, so what should we do about that?
2 of them are thermal relay, 2 are stator
Thank you so much!!! for helping electrical enthusiasts.
Thank you very much, this is a very useful diagram!
The article is great! Everything is very clear, I started the same engine on the first try.
Thank you. 10 points. I'd like to see a wiring diagram using a speed sensor. Thanks again.
if there is such an opportunity
Electric motor from the Atlant steel machine. 8 terminals
Thank you. 10 points, and how to reduce engine speed?
How to reduce the speed of a washing machine's asynchronous motor. Thanks, Evgeny.
Can I dig up a speed controller somewhere?
Very useful information, most importantly, everything is clear. Thank you.
Everything is accessible. Thanks for the info. I especially wanted to point out the word "resilience"; it made me smile.
The starting resistance will be greater.
Sorry, but that doesn't sound electrical. Resistance is true, but not more than that, quite the opposite. You're misleading people.
Thank you, very informative 5+
Clear and understandable. Thank you very much.
Simple and brilliant!
I connected the washing machine's electric motor, and now I want to restore its function. How do I access the necessary wires to make the machine work?
I have a motor in rewinding, 24 slots, pitch 5-7, tell me what the winding diagram is, everything is burnt out!
What is the connection diagram for stator windings with parallel connections?
Hello. I have two motors from different models, and they each have 5 terminals. What should I do?
How to connect if there are 9 wires?
Thanks, Bro!
And if the engine is connected in parallel and the speed controller is connected to the collector circuit, will there be a significant drop in power?
The motor from an Ardo TL800x-1 washing machine has 9 terminals, 4 pairs of different colors and one black. Does anyone know how to connect it?
MIELE 606/2 motor, 8 stator terminals only, 2 thermal relays, 2 tachogenerators. How do I connect it?
If the pinout is nine-wire, look closely: there are two brushes, two wires visible. The two on the frame in the center are the Hall sensor (not needed), the two are the thermal relay (not needed). And three wires on the stator winding side: left and right (needed). And the middle one is the central wire (not needed). And then, just like the author of the video did! Good luck 🙂