How to change a washing machine cuff?
 If your washing machine has served you faithfully for a long time, don't be surprised if the door seal becomes damaged or punctured. The seal prevents water from leaking out of the washing machine during a cycle and from getting inside or outside the machine. It ensures that water remains in the drum throughout the entire cycle.
Why can the cuff get damaged?
- As mentioned above, the cause may be prolonged use of the machine. Absolutely all household appliance parts have their own safety margin, and with regular and prolonged use, they can fail.
- The cuff is made of rubber. This material can deteriorate with excessive use of certain detergents used in laundry.
- When the machine is in operation, some internal components may come into contact with each other, causing friction. This friction can cause holes in the rubber.
- Friction can also occur against hard elements of the items being washed or against large items such as shoes, clothing that contains a lot of metal parts, etc.
- In addition, sometimes fungus can appear on the rubber surface, which over time degrades its quality.
- It is also easy to damage the cuff if you load and unload the items being washed carelessly.
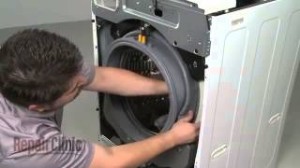
How to remove the hatch cuff?
 Some washing machine models are designed to allow the seal to be replaced without removing the entire machine body. For others, the front panel must be removed. The entire repair doesn't require any special skills. It's quite simple. However, care must be taken, especially when installing the new seal. Before you begin, you need to make sure that your new replacement part is identical to the one we want to remove.
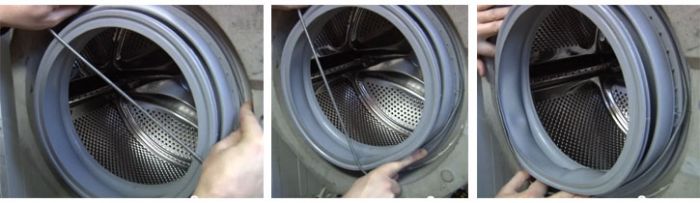
After we've verified the cuffs' identity, we can begin removing the old one. First, we need to remove the retaining clips. The outer part of the cuff is recessed into a special opening in the outer wall of the housing. There, it is secured with a clip. This clip can be made of either plastic or metal (wire). To remove a plastic clip, grasp the part where the latches connect and pull it toward you. To remove a wire clip, unscrew the screw or pry the spring with a flat object.
Next, we need to find the installation mark on the removable seal. This marks the correct position relative to the washing machine's tub. Only proper installation will help prevent leaks.
If you are unable to find this mark, you can mark the location of the cuff to be removed using a marker.
This step will help us determine the correct location of the new cuff. Once we've found the mark (or made one ourselves), remove the second clamp and pull out the cuff.
How to install a new cuff?
Before starting the installation, let's prepare the site. To do this, thoroughly clean the desired surface of any dirt. Then, apply a soapy water solution to the installation area. This will make it slightly slippery, making installation easier.
Next, we'll need to slide the gasket onto the tank. This part of the job can be quite tricky for some. It's important to remember the correct position of the gasket relative to the tank. And don't forget our marks. Align them with the marks on the tank. Now we need to slide the gasket's recess onto the tank. To do this, grip the inside of the gasket with your thumbs and pull it tight. We've prepped the edge with a soap and water solution. So everything should go like clockwork.
Some difficulties may arise during the replacement process. A common occurrence is that when tightening the cuff, even though most of it is already in place, an edge may fall out. To solve this problem, we can continue to tighten the cuff from both ends simultaneously, continuing until the very end.
We put on the clamps
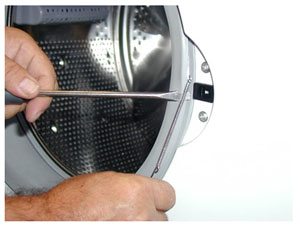 Next, we install first the inner clamp, then the outer clamp. If the outer clamp is adjusted with a screw, loosen it to the desired clamp diameter. Then, install the clamp on the cuff and secure it by tightening the screw. If the clamp is spring-loaded, it will take a little longer to adjust. We need to secure it at the initial tension point. To secure it completely, we'll use a screwdriver. Insert it all the way into the locking opening. Then, place the spring on our tool, pull it back, and insert the clamp into place.
On older machines, you'll need to use round-nose pliers to secure the clamp. This tool allows you to separate and connect the hooks, which creates the necessary tension on the clamp.
After installing the inner clamp, all that's left is to secure the outer one. This is done the same way as the first one, so we won't go into detail.
Once our cuff is installed and secured with both clamps, all that remains is to check the tightness of our washing machine. To do this, select the rinse cycle and start the machine. After a few minutes, drain the water. Then tilt the machine and inspect the bottom, floor, and seal itself for leaks. If we did everything correctly and the seal was in good condition, we won't find any traces of water. Congratulations!
To make this complex process more understandable, I suggest watching a video on how to change a washing machine seal:
Interesting:


3 reader comments
Add a comment
Headings
Washing machine repair


For buyers


For users


Dishwasher


What should I do if the front cover of the washing machine won't come off? But the seal needs to be installed.
This can't be.
ARDO A1000X