Disassembling the Atlant washing machine
 The question of disassembling an Atlant washing machine or another brand arises when repairs are needed and you simply don't have the money. Therefore, you want to at least save on labor by buying only the necessary part. However, without knowing how to disassemble the washing machine and whether it will be possible to reassemble it, many people give up on the idea of repairing it themselves. If you still want to take it apart, this article is for you; we'll share tips on how to do it correctly.
Tool preparation
Disassembling any car requires tools. First of all, you'll need:
- flat and Phillips screwdrivers;
- pliers;
- spanners and socket wrenches;
- hammer.
It's quite difficult to say the exact size of the keys; you can find out once you start disassembling the machine. Therefore, it's best to have a set of different keys on hand. Most often, keys of 8, 10, 13 mm are required. In addition, it is a good idea to have special tools, devices and equipment on hand, for example:
- bearing puller;
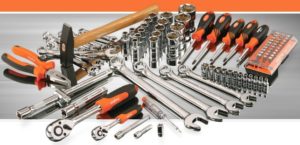
- ohmmeter or multimeter;
- screwdriver;
- WD-40 liquid;
- a rag and a container for water.
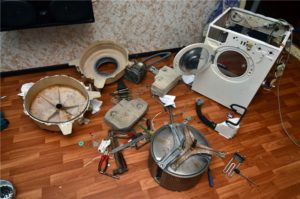
Partial disassembly of the machine
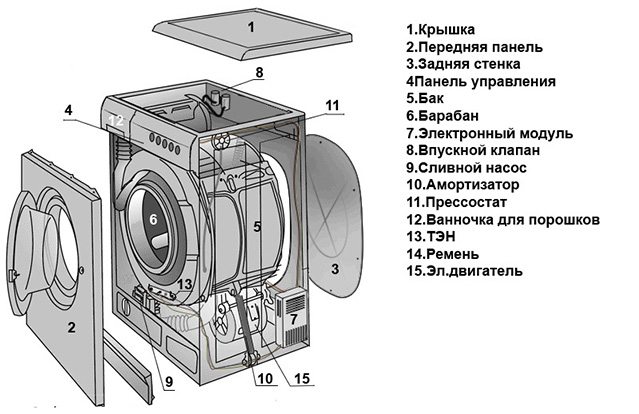
In most cases, washing machine repair requires partial disassembly. Removing, for example, the drain pump or heating element doesn't require disassembling the entire machine. So, let's first discuss how to access the machine's components that don't require complete disassembly. If you have a poor understanding of how a washing machine works, you should at least familiarize yourself with the diagram, which shows all of its main components and parts. The picture below shows one of such schemes.
 To disassemble the washing machine, start with the top and rear covers, which are held in place by several screws. Before doing this, disconnect the inlet hose. To lift the top cover, not only unscrew it, but also slide it back 1.5 cm. Under the top cover, you'll gain access to:
- pressure switch (water level sensor);
- transformer;
- interference filter (network capacitor);
- water supply valve.
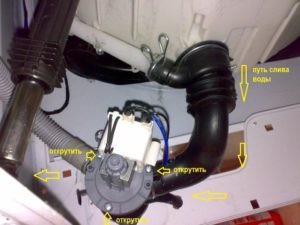
If you place the Atlant machine on its left side, the drain pump and drain pipe will be visible. The pump is held in place by two screws that are easily removed. To remove the hose, use pliers.
Important! Before turning the machine over, drain the water. This can be done either through the emergency drain hose located near the drain filter or through the filter itself.
Next, you can remove the back cover of the housing, revealing the heating element, drive belt, motor, and tank. From here, you can easily remove the heating element. It's located at the bottom, under the tank. Before pulling it out, disconnect all the wires and the temperature sensor, noting their correct position in the photo. If the heating element is difficult to remove, apply WD-40.
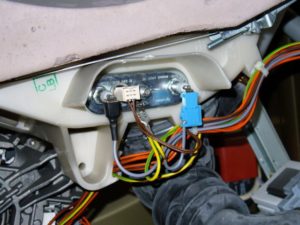 Also attached to the rear wall on the left is the electronic module, which is also easily removed by simply disconnecting all the connectors and wires. Now let's move on to the front of the machine. On this side, you first need to pull the powder drawer out of its housing, then unscrew the control panel.
To remove the hatch door, you need to unscrew the two screws holding it. The hatch cuff is secured with a metal clamp that needs to be loosened. To remove the front cover, you'll also need to unscrew the door locking mechanism and disconnect the sensor by reaching into the drum. This will completely disassemble the Atlant washing machine.
We remove the moving parts and the tank
Replacing the bearings in the tub, pulley, and drum of a washing machine requires a lot of effort and time. Disassembling these components can be quite labor-intensive. Few people are willing to attempt this at home. To remove the tub from the machine, you need: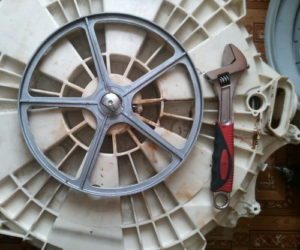
- unscrew the counterweights;
- remove the drive belt;
- unscrew the screws holding the engine, disconnect the wires from the engine and remove it;
- disconnect the wires from the heating element and temperature sensor;
- loosen the clamps on the drain and filler pipes and remove them;
- from the front we remove the hatch cuff from the drum;
- we remove the pressure switch;
- We remove the stands and pull the tank together with the drum out of the housing.
It's worth noting that removing the drum of an Atlant washing machine alone is inconvenient; it's best to get someone to help.
Now, let's proceed to disassembling the Atlant washing machine tank. Before you begin disassembling the drum of a washing machine of this brand, you should be aware that the manufacturer initially made such drums non-disassemblable. But that certainly doesn't mean it's an insurmountable obstacle for us. What needs to be done?
- We place our removed tank with the opening for placing the laundry facing up.
- We find the place where the two halves of the tank are joined.
- We select the screws that we will later use to screw the halves of the tank together.
- We drill holes in a circle (according to the diameter of the screws); it is better to drill them right away so that later we can easily connect the halves of the tank.
- Next, we take a hacksaw for metal and begin to saw the tank along the seam; this work is labor-intensive and requires patience.
Be careful when cutting the tank, try not to touch any metal parts, including the drum.
- Having cut the tank, we disassemble it into two halves, one half (the lower one) remains on the tank, and the second is removed to the side.
- Take a T-40 star wrench and unscrew the screw located in the center of the drum pulley. If you have trouble doing this, you can spray the screw with WD-40.
- Using rocking movements, remove the drum pulley.
- We tighten the screw back to make it easier to knock out the shaft.
- Next, we lightly hit the screw with a hammer so that the shaft and drum pop out of the half of the tank along with the bearings. If the shaft does not come out, then the blows must be applied through a wooden block so as not to damage the important part.
Having freed the shaft with the spider and drum from the other half of the tub and bearings, we've completed disassembling the Atlant washing machine. Next, we'll need to install new bearings and reassemble the washing machine, but that's covered in a separate post. If you're interested, How to change a bearing in a washing machine, read about it in the article of the same name.
In conclusion, any competent homeowner can partially disassemble an Atlant washing machine without much difficulty, but only a patient person will succeed in a complete disassembly, as it requires careful handling without damaging any important components. So, arm yourself with patience, have the right tools, and go for it—we hope you succeed!
Interesting:


1 reader comment
Add a comment
Headings
Washing machine repair


For buyers


For users


Dishwasher


Can you tell me how to connect the wires to the cold water supply tank?