Disassembling a Whirlpool top-loading washing machine
 Without prior disassembly, you can't repair a Whirlpool washing machine, especially if the motor, pump, or electronics are faulty. You need to know where to start and where to end, what tools to use, and how to avoid making the situation worse. Front-loading machines are easier to repair, as there's plenty of text information and videos with detailed instructions online. But owners of other washing machines shouldn't worry either—our article will help you figure it out. The key is to avoid experimenting and strictly follow the instructions.
Preparatory stage
To properly disassemble a Whirlpool top-loading washing machine and access the pump, motor, or pressure switch, just follow a few steps. First, you need to do some preparatory work; otherwise, you risk flooding your neighbors, electrocuting yourself, or permanently damaging the machine. Remember to keep the following in mind:
- disconnect the machine from the electrical network, turn off the water and disconnect it from the sewer;
- twist the connecting hoses and electrical wire, fixing them on the body in special grooves;
- ensure free access to the washing machine from all sides, for which it is advisable to move the unit away from the wall or move it to an empty room;
- prepare a container to collect the drained water;
- Spread as many rags as possible around and under the machine gun.
Important! Be prepared for water to remain in the washing machine, which will need to be drained onto the floor before repairs.
Now all that's left to do is gather all the necessary tools for disassembly. These include a putty knife, a screwdriver set, pliers, flat-nose pliers, round-nose pliers, a set of socket heads and wrenches. Insulating tape, gloves, and spare clamps will also come in handy. A detailed familiarization with the technical user manual for the existing Whirlpool model will help with the work. Only after this can you begin to disassemble the device.
We dismantle the pressure switch and the control panel
The next steps depend on the final goal. If the pressure switch or control panel needs to be removed, the starting point is the top of the machine body. The step-by-step instructions are as follows.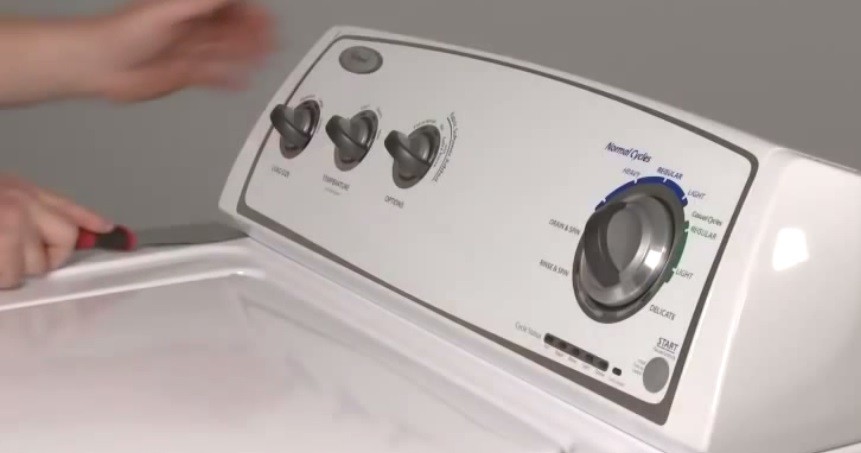
- Carefully insert a spatula under the dashboard and lift it up to release the two spring clips.
- Slowly pull the part towards you.
- Inspect the exposed selector switches and water inlet valve. When replacing the electronic board, note the location of the connectors and connecting wires.
- Disconnect the wires and the power cable (for easy removal of terminals and brackets, it is better to use a flat-head screwdriver or pliers).
- We remove the water level sensor tube.
- We unscrew the two mounting screws using a suitable head or key.
- We take out the central control module.
Now all that remains is to straighten out the groups of wires and finally remove the instrument panel. To avoid confusion during reassembly in the future, it is recommended to take photos of the connections and connectors or mark them with a marker or electrical tape. To get even deeper into the Whirlpool washing machine, you'll have to continue the steps you've already started.
Pump and motor
When the final destination is the pump, starting capacitor, or motor, disassembly begins from the bottom of the housing. For convenience and better visibility, lay the machine on its back. It's important not to damage the electronic board or cause a short circuit, which could result from residual water getting inside the machine. Therefore, first drain any remaining water through a debris filter and dry the dispenser sections in the powder receptacle. Then, follow these instructions: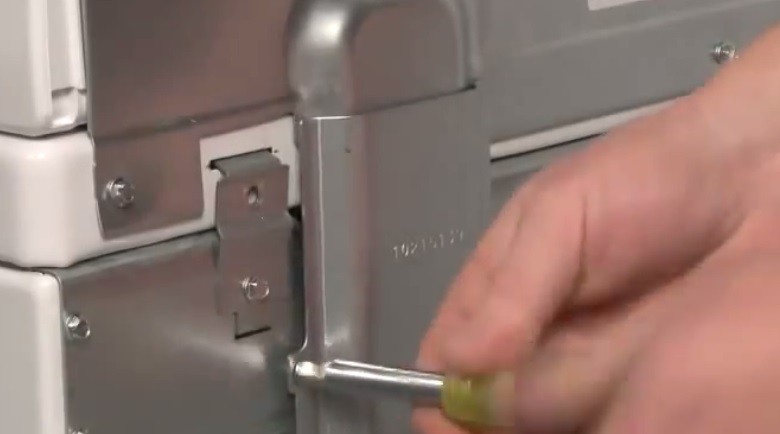
- we press the latch on the joint and disconnect the drain hose;
- We fix the cover with electrical tape, securing it to the machine body;
- slowly lower the machine onto its rear panel;
- take a 5/16 socket and unscrew the screws holding the drive belt;
- remove the protective cover;
- disconnect the connector connected to the electric motor;
- remove the drive belt;
- we select a 1/2 head and loosen the engine mounts;
- we take out the engine.
To access the pump, remove the left side of the housing and inspect the drain chamber. Then, disconnect the hoses and fittings and loosen the clamps on the pump. All that's left to do is pull the part toward you and pull out the pump.
Removing the tank
Removing the drum of a top-loading washing machine requires a special procedure. To access it, you need to turn the washing machine on its bottom and remove the top cover. While anyone can handle the first step, for the second, it's important to follow the detailed instructions.
- Take a quarter-inch wrench and unscrew the screws at the back that hold the cables and protective cover.
- We remove the protection.
- We unscrew the fasteners through which the upper part is attached to the body.
- We move the top cover forward until we hear a click, indicating that the latches have been released.
- We lift the part, making sure that the protrusions of the back wall fall into the special grooves on the lid.
- We attach the retaining chain to the holders on the body and lid.
- We release the last one back and make sure it is stable.
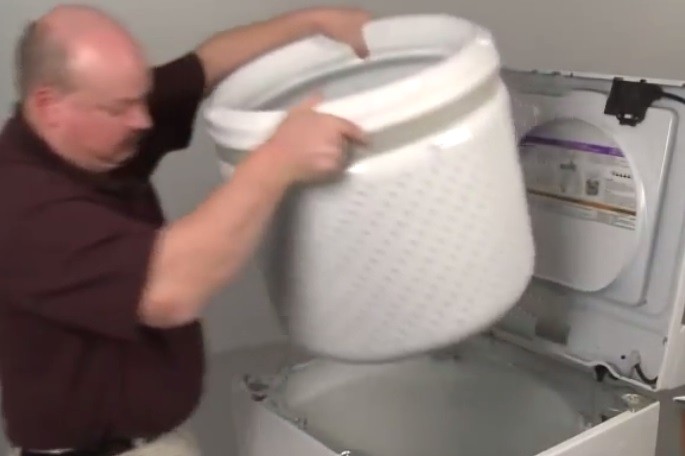
Now we begin removing the inner drum. Using a flathead screwdriver, press the tabs and remove the lid from the drum. Next, unhook the detergent dispenser and use a 7/16 socket to loosen the agitator fasteners. Next, remove the drum nut. Turn it clockwise and tap it with a hammer to loosen it and remove it. If you need to repair the outer part of the drum as well, proceed further:
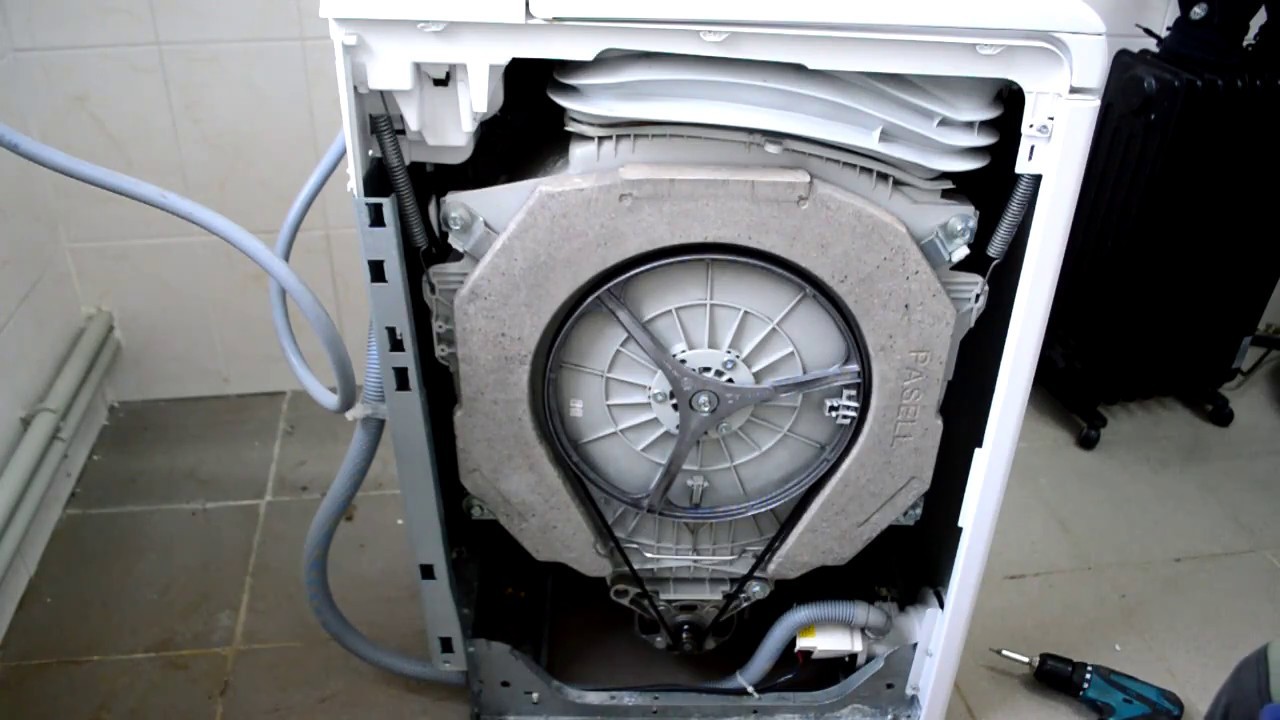
- we find the drive shaft;
- loosen the clamp and release the shaft from the drive unit;
- unscrew the fasteners on the pump cover and remove it;
- we remove the previously attached chain to hold the top cover;
- close the lid of the machine tightly;
- we return one or two screws on the back panel to their original position;
- carefully lower the machine gun onto its back;
- open the drain pump cover;
- we detach the wire from the retaining clamp;
- disconnect the pump hose;
- release the drain pump from the retaining screws and remove it;
- we disconnect the connectors from the capacitor, drive, electric motor and gearbox one by one;
- remove the gearbox;
- We free the base of the tank from the wiring harness.
We repeat the procedure again with the top cover open: we install the washing machine in its original position, loosen the rear screw and return to the internal device. Here we remove all the hoses attached to the tank (air pressure sensor tube, wire harness), disconnect the suspensions and ball joints. All that remains is to apply some effort and pull out the outer tank.
After practicing removing and disconnecting the pump, pressure switch, and all tank levels, it's easy to understand the disassembly process for the remaining internal components of a Whirlpool top-loading washing machine. It's recommended that you document all steps with notes or photographs to avoid confusion during reassembly. In addition to care and consistency, safety is also a must – then repairing your washing machine yourself will be a breeze.
Interesting:


Readers' comments
Headings
Washing machine repair


For buyers


For users


Dishwasher


Add a comment