How to disassemble a Zanussi washing machine
 Almost any repair of a Zanussi washing machine involves disassembling it, as the vast majority of parts are hidden inside the machine. Clearly, complete disassembly isn't always necessary; often, simply removing the top cover or back panel is enough to reveal the broken part. But what if the spider or bearings need repair, or worse, the drum needs replacing? In such cases, repairs can only be completed by completely disassembling the Zanussi washing machine. Let's find out how!
What tool do you need?
Let's not beat around the bush and get straight to the preparations, because disassembling a Zanussi washing machine with a 5 kg capacity drum isn't something you can do lightly. First, we need to gather all the necessary tools. This shouldn't be a problem. A little rummaging around in the garage and the storage room will suffice, and you'll find everything you need:
- a set of screwdrivers (you can use a screwdriver with a set of heads of different configurations);
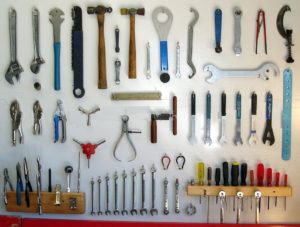
- a set of keys (you will need various keys, including open-end wrenches);
- a ratchet with a set of heads (mainly 7 and 8 mm);
- pliers (large and small);
- small round-nose pliers;
- bearing puller;
- pliers;
- WD-40 liquid;
- hammer;
- awl;
- markers of several colors.
As you can see, the tool is simple, and everything is easily accessible, so further discussion of this issue is pointless. The only thing I'd like to emphasize is to use only high-quality tools. When unscrewing fasteners with Chinese wrenches, you will most likely strip their edges and then add more work to your workload. If you don't have normal keys, ask a neighbor for some while you're doing renovations or buy Soviet-era keys from a junk dealer—you won't regret it.
Let's get into the washing machine body
It would seem that it would be simpler to climb inside a Zanussi washing machine and see what's inside, studying its operation in practice, so to speak. But it wasn't so simple. The body of old washing machines of this brand is disassembled quite trickily.
The top cover comes off without any problems. Just take a socket wrench with an 8mm socket, unscrew two bolts, grab the cover, slide it slightly toward you, and then lift it up—no big deal. The same can't be said for removing the back panel of a Zanussi machine, however. The Zanussi washing machine's body has one significant peculiarity: it doesn't have removable side panels. What does this mean?
Most brands of washing machines have a housing structure that consists of five or six elements:
- top cover;
- bottom;
- back wall;
- front wall;
- left side wall;
- right side wall.
Please note: Some washing machine models do not have a tray or lid covering the bottom of the machine.
The Zanussi washing machine has an unusual design in that the body of this "home helper" (except for the top and bottom) can be disassembled into two large halves:
- front wall, half of the left wall and half of the right wall of the body;
- back wall, half of the left wall and half of the right wall of the case.
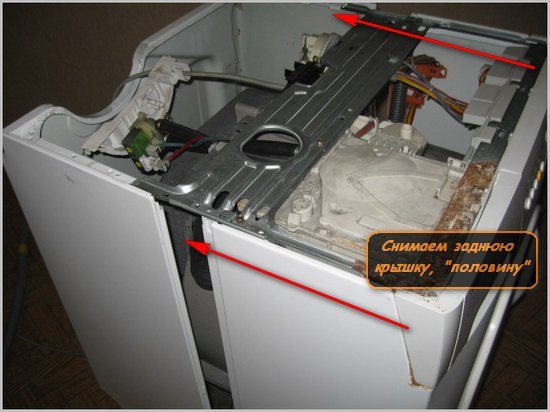
To access most of the necessary components, such as the engine, drive belt, and drain hose, we need to completely remove the rear half of the housing. How do we do this?
- We move the Zanussi washing machine to a place where it will be convenient to work with.
- We unscrew two or three (depending on the model) screws, which are located at the bottom of the rear wall of the case.
- We remove the top cover of the machine as described above.
- Now we examine the side walls and find plastic plugs on them. Using an awl, we pull off the plugs.
- We find the screws under the plugs and unscrew them.
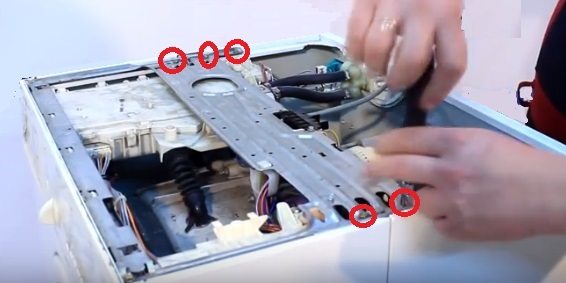
- Moving on to the top of the case. If you look inside the top of the case without the cover, you'll immediately notice a fairly large metal plate providing a stiffening rib. Along the edges of the plate, you'll find screws securing the back of the case; these need to be removed.
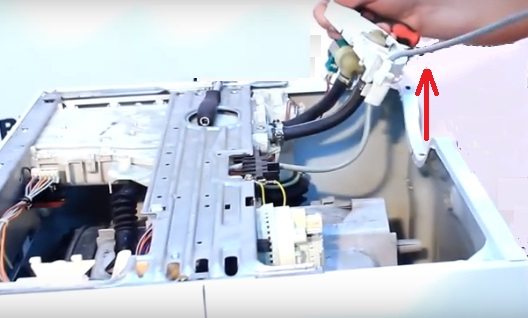
- The last element preventing us from removing the rear of the Zanussi washing machine is a plastic bracket. It houses the inlet valve with two hoses. There's no need to remove the hoses; we'll remove the bracket entirely by carefully prying up the plastic clips with a flathead screwdriver.
- Now all we have to do is go around the back of the washing machine and pull the rear part of the housing toward us; it should slide back and forth. Remove the rear part of the housing, and a picturesque view of the Zanussi washing machine's interior opens up.
To move the back of the body back faster, rock it from side to side.
Dismantling of main components
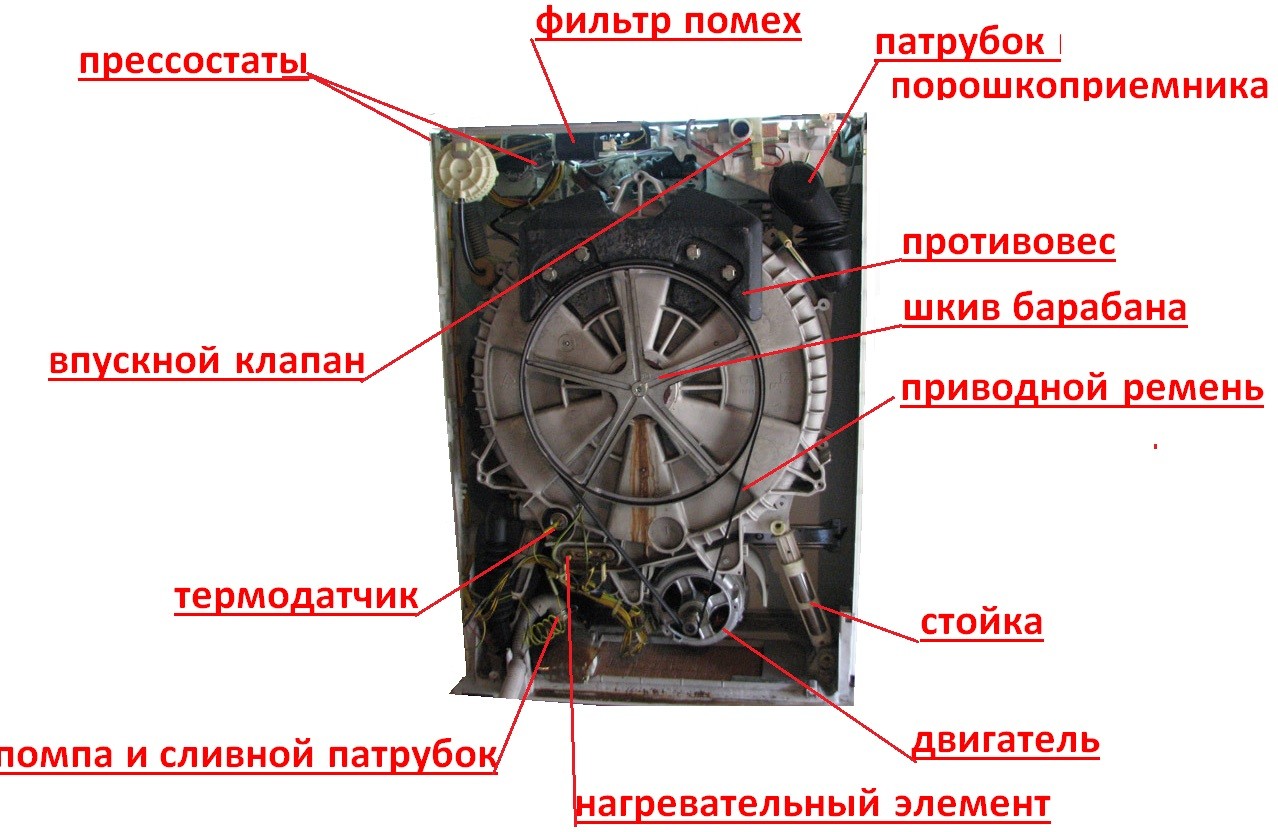
By removing the back of the Zanussi washing machine, we've made it much easier to access its main components. Now we can unscrew and remove a lot of parts for repairs, without anything getting in the way. Which parts are now easily accessible?
- Drum pulley and drive belt.
- Rear counterweight.
- Washing machine motor.
- Anti-vibration struts.
- Heating element (TEN).
- Temperature sensor.
- Inlet valve with pipes.
- Drain pipe and pump.
- Two pressure switches.
- Noise filter.
- Watering pump (used to force water into the tank during washing).
We begin the next stage of disassembling the Zanussi washing machine by removing the wires from the heating element (located under the drum pulley) and the motor, and removing the temperature sensor from the drum. Next, we'll remove the wires from the pressure switches. They're located in the upper left part of the machine body and the pump, which is located in the lower left part. We'll also remove the wire from the inlet valve. After this, we'll do something very useful: unscrew the rear counterweight, so that it will be easier for us to pull the washing machine during repairs. It is held on by 4 bolts.
Important! All removed wires must be marked with different-colored markers and paper labels to avoid confusion later. The electrical system of a Zanussi washing machine can be complex for a novice.
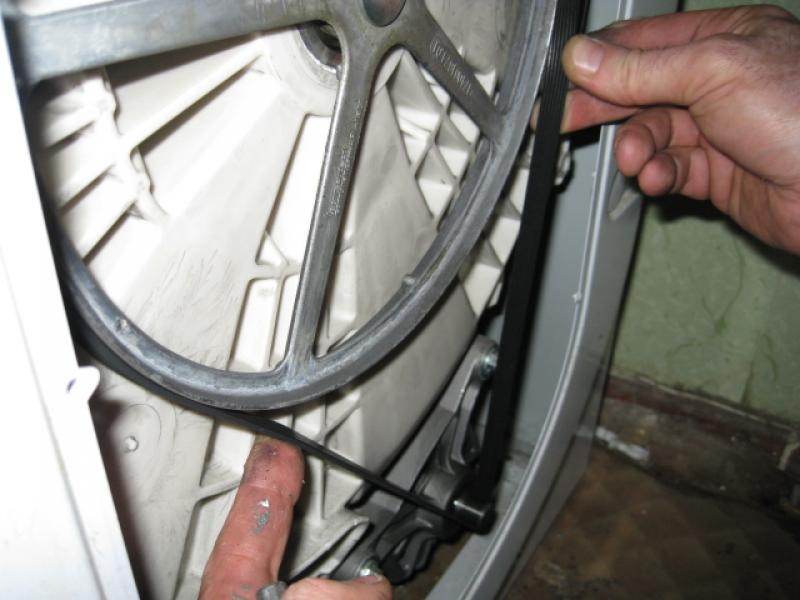
Remove the drive belt. Hold the belt with one hand and turn the drum pulley with the other. The belt will slip off easily. Remove the clamps from the hoses and pull them off. Use a ratchet with an 8mm socket and unscrew the two bolts holding the Zanussi washing machine's motor in place at the front, then unscrew two more screws at the back. Once the fasteners are removed, support the motor from underneath with one hand and gently tap the pulley with the other. The motor will come off.
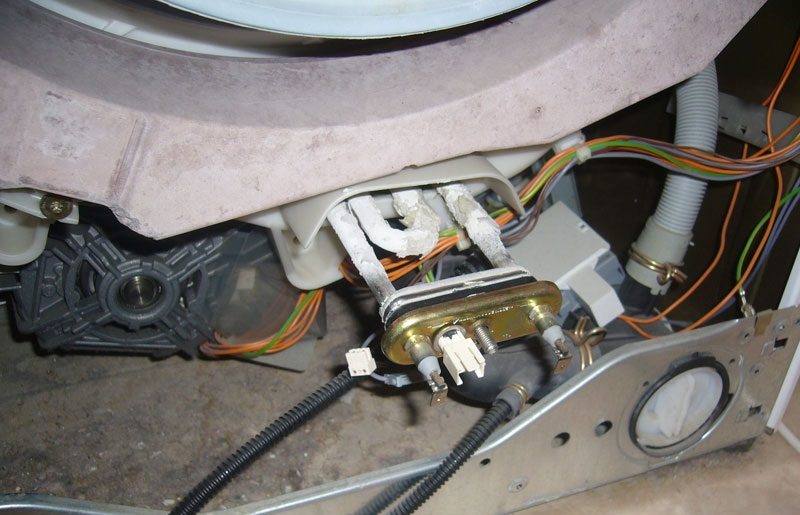
Now remove the heating element. Unscrew the nut located between its contacts. Apply gentle pressure, then grasp the heating element by the contacts and, very carefully, rocking it sideways, begin to pull it toward you. It is important here not to break off one of the contacts, otherwise you will have to replace the heating element.
Next, remove the struts. They're held in place by plastic rods on one side and a standard screw on the other. To remove the rod, take a 14mm socket, reach behind the rod, and slide the socket onto its latch. Then, grab the front of the rod with pliers and pull it toward you while holding the tank – the fastener will pop out. Unscrew the strut from below and set it aside. Repeat with the second strut.
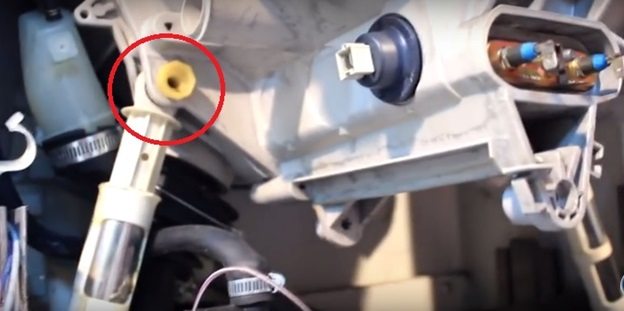
We remove the pressure switches from their slots, remove the clamps from the filler pipes, and put them away along with the filler valve. Unscrew the watering pump and disconnect the hose. Now let's look inside the machine from the top. On the top wall of the tank, we see a small breather pipe; we carefully pull it out. What's next?
- We go in from the front. Open the door of the Zanussi washing machine. Grasp the top of the rubber gasket and pull it slightly toward you.
- Next, pry up the plastic clamp with a flat-head screwdriver and work it around until you find the latch. Disengage the latch and remove the clamp.
- Since we have a Zanussi washing machine with a large capacity, there's an inlet at the top of the cuff where the watering nozzle connects. Again, grab the top of the cuff and pull it toward you.
- We remove the clamps from the pipe and the pipe itself.
Next, we'll go around the back of the car again and unscrew the interference filter. Now all that's left in the body is the tank and drum, suspended on two springs, the control panel in the front, the debris filter, the door lock, and the hatch cover. Hatch locking device The sunroof itself is easy to remove, as you can read about in a dedicated article, so we won't go into detail. Anyone can also unscrew the dust filter, but the control panel can be tricky.
How do you remove the control panel? Walk around the front of the washing machine and pull the detergent drawer out of its recess. Unscrew the screws located behind the drawer. Remove two more screws above the control panel. Next, gently pry the control panel up with a flat-head screwdriver and remove it.
Be extremely careful, there is a bundle of wires leading to the control panel and they must not be disconnected.
Having removed everything possible and having studied the Zanussi washing machine's structure as we disassembled it, we left the washing machine body with the tank and drum suspended on two springs. If we want a complete disassembly, we need to remove the tank from the springs and then disassemble it into parts.
Complete dismantling
With a friend's help, remove the drum from the springs and pull it out of the washing machine. This is very easy to do with two people, but doing it alone can be a real pain. Unscrew the front counterweight and remove it. Place the drum upside down on a flat surface to allow full access to the drum pulley. Next, follow these steps.
- Lock the pulley to prevent it from spinning. This can be done in any convenient way, for example, as shown in the picture.
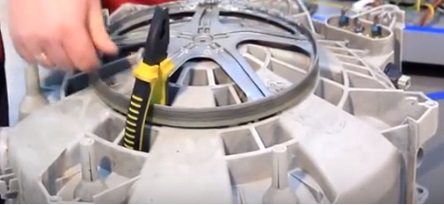
- Take a hex screwdriver and try to loosen the bolt located in the center of the pulley. If that doesn't work, you can lubricate the bolt, then wait a bit and try again. When unscrewing the bolt, try not to strip the hex key.
- We grab the drum pulley with our hands and, swinging it from side to side, pull it upwards.
- Having removed the pulley, we need to disassemble the tank body into two parts.
Please note: The two halves of the Zanussi washing machine's drum are held together with long screws, making it a detachable drum.
- We take a ratchet and an 8 mm head and alternately unscrew all the screws holding the two
 The tank halves are put together. Once the screws are removed, the tank will come apart.
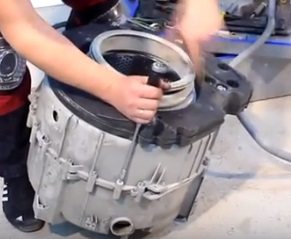
We were able to easily remove the front part of the tank, but the rear part is still securely attached to the drum via bearings, which in turn are mounted on the shaft. These need to be removed along with the tank. We take an old, unused screw that will fit the shaft threads (where we removed the pulley retaining bolt) and screw it in. Next, we place a wooden block under it and lightly tap the screw with a hammer until the rear part of the tank comes off the bearing.
As a result, the rear of the tank was left aside, and we were left with the drum at the back, which has a crosspiece and shaft attached. A bearing and seal are attached to it. Now comes the hard part.
- We drive the puller jaws under the bearing.
- We create tension by gradually tightening the threads of the puller.
- Generously fill the bearing with WD-40 lubricant.
- We wait 30-40 minutes.
- Slowly unscrew the thread further and remove the bearing, and then the oil seal.
To sum it up, we note that the design of a Zanussi washing machine does not seem so complex that you can trust a specialist to disassemble it. You can disassemble this washing machine yourself if you carefully read the instructions provided in this article. Zanussi machines may vary slightly depending on the model, but these differences are insignificant. Some models have slightly larger drum capacities, others don't have a spray system, and so on. It wouldn't hurt to study the manual and take your first Zanussi machine apart, screw by screw. Good luck!
Interesting:


29 reader comments
Add a comment
Headings
Washing machine repair


For buyers


For users


Dishwasher


Good morning, I would like to know if it is possible to disassemble the Zanussi tank without removing it completely?
No, it won't work.
How to remove the door bracket on a Zanussi 3102 washing machine?
It's held in place with rivets. Try cutting off the protruding ends with nippers. Then, punch the remaining pieces outward from the outside. If that doesn't work, drill out the rivets from the outside; they're soft.
Good afternoon! I have a 2006 Zanussi FE 1024N. It shuts off after a few minutes of use. Can you tell me what's causing this?
How to remove the pump and drain pipe from a ZWI 1125?
Good afternoon
Tell me how to remove the control unit (front panel)?
Can you tell me how you removed the control unit?
How do I disassemble the hatch on a Zanussi ZWS685V to replace the lock? There are two sealed rivets, that's all.
Great job! Thank you, everything is clear. Thank you! We did it.
Where is the drain filter on the Zanussi ZWF71243W? Thank you.
Can you tell me how to remove the programmer from a Zanussi TA833V (top-loading)?
Good afternoon. Please help!
Please advise how to remove the water tank from a Zanussi FLS-1083 Pr.N.914204001 (1999). It has a non-detachable housing, meaning only the top cover comes off. I had to remove all the wiring, circuit board, etc. to free up as much space as possible for the water tank. But removing the counterweights is impossible. Even if I manage to unscrew the bolts, there's not enough space inside the housing to remove the front counterweight, which extends all the way around. It's impossible for me to do it from the top alone. There's no one to help me.
Can I lay it on its side, remove the shock absorbers and springs, and then roll/drag it out? Will it crush the sidewall?
Hello, my daughter broke the plastic door with the lock on her Zanussi TA 1033 V top-loading washing machine. The lid was open and the door was broken. Can I fix it myself?
Hello, the shaft on my top-loading washing machine broke on the left side (where it connects to the drum). I'm thinking about welding it back on. Is that feasible? Is it a very labor-intensive process to remove the drum from its plastic housing?
Why does the drum rattle when spinning? Zanussi model FL904NN.
The door lock is stuck. There's no water in the machine, everything works, and we restarted the wash cycle. Zanussi F 505.
Good evening. Could you tell me how to completely remove the hose from a Zanussi 1025 top-loading washing machine? There's a pump attachment on one side and a thicker tip on the other. The hole doesn't seem to be damaged. Please help.
Could you tell me how to remove the pump housing on the ZWD5105? It's impossible because there are latches on the bottom that need to be pulled up, and the front part is in the hole in the front cover?
Can you tell me how to disassemble a Zanussi TA 833v?
Could you tell me if the dispenser in my Zanussi top-loading washer doesn't come apart? The rinse aid isn't draining into the machine. I cleaned the dispenser, but the machine still isn't picking up any rinse aid. What's the cause? Water still fills the tank during the rinse cycle.
Hello. Could you please tell me how to remove the control unit from a Zanussi Advantage 500?
Everything was helpful. Thank you!
Hello! Can you tell me if the detergent drawer can be removed? I want to clean it. It's darkened inside.
Zanussi FL503CN Type P667153 Prod. No. 914760010 00
Hello! The drain filter won't come out. I cleaned it a long time ago. Thank you.
Is there a video on "How to remove the control unit of a Zanussi washing machine" - model ZWN 286?
The machine doesn't fill with water, what could be the reason?
I can't get it out either. Didn't find a solution? Could you share? Thanks.
Hello, can you tell me how to disassemble the Lindo 300 case?