How to remove a washing machine door seal
 Replacing the rubber seal on an automatic washing machine may seem simple at first glance. However, not everyone can handle this task quickly and easily, so we've decided to detail the process of removing the seal from the drum, as this step can be challenging.
We remove the clamp
Before starting repairs, purchase an original spare part for your washing machine model. You can buy sealing rubber at a service store or online. Be careful when writing down the machine's serial number to avoid making a mistake. The new cuff should be soft and flexible.
Prepare for the repair and remember to unplug the appliance. You'll need a flathead and Phillips-head screwdriver. The first step is to remove the metal or plastic retaining clip from the door's rubber seal. This procedure is essentially the same on all machines:
- find the clamp latch or spring, which is a ring placed around the rubber seal;
In most cases, such a spring is located at the bottom of the washing machine hatch or on the side near the locking mechanism.
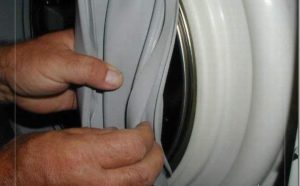
- Using a flat-head screwdriver, pull the spring toward you and loosen it. If there's a screw, unscrew it. The plastic clamp is held in place by latches that will release if you pull them toward you as well.

- Now we remove the ring, carefully prying it up with a screwdriver;
- We loosen the metal ring on the water supply hole and pull it out of its seat;
- Next, we remove the rubber cuff from the hatch and tuck it inside the drum;
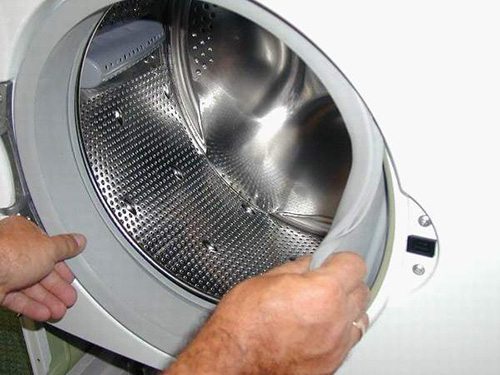
- Now you need to pay attention to the triangular mark, which should be on the rubber band and the drum. The marks must match exactly; if one of the marks is missing, mark it yourself. In the future, this will help you to correctly install the sealing rubber on the washing machine drum.

We are removing the facade
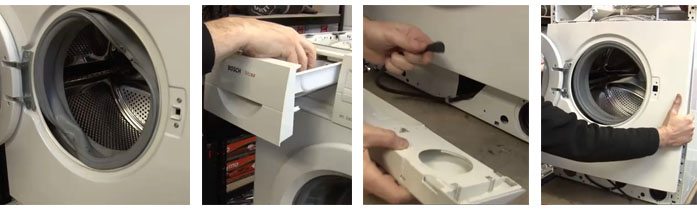
To completely remove the drum seal, you'll need to disassemble the front of the washing machine. This is done in the following order:
- remove the housing cover by unscrewing the bolts at the back of the machine;
- They take out the powder receptacle, under which they unscrew the bolts holding the facade;
- Using a flat-head screwdriver, release the latches that hold the control panel, carefully pull it out and place the panel on top of the case so that it doesn’t get in the way;
- Next, remove the lower plastic panel, and then unscrew the bolts around the perimeter of the front part;
- After this, the front part of the housing can be removed, providing access to the inside of the cuff.
Note! On some washing machine models, such as Indesit, Samsung, and AEG, you can do this without removing the front part of the machine. Simply unscrew and remove the top cover.
We remove the tires
The final step is to remove the rear section of the seal from the drum hatch. To do this, remove the retaining clamp. This is done in the same way as we described removing the outer clamp. You only need a flat-head screwdriver. Once you remove the clamp, you can use your hands to remove the cuff from the washing machine hatch.
That's all there is to it; as the saying goes, "breaking is easier than building." The hardest part for a beginner will be the reverse process, when you need to install the new sealing rubber onto the seat. Read about it in the article. How to put a cuff on a drumAnd for those who still don't understand what to do, or who need to know the nuances, watch the video below.
Interesting:


1 reader comment
Add a comment
Headings
Washing machine repair


For buyers


For users


Dishwasher


To disassemble the front part of the Westel WMA1600 washing machine, you also need a hex key.