How to make a food cutter from a washing machine?
 Not everyone knows that you can avoid the expense of a feed grinder and make your own feed cutter from a washing machine. It takes a couple of hours and minimal materials, but the resulting device will allow the farmer to prepare feed more quickly and without unnecessary effort or expense. Don't experiment – below is a step-by-step guide with explanations and recommendations.
We manufacture a container and a feed ejector
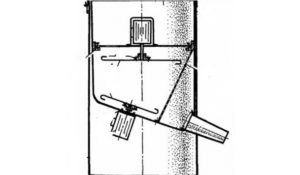
First of all, it is necessary to disassemble the washing machine that has served its purpose. To operate, you only need a motor with a shaft and a tank, so we remove the back panel and first take out the motor, and then we get to the drum. Please note that the machine's main container must be made of stainless steel. The next steps for creating an electric food cutter are as follows: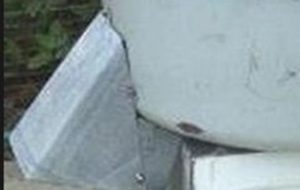
- thoroughly clean the container, removing scale, rust and dirt;
- at the back of the tank we mark a hole proportionate to the motor shaft and carefully make a slit;
- We drill three more holes for fasteners from the edges - 2 equal and one smaller;
- We bend a sheet of iron to form a half-funnel, which we attach to the drum for further ejection of feed.
It is better to clean the motor first to increase its service life.
Preliminary markings must be carefully done, otherwise it's easy to overdrill or distort the proportions. Pay special attention to the quality of the fastening—all bolts and screws must be securely tightened. This concludes the main stage of the DIY project, and refinement begins.
Making a cutting element
The chopper requires knives at the bottom. They are securely fastened to the motor shaft, and the blade diameter should be just 1-2 cm smaller than the existing tank. A total of two cutting elements are required on the food processor: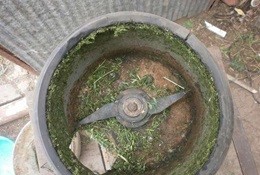
- The first is located at the very bottom and is shaped like a propeller, with blades that curve 2-3 mm. It is responsible for tossing the food placed in the container and pushing the pieces out.
- The second knife should be narrower and sharper. You can buy a new one or cut one yourself from an old saw.
To ensure the forage cutter grinds feed faster, it's important to sharpen the blades thoroughly and monitor their dullness during operation. It's a good idea to slightly curve the blades for increased productivity. Particular attention should be paid to ensuring a secure fit.
We are making the supporting part
Once the base is ready, it's time to think about the support. This will be a sturdy metal structure with four legs, resembling a stool. This "foundation" can be constructed by welding together sections of iron or screwing together construction angles. The drum with the knives is screwed onto the stand on top.
The most important thing is that the support doesn't wobble, stands level, and can withstand the upcoming load. Otherwise, the speeding motor will cause vibration, and the structure will fall along with the feed. It is advisable to install a lid on top, which will prevent vegetables from falling out and will significantly reduce feed consumption.
At the final stage, we check the quality of the fasteners and perform a test run by connecting the former washing machine to the power supply. If the motor runs and the support can withstand the power of the forage chopper, then you've successfully built your own forage chopper.
Interesting:


Readers' comments
Headings
Washing machine repair


For buyers


For users


Dishwasher


Add a comment