DIY emery from a washing machine
 Your washing machine is broken and beyond repair. What can you do with it? It's a reasonable question: if you can't sell it for parts and don't want to throw it away, you can try constructing something useful from its parts. In this article, we'll show you how to make a homemade sandpaper from a washing machine motor.
The structure of the emery wheel and its purpose
Emery is a useful thing to have around the house. They are very convenient for sharpening metal knives, scissors, drills, shovels and other tools. You can buy a similar device in stores; there's a wide selection available. However, the price may discourage you from purchasing one. Therefore, you can try making your own sandpaper from an old washing machine motor.
To carry out this type of work, you need to have a good understanding of how an emery wheel is constructed and what parts it consists of. The simplest emery wheel has:
- engine;
- bushing;
- flange;
- starting device;
- emery wheel;
- protective cover;
- electrical cable and plug;
- support.
Of all the parts listed, you'll need to purchase a high-quality sanding wheel. All other parts can be made by hand, as we'll discuss later.
Turning out a flange
 To fit an abrasive wheel onto a washing machine motor bushing, you will need a flange, since the shaft diameter is usually not the same as the diameter of the stone. If there is no factory flange of the appropriate diameter, then we make it ourselves. Take a piece of metal pipe with a diameter that will easily and securely press onto the motor shaft; a 32 mm diameter pipe is usually suitable. The steel pipe should be no longer than 150-200 mm; this will be enough to secure the grinding wheel to it.
So, on one end of the pipe, using a tap, we make a thread approximately twice the diameter of the circle. After this, the other end of the pipe must be thoroughly heated, for example with a blowtorch, and then inserted onto the shaft. The homemade flange can be secured by welding, if possible, or by drilling a bolt through both the flange and the shaft.
Important! The threads on the flange must be opposite the rotation of the washing machine motor shaft to prevent the sanding disc from slipping off. If the threads are cut incorrectly, the shaft rotation on the asynchronous motor will have to be reversed.
The transition piece from the motor to the grinding wheel is ready. Now we screw a nut onto the thread, then a washer. After the washer, we attach the grinding wheel, securing it with a washer and nut. Tighten the nuts securely; for added security, you can add another lock nut at the end.
Connecting the engine
For DIY sandpaper, the craftsman recommends using motors from Soviet-era washing machines like the Volga, Oka, or Vyatka. This is because their motors are powerful. Generally, a motor with a power output of around 200 W and a speed of 1000-1500 RPM is sufficient, although a 400 W motor with a speed of 3000 RPM can also be used to make a homemade sandpaper. However, the sandstone must be very durable, otherwise it will crumble at such speeds.
A very important step in making an emery wheel is connecting the motor to the power supply. This will require an electrical cord and plug. Connecting the motor from an automatic washing machine and the motor from a Soviet washing machine is slightly different. In a six-wire automatic washing machine motor, only two wires are required, going to the motor brushes and two wires from the stator. The remaining two wires are the tachometer wires.
To find these wires, use a multimeter. Measuring the resistance of the wires, we find the tachometer wires; their resistance is about 70 ohms, and set them aside. We determine the resistance of the remaining wires in pairs. Now connect one stator wire to the brush wire, insulating the connection with electrical tape. Connect the remaining two wires to an electrical cord with a plug at the end.
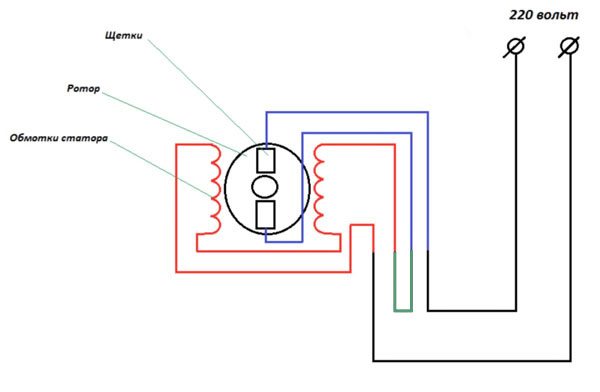
Important! This motor doesn't require any capacitor; it will start spinning immediately after being plugged into a power outlet.
To connect a motor from a Soviet washing machine, you need to determine which of the four wires are working and which are starting:
- We take a multimeter and apply the probe to one wire, and alternately apply the second probe
 to the remaining wires, as soon as the pair is found, we move the wires aside.
 - Then we measure the resistance of the second pair of wires.
- We select the working winding, in this case, this is the pair of wires whose resistance turned out to be lower.
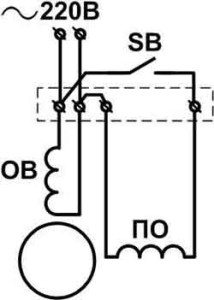
- Now connect the wires of the working winding directly to the electrical cord with a plug. You can leave it like this, but then to start the motor, you'll need to spin the grinding wheel by hand, and it will start to rotate. The doorbell button can be used as a trigger. How do you connect it to the circuit yourself? You need to connect one wire from the button to the working winding via a terminal, and the other to the starting winding. The diagram on the right shows how to connect a homemade grinder from a motor via a button, where SB is the button, OB is the working winding, and PO is the starting winding.
Please note: Do not use a capacitor as a starting device, as it will burn out the winding.
When working with electrical equipment yourself, be careful. If you're unsure of your abilities, consult someone who's comfortable with a multimeter and understands how to properly connect a homemade grinder to the power supply. You can also find video instructions on connecting a motor online or watch this video.
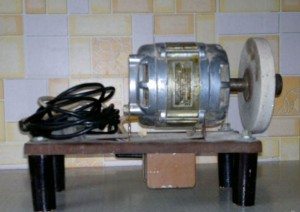
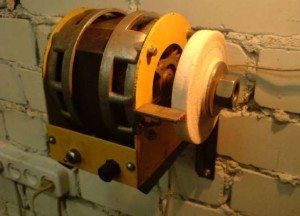
We are doing the installation
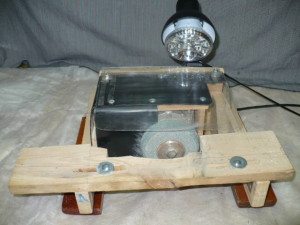 The final step in making the sandpaper is securing it to a flat surface, such as a workbench or woodworking table. You can also screw the sandpaper to an old, sturdy stool. The motor housing from a washing machine has mounting holes. Before screwing it to the table or stool, place a metal sheet underneath and secure it.
For safety, you can attach a metal arc over the sanding disc to protect it from flying particles during work. Additionally, It is imperative to wear safety glasses when working with sandpaper.
So, making a sandpaper from a washing machine motor is easy. Just be patient, read the instructions carefully, and watch the video. Besides sandpaper, you can make a homemade wind generator, a cement mixer, and other useful household items from the motor and other parts of the washing machine. This article explains how. What to make from an old washing machine.
Interesting:


1 reader comment
Add a comment
Headings
Washing machine repair


For buyers


For users


Dishwasher


Regarding this article by Kulibin, I advise using a 3/4 inch die and plumbing nuts of this size instead of a tap.