How to adjust the motor speed of a washing machine
 Adjusting the speed of a washing machine's motor may be necessary for any home DIYer who decides to repurpose a part from a used machine.
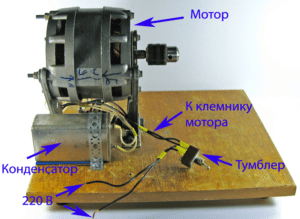
Simply connecting a washing machine motor to the power supply isn't very helpful, as it immediately reaches maximum speed. Many homemade appliances require increasing or decreasing speed, preferably without losing power. In this article, we'll discuss how to connect a washing machine motor and how to make a speed controller for it.
Let's connect first
Before adjusting the washing machine's motor speed, it must be connected correctly. Commutator motors in automatic washing machines have multiple outputs, and many novice DIYers confuse them and can't figure out how to connect them. We'll cover everything in order, and also check the motor's operation, as there's a chance it might be faulty.
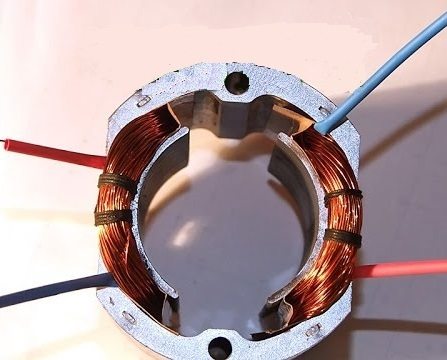
- First, take a washing machine motor, twist it around, and find the excitation coils or boots, which should have 2, 3, or more wires running from them. The boots look something like the one shown in the picture below.
- Take an ohmmeter, set the toggle switch to minimum resistance, and begin ringing all the outputs one by one. Our task is to select the two excitation coil outputs with the highest resistance. If there are only two, then there's no need to select anything.
- Next, you need to find the motor collector and brushes, from which 2 wires will also come. In this case, there will be only two outputs; if there are more, it means you mixed something up or one of the wires is simply torn off.

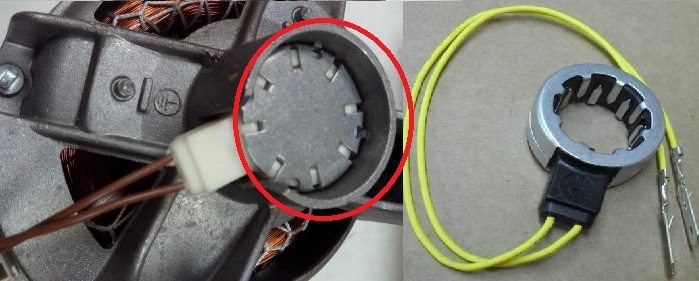
- The next group of outputs we urgently need to locate are the tachometer outputs. In some cases, the wires coming from the tachometer can be seen directly on the engine housing, but sometimes they are hidden deep within the housing, requiring partial disassembly of the engine to connect.
Please note! Tachometer sensors with two outputs can be easily tested with an ohmmeter. However, similar components with three outputs cannot be tested in either direction.
- Next, we take one wire coming from the collector and connect it to one of the coil wires.
- We connect the second collector wire and the second coil wire to the 220 V network.
- If we need to change the direction of rotation of the anchor, we simply swap the connected wires, namely, we connect the first wire of the collector and the first wire of the coil to the network, and connect the second wires to each other.
- We mark the wires of the coil, tachometer and collector with labels to avoid confusion and perform a test run of the engine.
If the test run was successful, meaning the motor accelerates smoothly without sticking or jerking, and the brushes are free of sparks, you can proceed to connecting the washing machine motor via the speed controller. There are many different circuits for connecting the motor via the speed controller, as well as for the controller itself. Let's look at two options.
Let's connect it via a voltage regulator
The simplest way to regulate a washing machine's electric motor is to use any voltage regulator (dimmer, drill switch, etc.). The idea behind this adjustment is that the motor is initially supplied with maximum voltage, causing it to rotate at maximum speed. By turning the dimmer switch, we decrease the voltage, and the motor begins to slow down accordingly. The connection diagram is as follows:
- we connect one wire of the coil with one wire of the armature;
- we connect the second wire of the coil to the network;
- We connect the second wire of the anchor to the dimmer, and connect the second output of the dimmer to the network;
- We perform a test run of the engine.
Let's test the motor's performance at minimum power. You can see that even at minimum power, the RPMs are impressive without load, but as soon as you lean a wooden block against the rotating shaft, the motor stops immediately. What's the conclusion? The conclusion is that this method of regulating the washing machine's electric motor's speed leads to a catastrophic loss of power when the voltage is reduced, which is unacceptable if you're planning to use the motor for some kind of DIY project.
Important! Observe safety precautions when starting the washing machine motor. Be sure to secure the motor before starting, and avoid touching rotating parts with your hands.
Our initial goal was to learn how to manually regulate the washing machine's motor speed with minimal or no power loss, but is this even possible? It's entirely possible; the wiring diagram would just be a bit more complicated.
Through the microchip
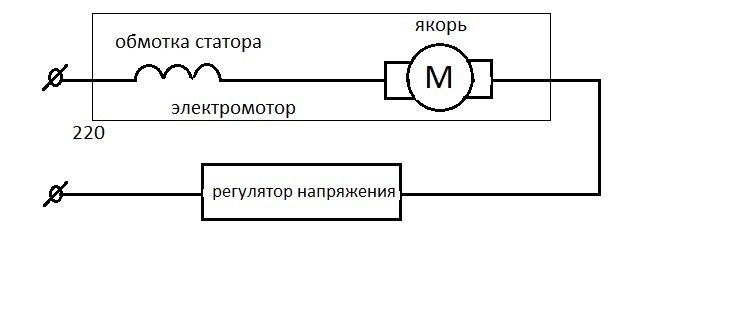
It's time to remember the tachometer and its outputs, which we found on the engine but set aside for now. The tachometer will help us connect the washing machine's motor and regulate its speed without losing power. The tachometer itself can't control the motor; it's only a proxy. Actual control must be carried out by means of a microcircuit, which is connected to the motor tachometer, winding and armature and is powered from a 220 V network. You can see the basic diagram in the figure below.
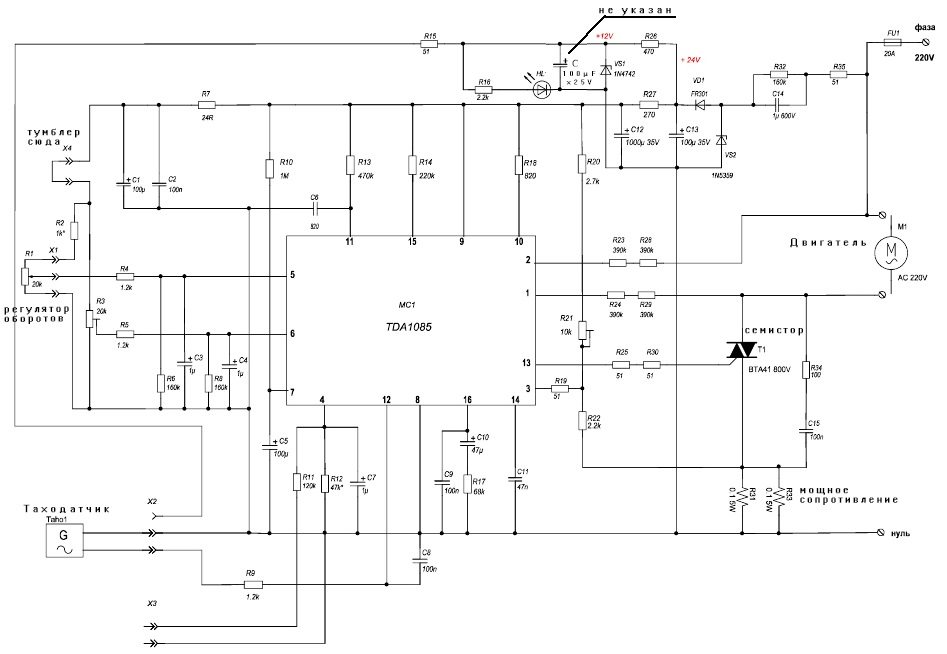
What happens to the engine when we connect it to the power grid via this microcircuit? Here's what happens: we can either start the engine manually at maximum speed, or we can turn a special switch to reduce the speed. We apply a sudden load to the engine by placing a wooden block under the rotating pulley. The speed drops for a split second, but then recovers, despite the load.
The thing is, the tachometer detects a drop in RPM due to the increased load and immediately sends a signal to the control board. The microcircuit, upon receiving the signal, automatically increases power, thus leveling the engine speed. A DIYer's dream, as they say, has come true. With this wiring diagram, you can make a washing machine motor. grain crusher and a wood splitter and many other useful things.
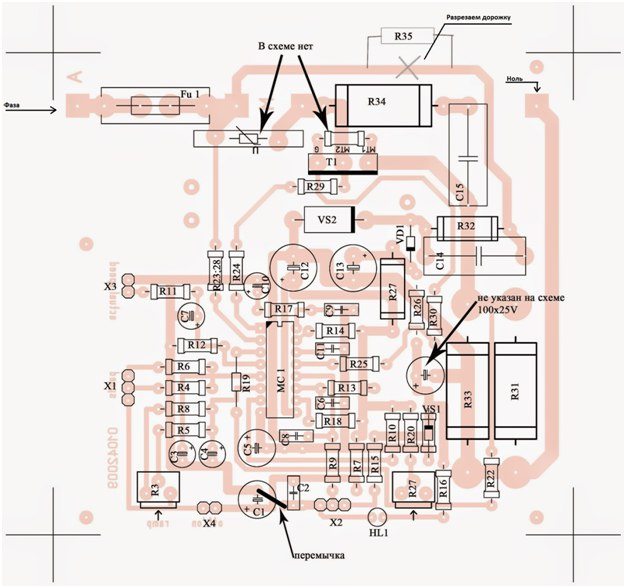
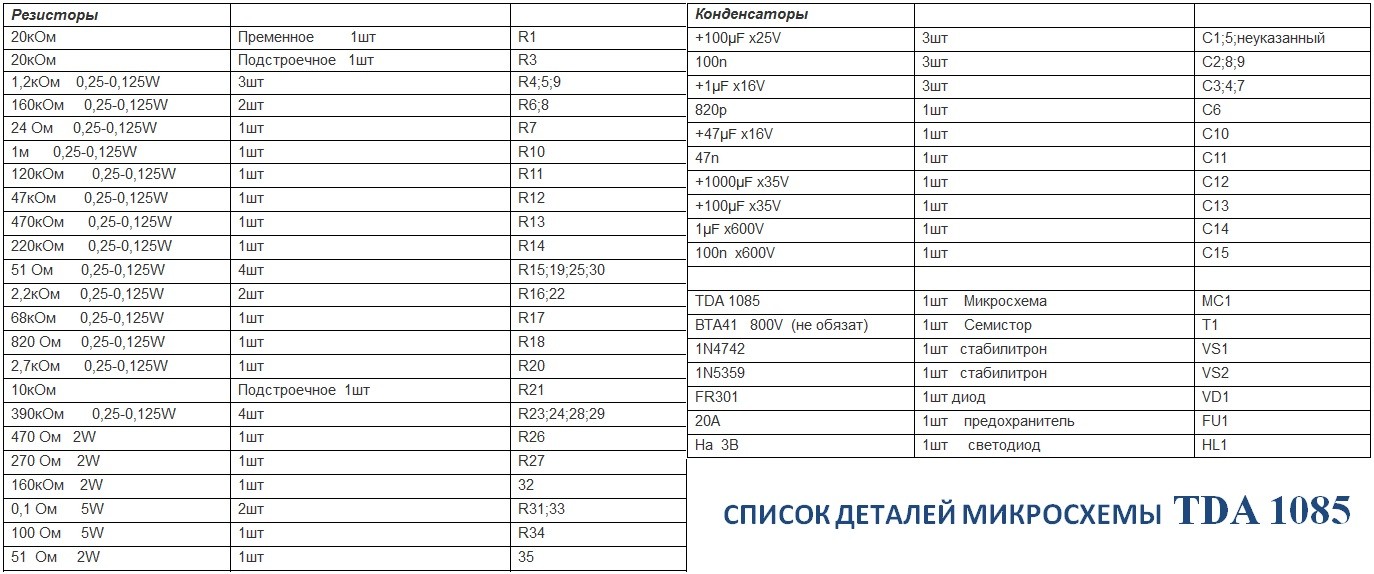
To wrap up our story, let's answer another reasonable question that readers may have: where can I find such a board? You can build one using the schematic and parts list included in this article, or you can order one ready-made from specialists. Fortunately, there are plenty of options available online. You need to look for the TDA 1085 circuit.
Interesting:


10 reader comments
Add a comment
Headings
Washing machine repair


For buyers


For users


Dishwasher


How to connect the original myr95-3m unit?
Hello, the arrows on the printed circuit board point to two components and say "Not in diagram." Should they be there? If so, what components and their values?
Why does the engine start jerking at low RPMs under load? The regulator is based on the TDA1085 microshaft.
Thanks for the information.
Hello, can I connect an asynchronous motor from a washing machine to this circuit? Thank you.
Can I connect a 200W dimmer to a 180W footswitch motor? Or will I need something more powerful, and will I lose power with these dimmers?
Where can I buy a complete board and how much does it cost?
Is it possible to regulate the speed with a resistor?
It's easier to use a potentiometer rather than a resistor.
Simple. You need an autotransformer.