Error 03 on an LG washing machine
 Thanks to the self-diagnostic system found in modern washing machines, users can more easily understand why the machine stopped working. Some homeowners may wonder what error code 03 means on an LG washing machine. In fact, such a code doesn't exist; instead, there's a fault code, OE, which is often misinterpreted due to carelessness. Let's figure out why this code appears on the display and how to restore the washing machine to its previous working order.
Why does this code appear?
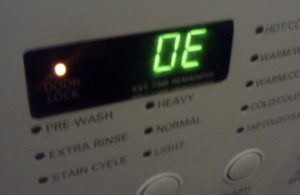
The designation is displayed on the device display after the program has finished running. The washing machine is giving an error. OE if the waste liquid has not drained from the tank within five minutes after the end of the wash cycle. It is not necessary that water will not drain at all; perhaps the rate of its removal from the system is simply much lower than the standard.
The washing machine drum must be completely emptied within the 5 minutes specified by the manufacturer after the end of the cycle.
What should you do in this situation? Experts see several possible causes for this problem:
- clogging of the waste filter and snail;
- kinking or crack in the drain hose;
- failure of the pump responsible for draining water;
- blockage in the sewer pipe;
- pressure switch malfunction.
The list of possible causes is quite long. To correct the situation, there's no other option but to inspect every element of the washing machine's drainage system and ensure the sewer system is not clogged.
Cleaning the filter element
It's best to start with the simplest thing: checking the drain filter. This element must be removed from the LG washing machine housing. Unscrewing the filter is easy – just grab it and turn it half a turn to the left. Pull the cover toward you. After removing the debris filter from the housing, you'll see water begin to flow out of the hole. This is why it's so important to place rags under the machine before starting work.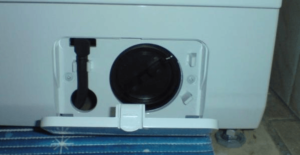
You can now proceed to cleaning the filter element. Remove any stuck-on hair, dirt, and other debris from the part. Then, rinse the part under running water. If limescale deposits are visible on the drain filter, a weak solution of citric acid will help remove them. To remove scale from the surface of the element, soak it for several hours in a small amount of water with 50 grams of lemon juice added. Any deposits will easily come off the surface of the part.
It's equally important to inspect the hole that opens after removing the element. This is the filter's volute. Use a flashlight and shine it into the area, removing any dirt, lint, or other debris that has accumulated within.
Take a small cloth and wipe down the inside of the opening, including any areas you can reach. Once cleaning is complete, replace the filter element and run a wash cycle. If the machine still displays the OE code, you'll need to look further.
We inspect the hose and check the sewer system.
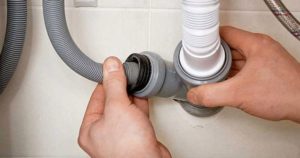 While cleaning the waste filter, you should also check the drain hose. It's likely kinked, preventing water from draining freely from the tank. Also, be sure to check how water drains from the apartment into the sewer system. If the problem also affects the drain from the bathtub, washbasin, or kitchen sink, the sewer pipe is clogged. You can try clearing the clog with specialized chemicals. If these attempts fail, call a plumber.
Make sure you didn't place the washing machine on the drain hose when installing it. A heavy machine will crush the hose, making it difficult to drain waste water from the tank. Another cause is a clog in the drain hose. Clear the area and see if the washing machine is repaired.
Is the pump working?
In modern washing machines, the drain pump can be accessed without disassembling the housing. This is possible on most LG models. To make the pump visible, follow these steps:
- de-energize the washing machine;
- disconnect the drain and water intake hose;
- drain the remaining liquid from the system through a waste filter;
- remove the detergent dispenser from the housing;
- cover the floor with a rag;
- Carefully lay the unit on its right side.
Most washing machine models don't have a bottom. The components underneath are easily accessible. In the event of an unforeseen repair, this design feature is a boon, as access to the drain pump is easy. Now it's time to check the pump.
The most common reason for the drain pump to fail is that it becomes clogged with various debris that has accumulated during the operation of the washing machine.
Therefore, don't immediately test the pump with a multimeter. In most cases, simply cleaning the pump of hair, dirt, and lint will suffice. The drainage system of automatic washing machines is designed so that most of the debris that gets into the drum eventually settles in the filter. However, even a small amount of dirt touching the pump impeller can cause the washing machine to malfunction. Repairing the drain pump follows the following procedure:
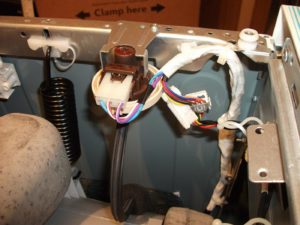
- Take a photo of how the wires leading to the pump are located and connected;
- disconnect the wiring from the part;
- Using pliers, loosen the clamps that secure the hose and pipe to the pump;
- remove the hose and tubes;
- take the pump with your hands and turn it 180 degrees to the left;
- remove the drain pump from the system.
Inspect the impeller for any hair or other debris, and be sure to clean the cavities. Use a flat-head screwdriver to pry up the latches and disassemble the pump housing. When checking the drain pump, examine the integrity of the internal mechanism, rubber seals, and remove any debris that has entered the pump cavity.
If visible defects in the drain pump are detected, a new part must be installed.
If it breaks or the impeller flew off, there's no need to replace the entire pump. You can find a plastic spinner at specialty stores and install it in place of the faulty part. Once the drain pump repair is complete, run a standard wash cycle and check the washing machine for proper operation.
Pressure switch
 What should you do if the previous steps haven't helped? The water level sensor is likely malfunctioning. To verify the pressure switch is working properly, disconnect the water intake hose. Access the sensor as follows:
- unplug the washing machine;
- remove the top cover of the unit housing (to do this, unscrew the two bolts holding it).
The pressure switch on LG models is located on one of the walls of the washing machine, very close to the top. Once you've located the water level sensor, disconnect the inlet hose from it, which is secured with a clamp. Attach a special tube of the appropriate diameter, which you should have prepared in advance, to the freed-up space. Blow lightly into it. If the pressure switch contacts are working, you'll hear a distinct clicking sound. The number of clicks directly depends on the model of the machine and how many water levels the system has for different modes.
All hoses and tubes should also be inspected for integrity. If any defects are found, the tubes will need to be replaced. The pressure switch relay contacts should be carefully inspected; if they are dirty, be sure to clean the connectors. If the contacts are sticking, the pressure switch will need to be replaced entirely.
Once finished, reconnect the inlet hose and secure it with the clamp. Then replace the housing cover and test the machine. After taking all the necessary steps, you should definitely be able to fix the OE error. To prevent this problem, periodically clean the debris filter and thoroughly inspect clothes for foreign objects in pockets before loading them into the drum.
Interesting:


Readers' comments
Headings
Washing machine repair


For buyers


For users


Dishwasher


Add a comment