Error 2 in Haier washing machine
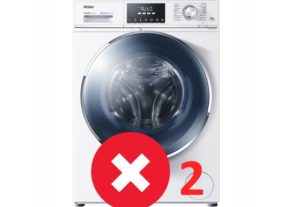 The most common error code found on Haier washing machines is ERR2, or simply 2. Sometimes this error can be cleared by simply restarting the machine. However, in most cases, this is ineffective. What should you do if your Haier washing machine displays error 2? Is it possible to fix the problem yourself, without professional help?
Meaning of the code
To begin repairs yourself, you need to figure out what exactly happened to your "home helper." Error 2 is displayed on the screen if the water from the tank has not drained within the standard four minutes. There may be several reasons why it is impossible to remove water from the system:
- clogged or faulty pump;
- problems with the drain hose;
- contamination of the waste filter.
Experts recommend starting any washing machine repairs by checking the waste filter. This element often becomes clogged and prevents water from draining properly. The waste filter is located at the front of the washing machine, in the lower right corner behind a special door.
Unscrew the filter and carefully inspect the drain pump impeller through the resulting hole. Sometimes hair or lint gets caught in the impeller blades, causing it to stop spinning. Stagnant water in the drum can be caused by a clogged or kinked drain hose. The pump itself may also be faulty. To fix error 2, you'll need to check many components of your washing machine, so make sure you have some time to spare.
Cleaning the trash filter
We've decided what to do first. Let's check the debris filter. The element on Haier washing machines is located behind a small hatch on the right side, in the lower corner of the front panel. To check the filter element, follow these steps: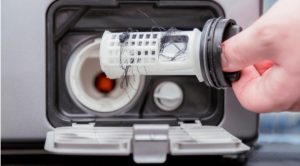
- Unplug the washing machine and turn off the water supply. This is necessary for safety reasons. You don't want to get electrocuted or flood your apartment while working.
- Open the door behind which the dust filter is hidden. The door is usually secured with a latch that can be easily opened using a flat-head screwdriver or a knife with a rounded tip.
- Line the floor under the machine with rags. As soon as you begin to unscrew the dust filter, water will flow out of the hole. You can slightly raise the machine, place a basin under the machine, and then unscrew the filter element to allow the liquid to drain into the container.
- carefully unscrew the filter and remove it from the washing machine housing;
- Clean the filter surface. First, remove any large debris—hairballs, foreign objects, threads, etc.—and then, using a regular sponge, scrape off any remaining deposits. Then, rinse the element with a good stream of warm water.
Avoid immersing the filter in water that is too hot, as the plastic may become deformed and the rubber seal may lose its seal.
Be sure to look into the resulting hole and clean out any accumulated debris. Use a rag or sponge to wipe away any dirt from the cavity walls. Remove any hair that has gotten caught in the impeller cavity. Spin it; the impeller should rotate freely. If you shine a flashlight inside, you can inspect the pump as well. Remove any debris that has slipped into the pump.
After clearing any blockages and removing any debris, replace the filter. Tighten the element cap clockwise. Then, turn the shutoff valve and plug in the washer. Run the "Rinse" cycle without loading any items. This is necessary to check for leaks from the filter. If no water leaks, the door closes and latches.
Let's check the pump at the same time.
As mentioned earlier, when cleaning the waste filter, it's a good idea to inspect the pump as well. If you shine a flashlight into the volute, you can see the impeller. Use a long stick to check how freely the impeller rotates. If it doesn't rotate but simply wobbles, the drain pump is faulty and unable to pump water. Broken cavities of the impeller and other damage indicate that the pump is out of order.
Any debris that has wound around the moving part of the drain pump can be removed without disassembling the washing machine, but directly through the snail cavity.

If a full pump diagnostic is needed, you'll need to lay the washing machine on its side and peer inside through the bottom. The drain pump can be tested using a special device called a multimeter. The tester's probes are connected to the pump terminals. If no readings are displayed on the device's screen, the pump is faulty. The pump can also be disassembled to inspect for internal damage and blockages.
Remove and clean the drain hose.
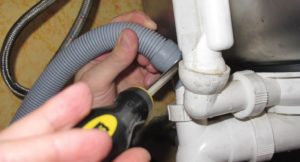 Error code 2 is often displayed on a Haier washing machine due to a clogged drain hose. To disconnect the hose from the pump connector, lift the washing machine body. Loosen the clamp, and then remove the end of the drain hose. The other end is attached to a trap or directly connected to the sewer system. Disconnecting this end of the drain hose is straightforward.
Next, you'll need to clean the hose. Blockages can be removed by rinsing the hose cavity under running warm water. It's important not to use boiling water, as this could damage the material. There are many specialized products available in stores designed to combat deposits on the inside of hoses. You can use liquid, powder, or tablet solutions.
Before using chemicals, be sure to read the instructions for their use.
If the clog is particularly stubborn, you can clear it using a long, thin metal rod. Bend one end of the rod into a ring with pliers. Insert the rod into the hose and carefully begin clearing the clog. Then, rinse the drain hose with water.
It's possible that the problem isn't even a clog, but a kinked or improperly positioned drain hose. Therefore, before disconnecting the hose, be sure to check that it isn't twisted or dislodged. If the hose has cracks or other damage, it should be replaced with a new one to avoid leaks. Error code 2 can be resolved by yourself if you thoroughly clean the drainage system and, if necessary, replace damaged elements.
Interesting:


Readers' comments
Headings
Washing machine repair


For buyers


For users


Dishwasher


Add a comment