Siemens Washing Machine Error Code E18
 If your Siemens machine has a display on the control panel, diagnosing the problem will be easier: the system will automatically display a special code. Knowing its decoding can help narrow down the problem and begin repairs faster. For example, error E18 in a washing machine indicates a drainage problem. We'll cover the possible causes of the problem in more detail in our article.
The meaning of the specified code
The error codes provided by the Siemens washing machine system are standard across all models, making them easy to decipher. Again, E18 indicates a problem with the drainage system. These include the following "sore points":
- clogged trash filter;
- failed pump;
- contamination of drainage channels, hoses or pipes;
- faulty pressure switch;
- malfunctioning control module.
 Often, malfunctions are caused by broken small parts, loose contacts, or loose components. These are all consequences of improper use of the machine, such as coins left in pockets, torn buttons, or hair stuck to clothing. Foreign objects from the drum get into the tank, filter and hoses, hindering water circulation and rotation of the pump impeller.
Most of the listed sources of the E18 error can be replaced, adjusted, and repaired without the need for service personnel. If you want to troubleshoot the problem yourself, begin the diagnostics yourself.
Where to start checking?
The first thing to do when the E18 error occurs is to prepare the machine for diagnostics. Stop the wash cycle by pressing the "Stop" button, unplug the machine, and turn off the water supply. Next, disconnect the drain hose and drain any remaining liquid. Then, move the machine away from the wall or remove it from the cabinet and begin a sequential check for all possible sources of the problem. Follow these steps in order.
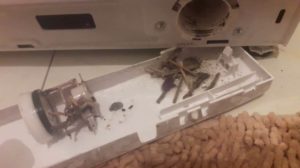
- Check the pump filter. Wait 15-20 minutes for the water heated during the wash cycle to cool, then look at the base cap in the lower right corner of the machine. Locate the small drain hose, pull it toward you, and unscrew the plug. Once the accumulated liquid has drained, remove the filter cap and clean it.
- Carefully inspect the filter housing for signs of damage, such as darkening, traces of burning, or rust. Next, examine the integrity of the existing pipes and the pump impeller.
- We blow out the drain hose, checking for blockages.
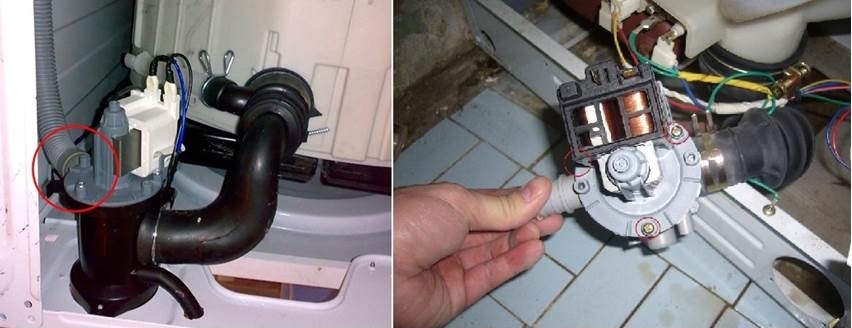
If there is heavy contamination, hairballs, scale or other foreign objects, it is necessary to thoroughly clean all parts. It is recommended to feel the hoses and pipes, and then tighten all clamps and clamps. If there is obvious damage, we change the pump.
Once all manipulations are completed, restore all connections, remembering to ensure reliable fixation and tightness.
Let's check the level sensor
Often, solving the E18 problem requires repairing the pressure switch. Doing this yourself isn't difficult. Just remember to follow safety precautions and disconnect the circuit breaker from all utilities. Then, begin checking the water level sensor: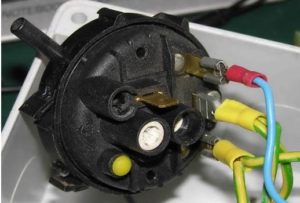
- unscrew the two upper screws on the back wall of the case;
- we move the top cover, gently tapping it away from us;
- we find a tube with a diameter equal to the pressure switch fitting;
- loosen the clamp on the pressure hose and disconnect it;
- we insert a tube into it and slowly inhale air into it;
- listen carefully: if there were 1-2 clicks, it means the contacts worked.
We finish the testing with a visual inspection. We probe the channels for blockages and examine the device itself for integrity. If clogged, we flush the holes with a stream of water, and if damaged, we replace the pressure switch.
Another, more reliable way to check the water level sensor is to test it with a multimeter. Set the device to resistance measurement mode, connect the probes to the contacts, and read the display. Fluctuating readings indicate the pressure switch is fully functional, while a lack of change indicates a malfunction. Repairing the sensor won't fix the problem; a complete replacement is necessary.
If both the pump system and pressure switch pass the test, the problem lies in the control module. DIY repairs to the washing machine's electronics are strongly discouraged, as there's a high risk of making the problem worse. It's best to stop the diagnostics and contact a service center.
Interesting:


Readers' comments
Headings
Washing machine repair


For buyers


For users


Dishwasher


Add a comment