Washing machine drain hose overview
 It's no secret that when maintaining your washing machine, you should clean and inspect not only the drain hose, inlet hose, and debris filter, but also the hoses. Washing machine hoses are located inside the machine body and hidden from the user's view, so problems with the hoses are often discovered when they start leaking. This is unavoidable, so we've decided to dedicate this article to repairing and maintaining various washing machine hoses. But first, let's look at the different hoses used in washing machines.
Location
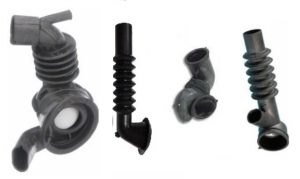
In a modern automatic washing machine of standard design, three types of pipes are installed:
- water inlet pipe;
- dispenser pipe;
- drain pipe.
The water inlet pipe connects the washing machine's inlet valve to the detergent drawer or dispenser. The trick is that water from the water supply, passing through the inlet hose and valve under pressure, inevitably enters the inlet pipe. Passing quickly through this short pipe, the water rushes into the dispenser, dissolving and carrying away detergent.
Where does the powder and water mixture go next? The soapy water then flows from the detergent drawer into the dispenser tube, which connects the detergent drawer to the tank. So, the soapy water, in which the clothes are washed, flows into the washing machine's drum. What next?
The washing machine then washes the laundry, completes the cycle, and needs to drain the dirty water from the drum to rinse the laundry with clean water. The control module activates the drain pump. Dirty water from the drum flows through a special opening into the drain pipe, passes through it and the pump, and is then discharged into the drain hose and from there into the sewer. That's it.
It turns out that tap water flows all the way through the depths of the washing machine, passing through three pipes. Any of these hoses is at risk and can fail at any time. Specifically, a layer of limescale builds up inside the water inlet hose, which over time can clog the hose, and the water pressure can simply rupture the soft rubber.
Please note! Washing machine hoses are flexible and durable, but over time they harden, crack, and eventually begin to leak.
In addition to limescale, deposits from detergents can also harden and form in the dispenser hose. The drain hose is the worst affected. The drain hose is the most prone to failure, as it handles dirty water and hazardous contents from the tank.
- pins;
- bra underwire;
- buttons;
- coins;
- toothpicks and so on.
So, if a washing machine repair technician suspects that one of the pipes has failed and is leaking, the drain pipe is the first to come under suspicion. Calling a technician to your home, as well as servicing your washing machine's hoses, is quite expensive these days. It's better to do the job yourself, and we'll show you how to clean and repair your washing machine's hoses.
Let's prepare your washing machine for repair
Cleaning and repairing a washing machine's water hose requires disassembling the machine, as all the hoses are located inside the housing. To ensure disassembly and avoid damaging vital parts, it's essential to carefully prepare the machine for repair. What do we do?
- We shut off the water supply to the washing machine.
- We disconnect the washing machine from the electricity, water supply and sewerage system, and disconnect the hoses.
- We spread a large cloth on a free area of the floor.
- We take out the powder receptacle.
- We unscrew the trash filter and drain the remaining water from the tank through the emergency drain hose, which is located next to the trash filter.
Please note: Since you're going to remove the dust filter anyway, be sure to clean it of any dirt.
- Carefully move the washing machine to a clear area of the floor, directly onto the rag.
- Carefully tilt and place the washing machine on its side wall.
At this point, we can consider the washing machine's preparation for repair complete. We performed all these steps to, firstly, ensure ease of use of the washing machine, and secondly, in order to remove the remaining water from the cuvette and tank, Because there's a risk that water will flood the control module and damage the washing machine. That's it. Now all we need to do is grab a flat-head screwdriver, a Phillips-head screwdriver, and some pliers, and we can repair the drain, inlet, and dispenser hoses.
We are repairing the water inlet pipe
To determine if the filler neck is working, you need to access it. The easiest way to do this is through the top cover of the washing machine. First, unscrew the two screws holding the top cover in place, then gently push the cover toward the back of the washing machine with your hands. Then, lift the cover and remove it.
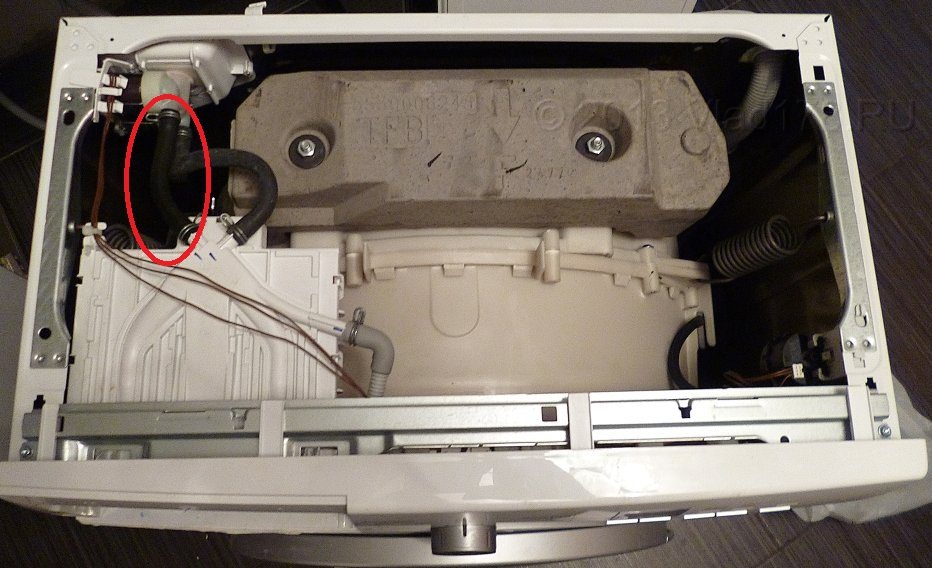
Right in front of us, in the upper left corner, we see a rubber hose running from the fill valve to the powder receptacle body. This is what we need. The ends of the hose are clamped at both ends with metal clamps. Let's remove the hose for a thorough inspection.
- Using pliers, loosen the clamps and move them toward the middle of the hose. We'll be reusing the clamps, so be careful not to break them.
- Very carefully, but with force, pull off the filling pipe from one side of the valve and from the outlet of the powder receiver on the other.
- We inspect the filler pipe for blockages and damage. If there are any blockages, a plastic brush will clean them out; if there are none, rinse it and put it back in place.
- If there is damage, purchase an original inlet pipe that fits your specific washing machine model, attach clamps to it, and install it in place.
Important! If the hose has no visible damage, but has become very stiff and cannot be flexed, it should be replaced with a new one.
Dispenser pipe repair
The dispenser hose may require a thorough cleaning and repair. Who better to clean it than you, especially considering you've already declined professional services? Let's figure out where to find the dispenser hose.
In many washing machine models (for example, LG washing machines), the dispenser hose can be removed in the same way as the water inlet hose through the top cover. However, in some cases, it can only be accessed by disassembling and removing the front panel of the washing machine. You can read about how to do this in the article. Disassembling a washing machineWe won't go into detail on this point. So, what do you need to remove the dispenser hose?
- We unscrew the screw clamps holding the pipe on both sides.
- Carefully disconnect the pipe from the dispenser on one side and from the tank on the other.
- We inspect the pipe for blockages and damage and, if necessary, replace it with a similar one.
In theory, it all seems simple. But in practice, accessing the screws holding the clamps can be tricky. Also, keep in mind that many cars have a flow-through filter mesh on the filler neck. Often, when removing a pipe, the mesh falls out, and when installing a new pipe, people simply forget to put it back - be careful. This mesh is necessary and it is better to put it back in place after cleaning is completed.
We repair drains
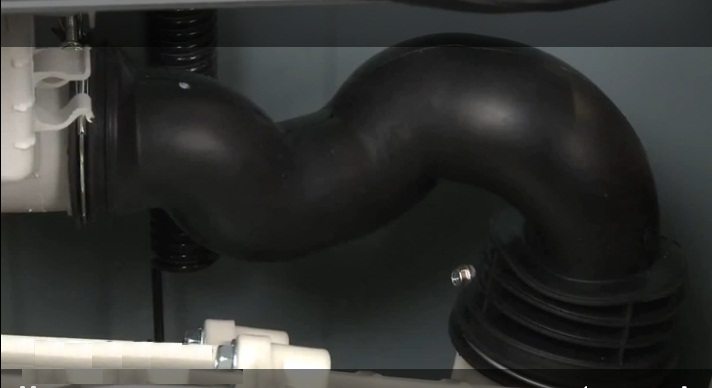
Statistically, the drain hose needs to be cleaned and inspected most often. It can be accessed through the bottom of the washing machine. On open-bottom models, the drain hose protrudes outward; simply tilt the machine onto its side and the hose will be within easy reach. If the washing machine has a drip tray or bottom cover, you'll need to remove it first, and then you'll have access to the hose in the same way.
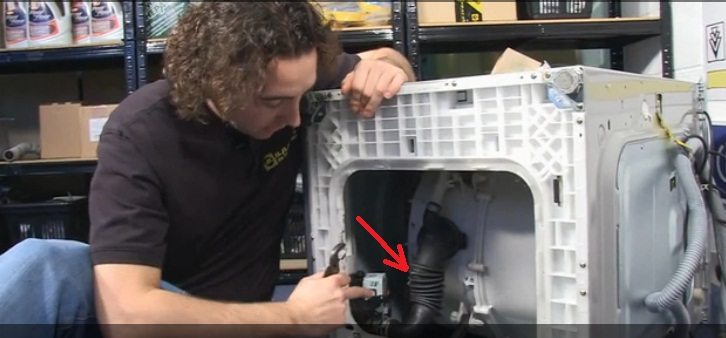
The drain pipe has three connection points: pump, tank and pressure take-off hose. Our task is to loosen or press the clamps holding the hose at all connection points, and then simply pull it aside. If the hose is in good condition, use a special brush to clean it. The brush will thoroughly clean it, and then all that remains is to reinstall the element. If the hose is worn or damaged, it must be replaced with a similar one, installing it on the old clamps.
Note! A citric acid solution will clean the hose effectively. Soak 100 grams of citric acid in 2 liters of water, then soak the hose in the solution for 2 hours. Then remove the hose and rinse it under running cold water.
Finally, let's discuss who can clean your washing machine better than you. The answer is obvious: an experienced technician. However, their services are quite expensive, and cleaning requires regular maintenance, including cleaning the hoses. We've explained how to install, remove, and clean the main hoses of your washing machine, and we hope you find this information helpful. Good luck!
Interesting:


Readers' comments
Headings
Washing machine repair


For buyers


For users


Dishwasher


Add a comment