How to connect a washing machine drain hose to the sewer
 How do you connect a washing machine drain hose to the sewer? It seems simple—just plug it in—but it's not that simple. Incorrectly installing a washing machine drain hose can lead to a host of problems down the road. Even with such a simple task, you shouldn't neglect the simple rules for connecting a washing machine, which we'll discuss today, given that there are quite a few ways to do it.
How to connect?
There are various ways to connect to the sewer system and organize the wastewater drainage of a washing machine. The connection depends on a number of factors:
- depending on how close the sewer drain is to the washing machine body;
- is there a connection point within reach at all;
- at what height and at what angle relative to the washing machine body is this point located;
- What other appliances will need to be connected to the sewer system along with the washing machine, etc.
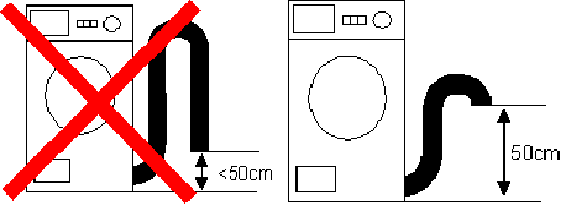
It's crucial to consider the angle of the drain hose relative to the washing machine. If the hose is positioned incorrectly, a "siphon effect" will occur, causing water from the drain pipe to flow back into the washing machine.
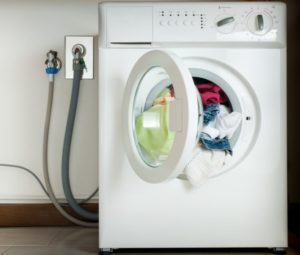
 Based on the above factors, there are three main ways to organize the drainage of waste water for a home assistant. Firstly, you don't need to install a drain at all if you just run the drain hose into a nearby plumbing fixture, such as a bathtub, sink, or even a toilet.
Secondly, the washing machine can be connected to the side outlet of the trap. This outlet is ideal for attaching the drain hose to it and forgetting about the problem once and for all. Thirdly, the washing machine's drain hose can be secured with a clamp after inserting it into a branch of the sewer pipe – it's cheap and easy, and most importantly, there's no need to buy a special trap with an outlet under the sink. We'll discuss these three drainage methods in more detail later, but for now, let's focus on the important nuances that can affect the quality of the drain.
What else matters?
Why are we talking about drainage quality, and what difference does it make what kind of sewer connection we choose? The main thing is to do everything relatively correctly, and then it doesn't matter. This is the opinion of many people who try to connect their automatic washing machines to the water supply and sewer system themselves, thereby unwittingly shortening the life of their "home helper." What exactly are we talking about?
Let's explain this with a specific example. We're connecting two identical automatic washing machines to the sewer system. The first machine is located nearby, 1 meter from the connection point, and we're connecting it using the included 1.5 meter drain hose, following all the instructions. The second machine is located 2.4 meters from the connection point to the sewer pipe or trap; we're connecting it using an additional 3 meter drain hose.
Both washing machines have been in use for seven years. The first washing machine operated without a single problem during this time, while the second's drain pump was replaced twice: the first pump broke after four and a half years, and the second after seven years. A "debriefing" revealed a pattern that many have assumed, but is nonetheless intriguing. The longer the drain hose of the "home helper", the more often the pump will break down, since during operation it will experience loads exceeding the design ones.
Place the washing machine as close as possible to the point where it is connected to the sewer.
 The leveling of the washing machine is also crucial, as this affects the lifespan of the pump, motor, hose and pipe connections, and electrical wiring. It's crucial that the washing machine not only be level but also rest on a flat, solid surface that won't sag or become loose from constant vibration over time.
Various modern accessories are also important, as they simplify the process of connecting the washing machine to the sewer system and further protect it from certain risks, primarily the "siphon effect." By this, we mean drain hoses with a non-return valve. This valve is specifically designed to prevent sewage from flowing back into the washing machine under any circumstances, while allowing it to drain completely freely. You can read about this device in the article. Check valve for washing machine.
Consumables and tools
Before installing your washing machine, including connecting it to the sewer system, you need to gather all the tools and materials you'll need for the job. This way, you won't have to run to the store for a clamp or jumper. So, let's start with the tools.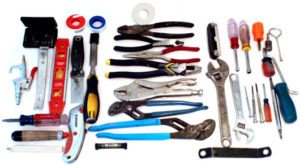
- Large and small adjustable wrench.
- Screwdrivers (flat and Phillips).
- Device for cutting plastic pipes.
- Pliers.
- A sharp knife.
- Roulette.
- Construction level.
The tool kit isn't extensive. It's immediately clear that the entire list can easily be found in any pantry. If you don't have a tool for cutting plastic pipes, you can use a regular hacksaw instead. Now let's look at the materials.
- A drain hose of the required diameter and length.
- Plastic sewer pipe and tee for it.
- Jumpers and clamps.
- Check valve.
- Automotive or plumbing sealant.
- Winding.
- Sealing rings and gaskets.
Before purchasing small consumables such as O-rings and gaskets, calculate how many you will need.
No connection
Now let's talk about how to properly connect our washing machine to the sewer system. We'll start with the simplest drainage option, which, paradoxically, doesn't require connecting the washing machine to the sewer pipe. Let's talk about that.
This method is good for lazy people, since it does not require many materials and tools. And the time spent will be minimal. However, certain conditions must be met.
- A sink, bathtub, shower stall with sufficiently high sides, toilet or bidet should be located near the washing machine body at a suitable height.
- There should be a way to secure the drain hose. Why secure it? To prevent it from accidentally popping out of the fixture when pressurized water rushes from the washing machine's tub through the hose and into the drain of a sink, bathtub, etc.
- People using plumbing fixtures should not be squeamish, as they will have to endure some inconveniences that will arise due to this arrangement for draining water from the washing machine tank.
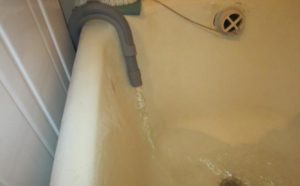
To set up drainage this way, you need to lower the machine hose into the bathtub, sink, toilet, etc., without straining it. Create an S-shaped bend in the hose. Secure it to the wall of the plumbing fixture so it doesn't dangle freely, and then test it. If the drainage is normal, you can leave everything as is; the job is complete.
Through a siphon
This installation method is unique in that we connect the washing machine's drain hose not to the sewer pipe or its branch, but to another plumbing component—the sink's drain trap. Modern sink traps include a special outlet for connecting the washing machine, which we'll use.
There are siphons with two outlets to connect a washing machine and a dishwasher at the same time.
The basics of connecting a washing machine via a siphon are as follows. Install the siphon and check how the water drains through the sink drain hole, making sure there are no leaks. The siphon can be easily installed yourself without any tools. If you encounter any problems, you can read the article. Washing machine siphon – installation and connectionNext, we connect the drain hose to the side outlet of the siphon, remembering to seal the joint. The hose must be bent into an "S" shape; if this is not done, the machine will freeze in the middle during the first wash.
Directly into the sewer pipe
You can also connect the washing machine to a nearby sewer outlet. To do this, you'll need to install a similar outlet. Here's how.
- We purchase a tee for the sewer pipe.
- Using a pipe cutting tool, we cut the plastic sewer pipe.
- We install the tee and seal the joint.
Now, the drain pipe outlet is set up. In this case, it's crucial that the outlet be located at least 40 cm above the floor. Insert the end of the drain hose into the drain pipe outlet and seal the connection. Secure the connection with a clamp to prevent the pipe from accidentally popping out under pressure and flooding the floor. Bend the hose into an "S" shape and secure it to prevent it from dangling.
In conclusion, connecting a washing machine to the sewer system is truly easy if you follow the simple instructions that have long been formulated by experts. You can do it too. Read this article and get started. Good luck!
Interesting:


Readers' comments
Headings
Washing machine repair


For buyers


For users


Dishwasher


Add a comment