Connecting the motor from a Bosch washing machine
 If your washing machine breaks down but the motor remains intact, don't rush to throw it away – some parts, such as the motor itself, can be repurposed. This is a useful household device that, in the right hands, can be turned into an electric sander or a grinder. All you need is some imagination and a good understanding of the motor's design. We'll explore how to connect a Bosch washing machine motor to power for future inventions. We'll explain all the details and show you diagrams.
Is a detailed diagram required?
Having come up with a "second life" for the Bosch washing machine motor, you can begin the conversion. The first step is to understand how the motor is connected to the electrical circuit. Experimenting here is dangerous: it is better to start with theory and carefully study the electrical circuit of the device. It looks like this:
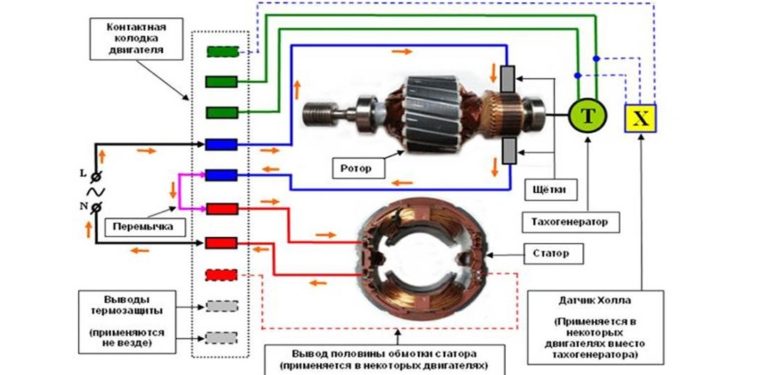
Before connecting the motor, study the electrical circuit diagram and review safety precautions for working with electronics.
After analyzing this wiring diagram, any questions should be clear. It will become clear where to connect the numerous wires coming from the engine and how to set up external power. With this cheat sheet, getting your new device up and running won't take long.
Let's deal with the wires
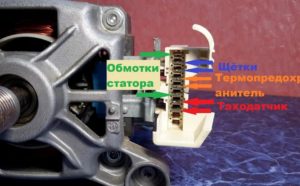
The difficulty of using a motor outside of a washing machine is that the abundance of wires can be intimidating and confusing. However, a careful study of the wiring diagram is usually enough to understand the motor's operation and properly route the wires. Not all the wires will be needed for the conversion.
The following recommendations will help you finally understand the wires:
- the first pair of left wires (if you look at the motor from the front) is needed to connect to the tachogenerator, which controls the rotation speed of the device, and is not used for most homemade products;
- When connecting the engine, the rotor and stator wires are mainly used;
- the wires from the stator are painted red and brown;
- Rotary wires have a gray or green tint;
- the motor is connected via 4 wires: two stators and two rotors;
- When running on mains power, the engine does not need a starting capacitor or starting winding.
In order for the engine to operate directly from the electrical network, it is necessary to establish a connection through the rotor and stator wires.
To avoid errors, all engine wires must be checked with a multimeter. Set the tester to ohmmeter mode, touch one probe to the conductor, and use the other to find the pair. Measure the resistance immediately. The wires going to the tachogenerator will show about 70 Ohms - you can safely move them aside.
Let's get started with the connection
Once the wire pairings are determined, you can begin connecting them. Prepare the insulation and splicing material. This must be done with extreme care, using the following diagram as a basis:
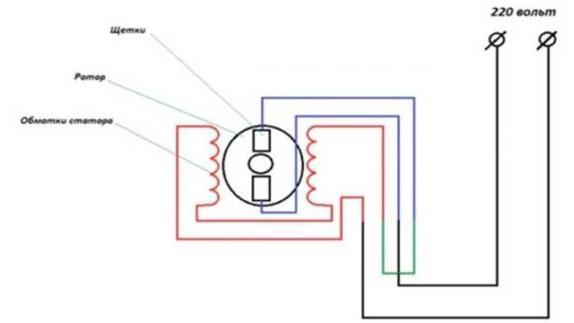
Based on this diagram, we proceed as follows:
- we connect the end of the stator winding and the rotor brush;
- we make a jumper (in the picture it is indicated by a green line) and insulate it;
- we supply 220 volts to the end of the rotor winding and the brush wire;
- We evaluate the performance of the device.
If you need to change the motor's rotation direction, you'll need to adjust the circuit. You'll need to jumper the other wires and also rewire the rotor brushes. The modified circuit will look like this:
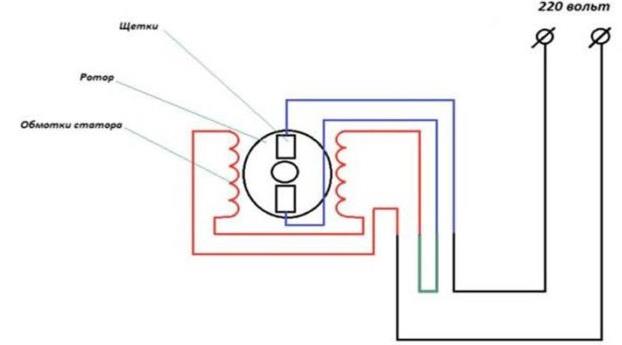
A properly turned on motor will begin to spin. It's important to understand that washing machine motors are highly powerful, so extreme caution is required. Ensure secure mounting and your own safety are paramount. A faulty motor will not operate.
Interesting:


Readers' comments
Headings
Washing machine repair


For buyers


For users


Dishwasher


Add a comment