How to change a bearing in an Atlant washing machine
 The need for washing machine repair can arise quite unexpectedly. It doesn't matter what brand it is, as any machine can break down, including those from the Belarusian company Atlant. Bearing failure is one of the most common problems. We'll discuss how to properly replace them yourself and what difficulties may arise below.
How to tell if a bearing is faulty
You can tell if the bearing is broken by a specific sound when the washing machine is running; it sounds more like a knocking noise that gets louder during the spin cycle. In addition, if you try to rotate the empty drum by hand, you can feel some play. If it is there, then it is 100 percent that the bearings are broken and need to be replaced.
Replacing this part is unavoidable, as tank wobble can lead to more serious damage and costly repairs. Bearing replacement can be done yourself if the machine's tank is detachable.
Please note! This type of repair isn't particularly complicated; just follow the instructions and do it carefully.
Preparatory work
When planning to replace bearings at home, it's important to be well prepared. Choose a convenient location for the repair. Ensure access to the washing machine from all sides, having first disconnected it from the power supply, water supply, and sewer system.
Then gather your tools, you will need: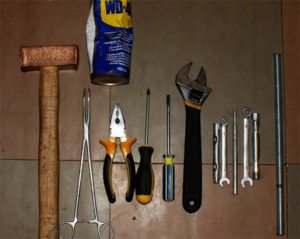
- socket and wrenches 12-19 mm;
- Allen keys;
- hammer and blunt chisel;
- Phillips and straight screwdriver.
In addition to the tools, also prepare:
- new bearings, preferably original, but Korean-made ones are also acceptable, they are more expensive, but the quality is better than Russian ones;
- gland;
- special grease for bearings and seals;
- WD-40 penetrating lubricant;
- dry, clean cloth.
We take out the tank with the drum
In the Atlant washing machine, as in many others, the drum is accessed from the top of the machine. The procedure is as follows:
- we take out the powder receptacle;
- remove the top cover;
- unscrew the front panel;
- unscrew and remove the counterweight;
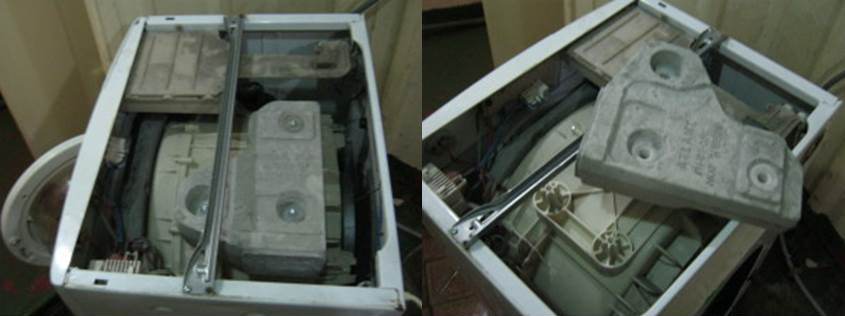
- After unscrewing the screws and disconnecting the water supply hose, we remove the compartment for the powder receptacle;
- disconnect the pipes from the tank;
- remove the back cover of the machine body;
- we disconnect the hose from the tank and the wires from the heating element and the engine;
Important! To avoid mixing up the wires, you can mark them with a marker or take a photo. This will ensure everything is connected correctly during assembly.
- unscrew the shock absorbers;
- we put the control unit aside;
- unscrew the drain hose and water supply valve;
- remove the cuff;
- Now, carefully grasping the springs, we remove the tank from the car through the top.
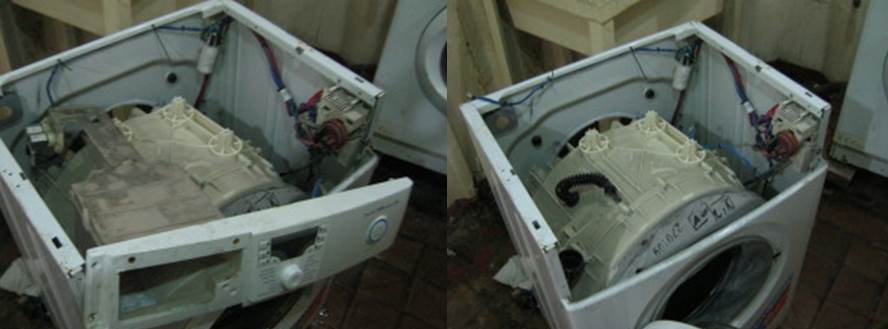
We are making a replacement
All that's left to do is disassemble the tank and replace the drum bearings. Follow these steps:
- carefully unscrew the counterweight and remove it;
- we unscrew the screws holding the front part of the tank;
- now turn the drum over with the pulley facing up, unscrew the central bolt and remove the pulley with the belt;
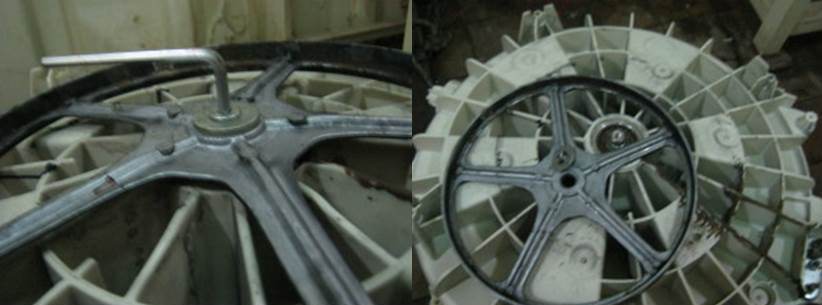
- we take out the drum with the sleeve from the tank body;
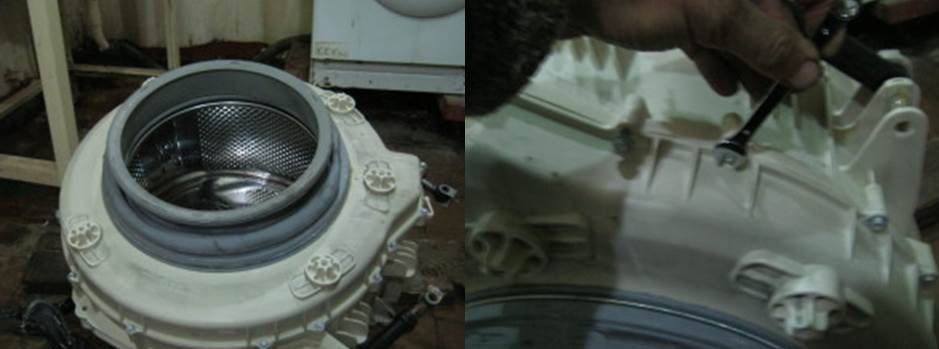
- then, using a chisel or a wrench with a head and a hammer, knock out first the inner bearing, and then the outer one;
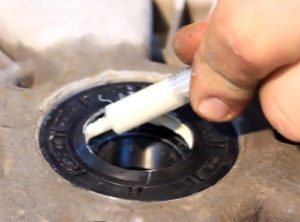
- Once the bearings are removed from their seats, all dirt must be removed before installing the new ones. To do this, apply WD-40 to the seat and then wipe it off with a dry cloth.
- Now we install new bearings, lightly tapping the outer race with a hammer,
 install the outer (smaller) bearing and then the inner bearing;
 - We install a seal on the inside of the tank. Grease is first applied to its inner surface, which prevents water from getting inside the bearing. The bearing itself already contains grease, so it does not need to be lubricated.
The bearings have been replaced, but before reassembling the car and completing the repair, you can inspect other parts; perhaps something needs to be changed. For example, you can clean the heating element from scale. The process of assembling the washing machine components with your own hands is carried out in reverse order.
So, replacing bearings in an Atlant washing machine can be complicated by disassembling the drum and knocking out the bearings. The pulley is often screwed on very tightly, which can be a challenge. However, this doesn't discourage you from doing the repairs at home, as you can save money on labor. Be prepared for difficulties, and good luck!
Interesting:


19 reader comments
Add a comment
Headings
Washing machine repair


For buyers


For users


Dishwasher


Your instructions were helpful, thank you!!! 4.5 kg/1000 rpm. Atlant bearing 725 and 726.
Thanks for your help!
What kind of bearing is used for Atlant 50s81?
Please tell me the markings on the bearings and oil seal!
Thank you!!!
What bearing do I need for the Atlant 50U102 washing machine? I can't find it online.
What bearings are in the Atlanta 60U87?
What bearing and seal are needed for the Atlant 50s84 machine?
Bearing 203 and 204.
How do I replace the front bearing in an Atlant 45U81? After removing the seal, I found it was stuck behind a glued-in steel bushing! It wouldn't move forward or backward!
My drum pulley won't unscrew, what should I do?
What kind of bearing does the Atlant 50U82 have?
6203 and 6204, the oil seal is difficult to find.
Seriously, moths eat you. Why write nonsense? It has 205 and 204 bearings, and because of you, I only bought a 203/204 seal kit for nothing.
What bearing is used for Atlant 60U107?
What bearing is used for Atlant 50s102?
Same problem. There's no information about the 50U102 online, but the workshop and bearing retailers say you need to remove it and inspect it—so to speak, locally... there might be different ones/other than those listed in the manual...
Could you tell me the part numbers for the bearings and seals on the drum? Atlant SMA 60s82 — xxx.
What bearing is needed for Atlant 60U1010?