How to replace the door seal on an Electrolux washing machine?
Careless operation of your washing machine can damage the door seal. This problem shouldn't be ignored: a deformed seal is a surefire way to leak. Let's look at how to replace the door seal on your washing machine, where to start, and what tools you'll need.
Purchasing a new part
The first step is to purchase a new seal. To do this, remove the old rubber seal and take it to the store. The salesperson will help you find a similar replacement part. You can also find the part number on the seal and share it with the sales assistant.
Alternatively, use the machine's serial number. This marking is located on a sticker above the door. Take a photo of the entire label so that you have information not only about the model, but also the year of manufacture and the code of the washing machine. Electrolux.
In addition to the new part, you'll need pliers and a flat-head screwdriver. Have some regular soap and a sponge handy. Now you're ready to replace the part. Beforehand, move the machine away from the wall and disconnect it from all utilities: power, water, and sewer.
Removing the old rubber
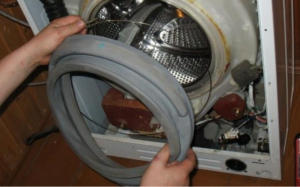
Simply removing the old rubber seal and installing a new one won't work. The rubber seal is secured in place by inner and outer clamps, which must be loosened before removal. The procedure is as follows:
feel the outer plastic clamp;
use a screwdriver to pry up the ring spring, pull it to the side, and then remove it (this must be done carefully so as not to stretch the clamp);
On many Electrolux washing machines the front panel is removable, so it can be detached for convenience;
then you need to remove the dispenser, unscrew the bolts securing the front part of the washing machine;
Caution! When removing the wall, be extremely careful—the hatch lock wiring is connected to it.
Next, you need to hook the inner clamp in the same way as you hooked the outer one.
Pull the rubber seal towards you, removing it from the grooves.
Now inspect the dismantled part, looking for cracks and imperfections on the surface. Determine the cause of the malfunction. It is important to prevent further damage to the seal during subsequent use.
Correct installation of a new part
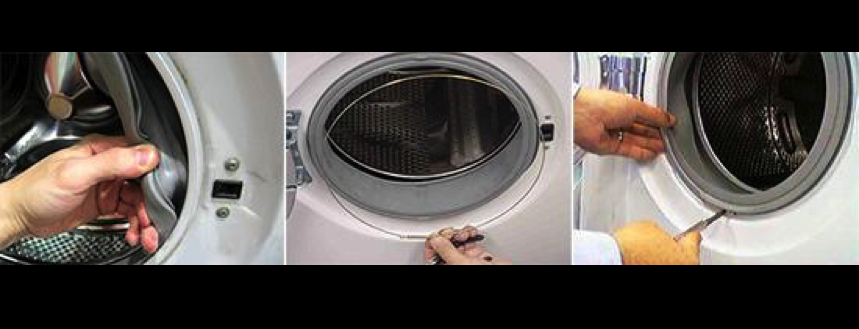
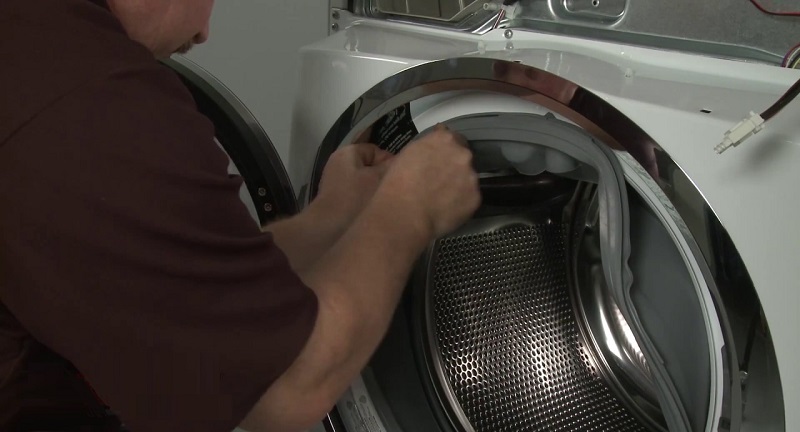
Installing the seal is more difficult than removing it. It requires some effort. Any misstep can lead to a potential leak in the future. Step-by-step instructions on how to replace the sunroof seal:
Use a sponge and soap to clean the installation area, but don’t try to remove all the foam – it will make installation easier;
find the special marks on the cuff and align them with the marks on the housing (the drain holes should be at the bottom);
Place the rubber seal into the recess and stretch it, holding it with your thumbs;
insert the inner clamp into the recess and tuck it around;
put the front panel back and secure it with bolts;
install a decorative panel;
straighten the cuff, insert the outer clamp with the spring facing down into the groove;
Stretch the ring along its edges (if the fastener is screw-type, it should first be loosened and only then secured in the device).
A testing step is essential. Ensure the rubber seal fits tightly against the drum and the body of your Electrolux washing machine. After installation, run a short cycle without laundry or detergent (a standard rinse is best) and monitor the machine's operation. If there are no leaks, the repair is successful.
Causes of seal damage
You can replace the seal yourself, without the help of a professional, and the procedure won't take much time. However, it's still better to prevent damage to the seal than to replace it regularly. Therefore, experts recommend inspecting the part after dismantling and determining what caused the deformation. Most often, the malfunction occurs for a number of reasons.
Previous careless installation - the rubber seal is too easy to puncture during replacement, so you need to be very careful when stretching it and reattaching the clamps.
Household chemicals used in appliances can be very aggressive and may contain components that negatively affect the structure of the cuff.
Mold and mildew - if you don't ventilate and wipe down your Electrolux washing machine after each wash, colonies of microorganisms will settle on the seal, which over time can corrode the rubber in certain areas.
When disassembling the machine, you can take advantage of the opportunity to clean the front part of the drum from dirt and scale.
Simple carelessness, when the consumer carelessly places and removes items from the drum.
Damage from foreign objects - a coin forgotten in a trouser pocket, a bra underwire, or a hairpin can pierce the pad (washing heavy shoes also negatively affects the condition of the cuff).
Friction forces - when the tank is overloaded, items will hit and rub against the seal, and sharp parts can damage the gasket.
Following basic recommendations and careful use of your washing machine can help delay the removal of the seal for a long time. However, if you notice even the slightest sign of a leak, you should begin repairs immediately. Replacing the old seal with a new one is not that difficult.
 Careless operation of your washing machine can damage the door seal. This problem shouldn't be ignored: a deformed seal is a surefire way to leak. Let's look at how to replace the door seal on your washing machine, where to start, and what tools you'll need.


Very useful information. I think I can replace the tires and the locking system at the same time. Thank you.
Thank you, it helped.