How to disassemble an LG washing machine yourself
 LG's inverter-powered washing machine quickly gained popularity among Russian consumers. Many families now own these machines, and some have already had them break down.
To repair an LG washing machine, you need to properly disassemble it and then reassemble it to remove any unnecessary parts. We'll discuss how to do this in this short article.
Tool
It might be a bit much to say that you can disassemble an LG washing machine with your bare hands, but it's a fact that disassembly requires a minimal amount of tools. LG Electronics, the manufacturer of LG washing machines, has taken great care to ensure the repairability of its equipment, so key parts can be accessed, literally, with just a Phillips-head screwdriver and round-nose pliers. If you want quick and easy disassembly, you will need:
- thin flat-head screwdriver;
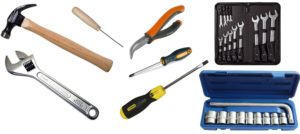
- curved round-nose pliers or flat-nose pliers;
- awl;
- hammer;
- small adjustable wrench;
- a ratchet with a set of heads from 8 to 18 mm;
- open-end wrenches for 8, 10, 12, 13, 14, 17 mm.
Walls and panels
 Accessing the insides of an LG automatic washing machine is prevented by the housing elements that reliably protect its components from the outside environment. These must be removed correctly to ensure easy reinstallation. Disassembling an LG washing machine begins with using a Phillips-head screwdriver to remove the two screws that hold the top cover in place. After unscrewing the fastener, move the cover a couple of centimeters towards you and then lift it up.
Next, remove the rear metal panel. Strictly speaking, most new LG washing machines have a huge service hatch on the back. It's almost as big as the back panel, so if we open it, we won't have to touch the panel itself at all, as all the components in the back will be accessible. Locate the screws around the perimeter of the service hatch, unscrew them, and remove the hatch. Now we need to remove the control panel of the LG washing machine, as it will clearly interfere with our further disassembly of the "home helper."
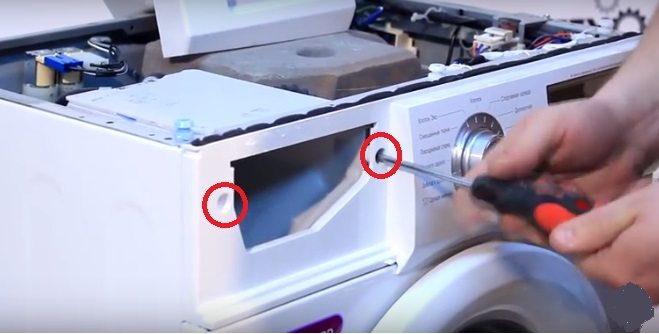
- We take out the powder receptacle and find two screws behind it, which we need to unscrew with a Phillips screwdriver first.
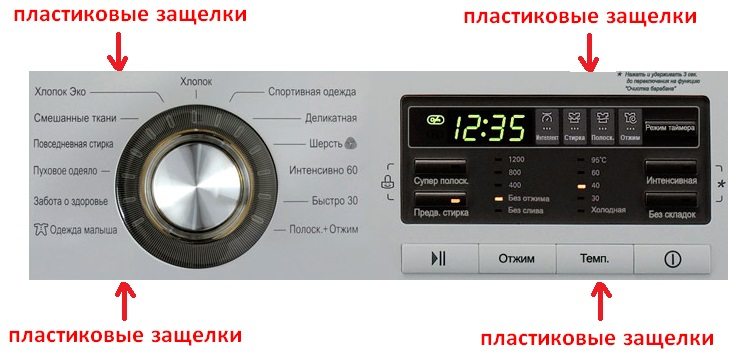
- After removing the screws, we need to detach the plastic clips that hold the top of the panel in place. Pry them up with a flat-head screwdriver and gently pull them out.
- To release the lower latches, you need to pull the panel towards you a little and then try to lift it up.
As you remove the top latches, you will hear soft clicking sounds, which will become louder as you remove the bottom latches.
You don't have to remove the control panel at all; let it hang by the wires. We just need to make sure it's out of the way. To do this, we'll slide it toward the side of the LG washing machine and secure it with tape. The next step involves removing the large rubber seal (the door seal). To do this, first open the door, then locate the steel clamp with a spring at the base of the rubber seal. Pry the spring up with a flat-head screwdriver, pull it toward you, and finally, pull the clamp off.
To be fair, it should be noted that the door seal clamp on an LG washing machine is much easier to remove than on washing machines of other brands. You won't find any plastic teeth or tricky clips on the LG machine's clamp, just a tight spring.
After removing the clamp, insert the large rubber band deeper into the hatch and proceed to remove the narrow lower front panel (false panel). Open the hatch hiding the debris filter and unscrew the screws located to the right and left of the filter. Use a flathead screwdriver to pry the panel up, unclip it, and set it aside.

It's time to remove the large front panel. It's held in place by four screws at the bottom, which were previously hidden under the plastic trim panel. Two screws hold it in place at the top. Remove all the fasteners and set the front panel aside.
Important! Before removing the front panel, you must remove the door lock cable.
Removing key parts
We've successfully dismantled the walls and panels of the LG washing machine, giving us access to the key components we'll be removing. Continuing with the disassembly, we'll remove the front counterweights, which are located neatly around the door. Next, we'll remove the top counterweight by unscrewing three screws.
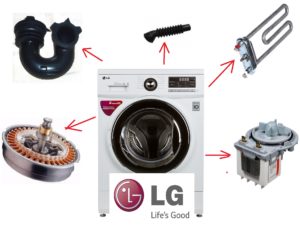
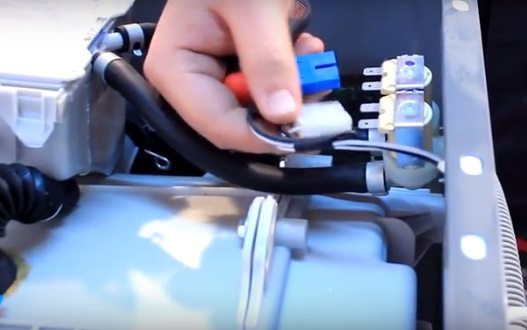
Next up is the dispersed hopper or powder receiver compartment. Unscrew the fasteners holding it in place at the top. Disconnect the pipe that connects to the hopper from below, then disconnect the side breather and the pipe that connects to the inlet valve. You can leave the filling pipes alone and remove everything together: the dispersion hopper, the pipes and the filling valve; it’s easier that way. Just don't forget to disconnect the connectors with wires from the valve.
The tank and drum are no longer supported by anything on top. There are no parts left that could interfere with its removal. We disconnect the pressure switch hose and reach down underneath the tank.
- Disconnect the wires from the engine. This will require removing several fasteners that hold the wiring in place.
- Using round-nose pliers, pry the drain hose clamps loose and pull it off the tank. In some cases, the drain hose is fitted with a clamp with a screw that needs to be removed.
- At the back of the case we disconnect the wires from the heating element.
- We detach the stands, and the tank, drum, and inverter motor are left hanging by springs alone. The stands are held in place by special fasteners, making them difficult to remove. Instructions on how to do this are included in the article. How to disassemble a washing machine Zanussi?
Removing the inverter
Now let's remove the inverter motor to avoid damaging it while disassembling the LG washing machine's drum. Unscrew the central bolt. To make this easier, grasp the drum from the front with one hand and hold it still. With the other hand, begin unscrewing the bolt.
The central bolt will be easier to unscrew if you spray it with WD-40 or similar lubricant 15-20 minutes beforehand.
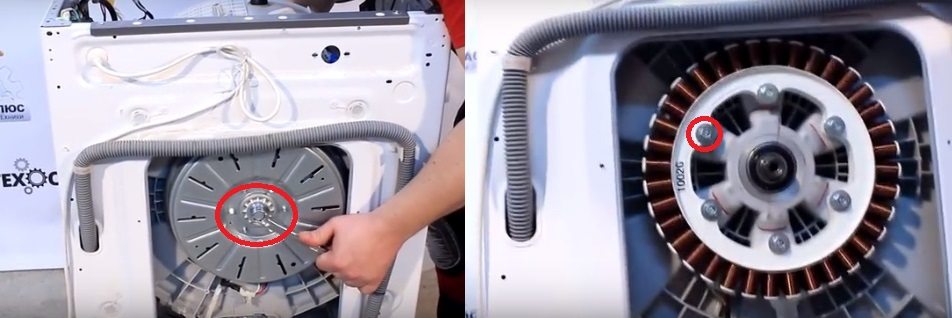
We remove the cover from the motor and under it we find 6 more bolts that need to be unscrewed. Once all the fasteners are removed, we can finally remove the motor and set it aside. As you can see, there is nothing complicated!
Tank
 The LG washing machine is almost completely disassembled; all that's left is to remove the tub and drum. With someone's help, pull it off the springs and pull it out through the front of the washing machine. Now we need to disassemble the tub and remove the drum, shaft, bearings, and spider. This is very easy on LG machines, as their tubs are detachable. What do we do?
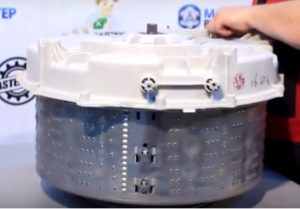
- We unscrew the screws that hold the two halves of the tank together and disassemble it into two parts.
- We will move the front forecastle to the side and work with the rear forecastle and drum.
- We pull the rear half-tank off the bushing, and we are left with a drum with a crosspiece, bushing and bearings.
- We remove the old seals and bearings and we can consider that the LG washing machine is completely disassembled.
In conclusion, we'd like to point out that with these detailed instructions on disassembling your LG washing machine, you'll be able to handle this task without any problems. My only advice is to take your time and proceed slowly, as this will reduce the risk of making mistakes. Good luck!
Interesting:


7 reader comments
Add a comment
Headings
Washing machine repair


For buyers


For users


Dishwasher


Great video! Thanks, Vladimir.
You've been a huge help. I'm now changing the bearings using your video as a guide!
The video helped, thanks! If the bearing seat is deeper than the bearing, I use an old bearing as a spacer, after grinding it down with sandpaper.
Thank you very much, thank you!
Everything is specific and on topic, it helped me despite the fact that my machine is different.
Is it possible to remove a bra underwire without completely disassembling it?
Hello! Thanks for the information, it's all very detailed, but I'm still hesitant...
My daughter "hid" a dice from her sister in the laundry detergent drawer. At first, she could hear it sloshing around in the water during the wash cycle, but now the sounds have stopped. Perhaps it fell into the drain? What should I do in this case? Should I take it all apart? Is there a chance it washed down the drain? 🙂
P.S. The edge of the cube is about 14 mm.