Disassembling a washing machine
 Good day, dear reader. In this article, you'll find instructions on how to disassemble a washing machine yourself. Many washing machine models from different manufacturers have similar designs. After reading this article, you'll learn how to disassemble front-loading machines (Hansa, Indesit, Samsung, LG, Siemens, etc.) yourself.
Of course, some models will have their own distinctive features. Some will use different fastening elements, have different appearances, or have other minor details. But overall, their design is similar, so using these tips, you can disassemble your washing machine.
Necessary tool
To disassemble a washing machine, we'll need tools. Most of the necessary tools are readily available in almost every home. If you're missing a tool, you can buy one at the store or borrow one from a neighbor.
So, we will need:
- Phillips and slotted screwdrivers.
- A set of wrenches of various sizes.
- Hammer.
- Flat-nose pliers, bent-nose pliers, pincers, nippers, and possibly round-nose pliers. All these tools should be insulated.
Before disassembling, we recommend gathering all necessary tools. Also, make sure the machine is disconnected from the water and power.
If you plan to reassemble the car later, you can take photos of particularly tricky fasteners, wire connections, and other parts. This will help you during reassembly.
Removing the front panel of the washing machine
 Disassembling the washing machine should begin with the top of the body, specifically the lid. It's secured with two bolts at the back. Use a Phillips-head screwdriver to remove them. Once the bolts are removed, push the lid from the front of the washing machine toward the back. Then, remove it.
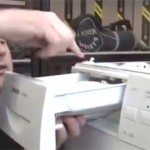 Next, remove the dispenser. On most washing machine brands, this requires pressing the dot in the middle of the plastic tray and pulling it toward you.
 Next we will need to unscrew the screws that secure the control panel.
Carefully separate it and place it on top of the washing machine, out of the way. Some models have a utility hook that we can use to hang it on the top of the side wall.
 Now let's remove the lower panel. To do this, we'll need to remove the bolts holding it in place. Then we'll move on to removing the hatch's rubber seal.
  To do this, open the door and remove the retaining clamp. To remove it, you'll need pliers, a screwdriver, or round-nose pliers (depending on the type of clamp).
Once the clamp is removed, we remove the cuff from the front wall of the machine. Next, we can unscrew the two bolts that secure the door lock.
Now all we have to do is remove the remaining fixing elements. 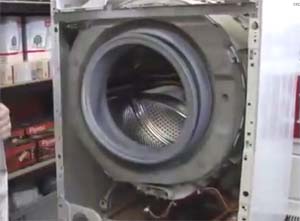 After which we can remove the front wall of the washing machine.
We continue to disassemble the machine
After this, you can remove the filler hose that connects to the tank. To do this, you need to remove the clamp with pliers. The hose is then no longer held in place and can be removed. Next, remove the hose leading to the pressure switch. To do this, you'll need to remove the clamp again first.
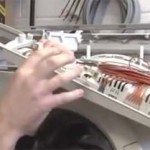
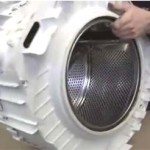
Next, we'll remove the inner clamp that secures the rubber seal to the machine's drum. And then we'll remove that seal. Next, we'll remove the back panel of the machine. It's held in place with screws. We can easily unscrew them with a screwdriver and remove them.
Next, remove the counterweights. They can be located either at the front or back of the machine. They look like concrete blocks. They are needed to prevent the washing machine from vibrating excessively during the spin cycle and other wash cycles. They are usually attached with long bolts. Unscrew the bolts and remove the counterweights.
 Next, remove the heating element. In most machines, it's located at the back, bottom of the tank. In some models, it's located at the front, also at the bottom of the tank. To remove it, unscrew the retaining nut. It's located in the middle. Then, press on the protruding pin—the one you used to unscrew the nut. Push it in. If you can't do this by hand, you can gently tap it with a hammer. Next, pry the heating element up with something flat and carefully remove it.
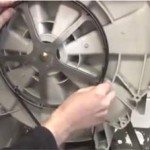 Next, remove the drive belt. It runs from the washing machine's motor to the pulley that's attached to the tank. We'll also remove any wires that may be attached to the tank and motor. Remove the motor's mounting hardware and remove the motor.
 Now our tank is suspended from below by springs and secured by shock absorbers underneath. We unscrew the shock absorbers and slowly remove the springs. Then we remove the tank. If you need to disassemble the tank, it's easy. First, we unscrew the bolt securing the pulley.
 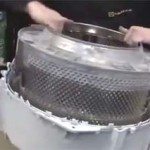 Remove the pulley. Press the shaft into the tank. Then separate the tank into two halves; to do this, remove the clamp.
Incidentally, some models include non-detachable, disposable tanks. Some DIYers cut them with a handsaw and then assemble them using bolts and waterproof sealant.
How to assemble a washing machine?
Reassembly is done in reverse order. Photos, if you took them during disassembly, will also be helpful. We recommend capturing the locations of various parts, as well as their mounting locations and the wires connected to them. Referring to these photos will help you reassemble the washing machine with ease.
For clarity, we also suggest you watch the video. This video covers replacing bearings, which involves disassembling the entire washing machine. The video is in English, but you can easily disassemble the machine without translation by simply following the technician's steps.
How to disassemble a washing machine – video
Read our website and good luck with your disassembly!
Interesting:


6 reader comments
Add a comment
Headings
Washing machine repair


For buyers


For users


Dishwasher


There's nothing easier to figure out, especially with such hints!
The Russians are invincible!!!
Respect to the author for the good presentation of the material
Author, can you tell me how to remove the universal joint from the drum of a Samsung washing machine? One of the mounting tabs broke, and the drum moved forward, cutting the outer tub. Now the universal joint needs to be replaced.
Not in Russian. But everything is clear from the video. Thank you.
I forgot to grease the seal, I broke off the gas tank latches for nothing, and I could spend 24 hours hammering out the bearings with a rubber mallet. Otherwise, well done.
What smart people we have in Russia!