Disassembling the washing machine drum
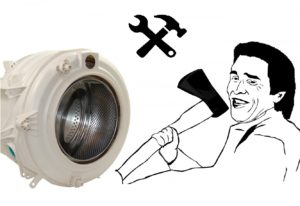 A washing machine's bearing failure is perhaps the most frustrating malfunction a home appliance can experience. The challenge isn't so much fixing the problem itself, but rather accessing the components, which requires literally disassembling most of the machine. Most importantly, the tub, which is assembled with the drum, is no easy task. In this article, we'll cover disassembling different types of front-loading washing machine drums.
Basic rules
 After watching numerous videos and images on the internet, users develop an unhealthy sense of self-confidence and begin to believe they can completely disassemble a washing machine, including the drum, and then reassemble it in a matter of hours. In fact, disassembling the tank and drum is fraught with many pitfalls. If you don't know them, you can ruin an important part of your "home helper" so badly that even a repairman won't be able to help you.
When wondering how to disassemble a washing machine drum, you first need to access it. This requires removing almost all the parts from the housing, as they will hinder the removal of the tub and drum. This is illustrated in detail in the article. How to disassemble a Zanussi washing machineAlthough this publication focuses on a specific brand of washing machine, it is very illustrative and allows for comparisons with any other brand of washing machine.
So, what are the rules for disassembling the drum and tank? What should you keep in mind when doing this? Let's summarize these rules.
- Remove the drum tank from the washing machine body very carefully. The tank of most modern cars is plastic and cannot withstand any mechanical impacts. When removing the tank, ask a friend for help.
- Before cutting apart a non-separable tank, use a thin drill bit to drill multiple holes across the joint for the fasteners. This will prevent movement. The more bolts you use, the better the tank halves will fit together. And of course, be generous with sealant.
- When sawing a non-separable tank, you must precisely follow the welded plastic seam, which is clearly visible from the side. In most areas, even a few millimeters of beveling is unacceptable.
- When loosening the screw holding the drum pulley, be extremely careful and cautious. It won't come loose without force, but applying too much force will strip the edges of the head, causing further problems.
- To remove the rear part of the washing machine tub from the shaft, you will have to apply a couple of light blows to the shaft - do not overdo it.
A seized bearing can be removed using an automotive bearing puller. You may need to warm it slightly with a blowtorch before removing it.
What will be required?
Disassembling the tub and drum of a washing machine requires relatively simple tools. Most of the necessary tools are probably already in your pantry, but some will require a trip to the garage or maybe even a neighbor's. What will you need?
- Phillips, hex, and flat head screwdrivers (in some car models, a flat head or Phillips head screwdriver is sufficient).
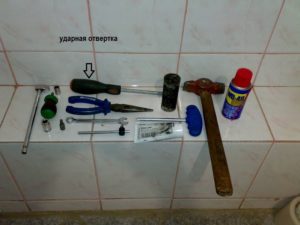
- Small adjustable wrench.
- Heads and open-end wrenches (set).
- Automotive puller designed for removing bearings.
- Blowtorch.
- A hacksaw for metal and many blades for it.
- Drill and thin drill bits.
- Wooden block and hairpin.
- A heavy copper hammer.
- Nippers and round-nose pliers.
It's also a good idea to have some WD-40 on hand. It'll help loosen stuck fasteners and make disassembly easier. Instead of a blowtorch, you can use a gas torch, but it will produce a lower temperature and the bearing may not get hot enough to slip off.
Don't use a blowtorch indoors. It's best to disassemble the washing machine's drum in a garage or shed, or better yet, outside under a canopy.
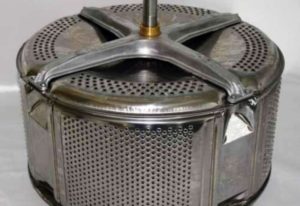
Removable tank
Approximately half of all modern automatic washing machines have detachable drums. This is very convenient and greatly simplifies repairs by speeding up disassembly. In a washing machine with a detachable drum, the two halves of the drum are bolted together. Furthermore, the joint is either sealed with sealant or rubber to prevent water leakage. To disassemble the detachable drum of a washing machine, follow these steps:
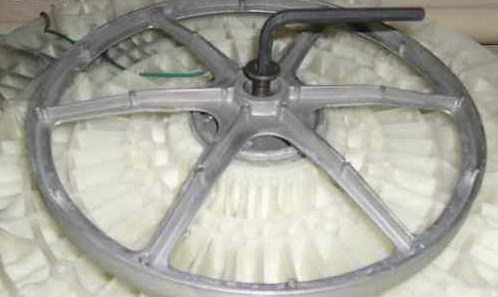
- Using a wooden block, wedge the drum pulley; the tank itself with the drum should be positioned with the hatch facing down;

- we take a head of a suitable size with a ratchet and try to unscrew the bolt holding the pulley on the shaft;
- we remove the pulley, and then, taking a suitable key, we begin to unscrew the bolts that connect the halves of the tank;
- Having unscrewed the halves of the tank, we apply a couple of light blows to the shaft and pull off the rear part of the tank;
- Using a blowtorch or gas burner, heat the bearings and pull them off using a puller.
It is not uncommon for bearings to come off the shaft without any problems, so a puller is not required.
Non-removable tank
We treat a non-collapsible tank in much the same way as we do a collapsible one. The only difference is that it needs to be sawed. Anyone who's ever done this work knows how difficult, tedious, and thankless it is. The main problem is that no tool on hand is perfectly suitable for this task.

- The hacksaw often gets stuck and the blades break.
- A thin hacksaw cuts too thickly into the wood, making it difficult to ensure a tight seal between the halves of the tank.
- An angle grinder is not suitable at all, since the disc can slip at any moment and damage the tank. Moreover, when working with an angle grinder, it is difficult to adjust the cutting depth, and this risks damaging the steel drum.
- A jigsaw is generally good, but in some areas you have to use a hacksaw again.
When cutting the tank, experts recommend using a regular hacksaw along with a hacksaw blade, wrapped with electrical tape on one edge for easier grip. This improvised saw can be used on welded areas where a regular hacksaw would be inconvenient. If you can successfully cut the tank after 3-4 hours, consider the job half done. And if the old bearings come off without any problems, consider the disassembly a success.
Finally, it's worth noting that disassembling a washing machine's drum requires considerable time first removing it before proceeding with the actual disassembly. If your washing machine model has a non-removable drum, you'll spend significantly more time disassembling it. Be careful and cautious!
Interesting:


1 reader comment
Add a comment
Headings
Washing machine repair


For buyers


For users


Dishwasher


Thank you, Vladimir, for the video. Everything is detailed and clear.