How to adjust the pressure switch on a washing machine
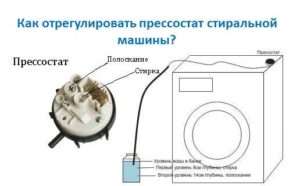 Over time, any component of the washing machine can fail – the rubber seal may crack, the heating element may stop heating, or the water level sensor may display an unspecified error. A problem with the pressure switch will be indicated by an imperfect water intake system. The washing machine will either underfill or overfill.
Not all sensors require replacement; sometimes the pressure switch may need adjustment. By attempting to adjust this part yourself, you'll avoid unnecessary expenses on a replacement part while extending the life of your existing sensor for many years. Let's look at how to adjust the part responsible for filling the tank with the correct amount of water.
Before opening the pressure switch
After detecting a malfunction in the system, it is necessary to determine whether the pressure switch is really the cause. Carefully inspect the filling system, examine the hose and fitting of the water intake sensor, and its transition chamber. The inspected elements should not contain:
- abrasions, tears;
- residue from detergents.
If you find dried detergent on the parts, be sure to rinse them and try running the machine again. This may help restore the pressure switch to working order.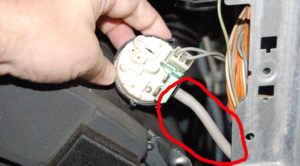
Next, check the connection between the power supply and the sensor. A wire may be frayed or kinked. If a defect is detected, repair it and test the washing machine for proper operation.
Finally, inspect the pressure switch contacts. If they are dirty, clean them. Then, begin testing the water intake sensor. For diagnostics, you'll need a tube of the same diameter as the sensor's permanent hose. Attach one end of the tube to the device's inlet fitting and gently blow into the other open hole. When the sensor is functioning properly, it will make a clicking sound. If no problems are found after this check, disassemble the pressure switch.
Adjustment process
You don't need professional help to adjust the liquid level sensor; you can perform the repair yourself. Just follow the instructions below carefully and perform all steps carefully, using extreme caution. To adjust the washing machine's liquid level sensor, follow these steps:
- disconnect the washing machine from the power supply and water supply;
- remove the pressure switch by unscrewing a couple of bolts holding it in place and carefully disconnecting the wires supplying the part;
- Find the special screws designed to tighten and loosen the internal contacts of the device;
- remove any remaining sealant from their surface.
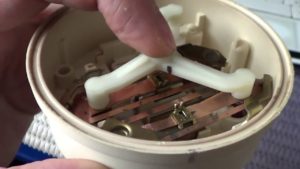 These manipulations can be considered preparatory; the real work of adjusting the pressure switch is still to come. Next, using the cleaned screws, you need to manually try to detect the moment the contacts close and open. In this case, you will have to use the well-known “trial and error method”, since a non-professional does not have special devices that allow you to determine the moment of closing. You need to do it this way:
- turn the first screw half a turn, connect the sensor to the machine, turn on the machine and start the washing mode;
- If in your case the required volume of water wasn't initially being filled, but now it's increased, then you've chosen the right course of action. Loosen the screw further in the same direction, then fill part of the part with sealant;
- If unscrewing the bolt has the opposite effect, turn it in the opposite direction by one or one and a half turns.
The main task when adjusting the pressure switch is to set the optimal operating parameters so that the sensor operates at the right time and accurately determines the volume of water collected in the tank.
Once the screws have been tightened to the desired position, be sure to seal them with silicone sealant to prevent the fasteners from working loose.
Signs that indicate a broken part
There are many factors that can indicate a faulty fluid level sensor.If the pressure switch fails, the washing machine's normal operation is disrupted and it begins to function incorrectly. Certain signs indicate that the device is faulty.
- The washing mode is activated even when the drum is empty.
- The heating element starts working even though there's no water in the tank. This inevitably leads to the heater burning out.
- The automatic machine takes in “as much water as it wants,” and not the required volume specified by the washing program.
- The washing machine cannot drain the waste water at the end of the cycle.
- The rinse mode in the machine does not function.
It's easy to diagnose a faulty pressure switch yourself; the symptoms described clearly indicate problems with the sensor. However, adjusting the sensor won't always help; in some cases, a complete replacement will be necessary.
What if the adjustment didn't help?
If your attempt to adjust the pressure switch yourself fails, it doesn't mean you need to replace the washing machine or call a repairman immediately. The most cost-effective option is to replace the faulty part with a new sensor.
It is important to choose the right pressure switch for replacement, and be sure to take into account the make and model of your automatic washing machine.
Installing a new water level sensor doesn't take much time. Simply remove the broken part, photograph the wiring diagram first, and then follow these steps:
- secure a working pressure switch in the system;
- connect the hose to the sensor tube and secure it well with a clamp;
- inspect the resulting connection for cracks, kinks, and damage;
- Connect the electrical wiring according to the previous diagram.
Do not use a washing machine with a non-functioning sensor, as this can lead to serious malfunctions. Adjust the pressure switch as soon as possible or replace it with a working one.
Next, reassemble the machine, replace the top cover, plug in the washing machine, and run a wash cycle. After replacing the part, the situation should undoubtedly improve.
Interesting:


3 reader comments
Add a comment
Headings
Washing machine repair


For buyers


For users


Dishwasher


If the pressure switch is screwed on, it can't be adjusted unless you replace it.
Ariston AVTF129, the water intake stops and spins, then continuously fills until an H2O error appears. I blew it out and checked the hose for leaks. Terminals 1-3, 2-3, and 2-4 are ringing with a tester. What could it be? Taking it to a repair shop is a long way off, and a mechanic with a car is very expensive. I would be very grateful!
The length of the tube: the longer the tube, the more water; the shorter the tube, the less water.