DIY LG Washing Machine Pump Repair
 Washing machine technicians often call the pump the "heart" of the machine. This is because it pumps wastewater out of the machine, bears the heaviest load, and is subject to significant wear. Sooner or later, this part becomes clogged or fails, and the only solution is to repair the washing machine's drain pump yourself. How can LG owners do this, and what is required for replacement?
Symptoms of pump failure
Don't rush into replacing the pump right away. First, you need to determine the nature of the problem with your LG washing machine's pump.A malfunctioning drain may be caused not only by the washing machine's "heart," but also by other problems with the machine. To avoid making mistakes, we consistently check the “weak points” of the drainage system.
The LG washing machine system can automatically diagnose problems with the pump and display the OE error code on the electronic display.
- Listen to the pump as it runs. You can tell by listening if the pump is working properly. To do this, start a cycle and carefully evaluate
 Sounds coming from the unit. If a loud humming noise is heard from below during draining and filling, but the machine neither drains nor fills, there's clearly a problem with the system. The same applies even if there's no noise, as a steady, subtle hum should normally be present.
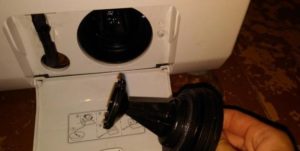
 - Clean the debris filter. Once the pump issue has been identified, it's time to check the debris filter. Open the access hatch in the lower right corner of the housing and unscrew the plastic attachment. The coil is likely clogged with dirt, hair, and other debris, preventing water from draining. Coins and bra underwires are common items found in the filter.
- Check the drain hose. The hose itself often obstructs proper drainage. Therefore, carefully check the rubber for blockages, or better yet, disconnect it from the housing and drain and rinse it under the tap. At this point, it's recommended to test the results by running a test wash. If the pump is still acting up, continue investigating.
Most often, a clogged waste filter or drain hose prevents a full drain.
- Check the impeller's rotation. By unscrewing the drain filter and shining a flashlight through the resulting hole, you can see the pump impeller—the "wheel" with blades. Reach into it and try to rotate it. If this isn't possible, carefully clear the impeller of any obstructing objects. Most likely, hair, thread, lint, or wire have become tangled around the protruding parts. If rotation isn't impeded but the pump isn't working, the cause is different, and repairing the pump will require disassembling the entire machine.
Finally, we check the pump contacts and sensors; they should be intact and functioning. If they are also OK, we test the control unit for functionality. If there are no problems with the control board, there is only one solution: replace the pump. We'll explain in detail below how to repair the drainage system.
What is needed for repairs?
To repair a faulty pump yourself, you'll need to stock up on certain tools and components. The number required depends directly on the scale of the problem and the technician's skills. In a worst-case scenario, you'll need the following parts:
- drain pump;
- impeller;
- axis;
- contacts;
- pump sensor;
- cuff;
- rubber gasket;
- pulley.
When selecting replacement parts, you should be careful - they must be a perfect fit for your existing LG model. Ideally, you should remove the old drain and ask the store clerk to find a suitable alternative. Another reference point will be the serial numbers, which are required to be applied to all pump components.
When ordering pump replacement parts through an online store, it is necessary to verify the serial number of all pump components and the LG model itself.
The tool kit is considerably smaller. Most work can be done with a Phillips-head screwdriver and a pocket knife. Sometimes, a multimeter is essential for testing contacts, sensors, and power supplies.
Is it difficult to find a pump?
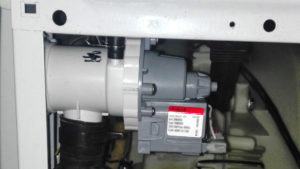 The drain pump is located in a standard location in almost all LG models, regardless of whether the machine has a direct drive or a belt drive. Furthermore, accessing the faulty part is easy—you don't have to completely disassemble the housing. There's also no need to even remove the back panel, top cover, drip tray, or front panel. Locating the pump is much easier, as it only requires a few simple steps.
- Disconnect the equipment from the electricity supply.
- Drain the waste water from the drum using the emergency drain.
- Turn off the water supply and disconnect from the sewer.
- Tilt the body back, placing old rags under the machine.
If you have any doubts about your abilities, it is better to contact the service department for professional help.
All. We look under the bottom and get free access to the entire drainage system. There is another way - move the car to the center of the room and place it on its left side.
We remove and disassemble the pump
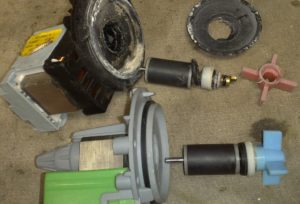
The key to repairing the pump is disassembling it. This is the only way to determine whether the impeller is rotating on the shaft and whether it is securely fastened to the retainers. An internal inspection is also essential if the impellers are difficult to rotate, but there are no visible obstructions, debris, foreign objects, or hair. In this case, you'll need to disassemble the housing and look for the problem inside. A standard disassemblable pump is "opened" as follows:
- we disconnect the pump from the snail by unscrewing the retaining screws;
- we press on the pump from the side of the drain valve, and then pull the housing towards ourselves;
- drain the remaining water from the part;
- we pry up the latch on the pump body from both ends;
- we remove the pump from the coil.
If your LG model is equipped with a non-disassemblable pump, don't hesitate to get it repaired. Even these mechanisms can be disassembled—you just need to follow the instructions.
- Disconnect the pump body together with the impeller from the volute and coil.
- Inspect the seemingly monolithic part.
- Put on gloves.
- Take any hair dryer and set the device to the lowest temperature setting.
- Carefully warm up the pump “tail” – the long rear tip.
- After a few minutes of heating, use a Phillips-head screwdriver to pry the crosspiece out of the housing. Along with the crosspiece, you'll also remove the magnet, which makes the unit "non-disassemblable."
- Thoroughly clean the disconnected part and the seat from accumulated dirt.
- Remove the magnet from the shaft.
- Locate the bearing on the removed magnet and lubricate it with the appropriate mixture. Don't forget the second bearing, located at the bottom of the housing.
- Return the removed pump parts to their original locations.
- Press on the top of the housing until you hear a click and the sealing rubber ring “sits” tightly in place.
Before installing a new pump, you should thoroughly clean all elements of the drainage system: the snail, the seat, the impeller, and the appropriate pipes.
If the inspection reveals that the pump cannot be repaired, you'll have to settle for a replacement. Simply purchase a new pump and install it in its place. The removal and installation process is simple, so we won't go into detail about the instructions.
Interesting:


Readers' comments
Headings
Washing machine repair


For buyers


For users


Dishwasher


Add a comment