Samsung Bio Compact Washing Machine (S821) Manual
 Finding the manual for the Samsung Bio Compact S821 washing machine is quite easy. Even if you've lost the printed manual that came with your "home assistant," you can always visit our website and download both the original and condensed versions. In this publication, we've provided the condensed, adapted version, which you're sure to appreciate, as it's only a short read.
Preparing the machine for work
The Samsung Bio Compact S821 washing machine is designed to be the perfect home assistant, quickly getting your dirty laundry in order. However, learning how to use it correctly and, of course, installing it properly is essential.
During the warranty period, please keep the packaging and all documentation that came with the washing machine.
After unpacking and inspecting your Samsung washing machine for defects and other damage, remove the shipping bolts located on the back of the machine. Next, choose a location. Strictly speaking, this should be done in advance, even before purchasing the machine. Arrange the utilities, reinforce the floor, and move furniture away from the washing machine while it's in use.
If all this is done, you can start connecting your “home assistant”. Installing and connecting a washing machine yourself, read the article of the same name. However, we will still provide some additional installation tips in this publication.
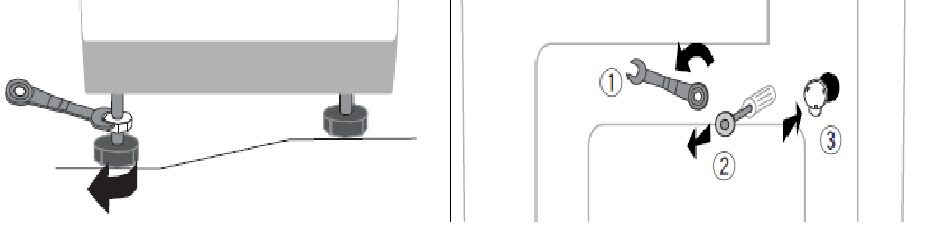
- Try to level the machine body as best as possible by tightening its legs one by one with a wrench.
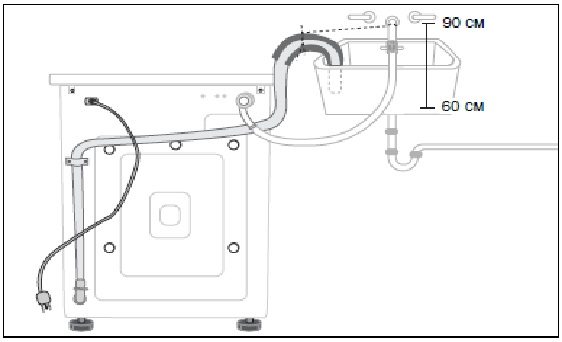
- When screwing on the inlet hose, do not forget to install the rubber sealing rings. If they have become hard from long-term storage, soak them in machine oil.
- If the inlet hose is too short, you can additionally purchase a longer hose and install it in place of the standard one. We do not recommend extending the standard hose.
- When connecting the drain hose to the trap or sewer pipe, be sure to seal and secure the connection with a clamp. The pump creates enough pressure during flushing to force water through the leaky connection and onto the floor.
- You don't have to connect the drain hose to anything, you can just hook it over the edge of the sink or throw it into the bathtub, but this won't look aesthetically pleasing.
- To connect the washing machine, you need a separate outlet powered by a wire of sufficient gauge, preferably copper. The outlet should be moisture-resistant. If you frequently experience power outages, connect a surge protector to the outlet and then connect the washing machine to it.
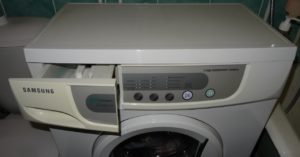
Control Panel: Button Assignments
After connecting your Samsung Bio Compact S821 washing machine, don't rush to start washing. First, familiarize yourself with its features by examining the control panel and the functions of the buttons and other elements. Let's describe them and give examples of how to use them.
- The detergent drawer or dispenser is a very important component located to the left of the control panel. This is where we pour in detergent, fabric softener, and bleach.
- The indicator panel. It takes up the lion's share of the Samsung Bio Compact washing machine's control panel. These are various lights, each with its own purpose. They convey important information about the progress of the washing, rinsing, and spinning cycles. They can even alert the user to a malfunction, but hopefully it won't come to that.
- The "Program Selection" button. This button (the first one next to the detergent drawer) is very important. It allows you to scroll through the washing programs until you find the one you want. You can experiment by pressing the "Program Selection" button several times and checking the indicator panel; the light should be lit next to the program you've selected—cotton, synthetics, delicates, etc.
- The "temperature selection" button (the second one from the powder compartment) is self-explanatory: it allows you to adjust the temperature.
- The "Drum Speed" button (third from the detergent drawer) allows you to set the spin speed. You can choose to wash without spinning, at 600 rpm, or at 800 rpm.
- The start/stop button (fourth from the drawer, large and backlit). This is an important button, as you have to press it every time to start the wash cycle. It's also used to stop the wash cycle.
- The "on/off" button (located on the far right). This is a standard button whose purpose you've already guessed.
The Russian-language control panel is very easy to navigate, as all the buttons and lights are labeled. However, if your washing machine is from Europe, the panel may be in English, German, Polish, or any other language. In this case, the manual will come in handy.
Washing and its management
So, we have carefully examined the control panel, we can start the first wash. According to the instructions, the first wash is carried out without laundry in order to rinse the insides of the “home helper”.
- You must first turn on the machine, then open the powder drawer and place a small amount of detergent in the far left compartment.
- Open all taps that shut off the water supply to the washing machine.
- Use the temperature selection button to set it to 400WITH.
- Click start and wait for the program to finish.
When using the machine for the first time, you must not put anything into the drum.
Now a few words about loading detergent. You'll be using a variety of washing programs, each with its own unique characteristics. These characteristics will also affect the placement of detergents inside the detergent drawer. Keep in mind that for pre-wash, you'll need the far right compartment, fabric softener should be placed in the middle compartment, and the far left compartment will be used more frequently, as it's for the main wash. Let's look at an example of a daily wash.
- We turn on the machine and open the door wider.
- Place your laundry inside, one item at a time. Don't cram dirty laundry into a lump, and of course, sort it before washing.
- Close the door until you hear a characteristic click.
- Place the detergent and conditioner into the powder compartment.
- Select the program, temperature, and spin speed using the corresponding buttons. If you can't select anything, it means the program doesn't support that combination of parameters.
- We start the wash by pressing “start/stop”.
How to properly maintain the machine?
Good homeowners always take care of any household appliance, especially their washing machine. A modern home without an automatic washing machine is a necessity. The Samsung Bio Compact S821 doesn't require any special care; in fact, the necessary maintenance won't be a problem. However, forgetting basic care rules can negatively impact the washing machine's performance in the future. What are these rules?
- The Samsung washing machine must be dried after each wash. Wipe the hatch cuff and other wet parts with a cloth. Leave the hatch and powder drawer slightly open to allow moisture to evaporate and prevent mold from growing inside.
- If water or detergent spills on the control panel, wipe it immediately with a dry cloth. Excess moisture is very harmful to electronics.
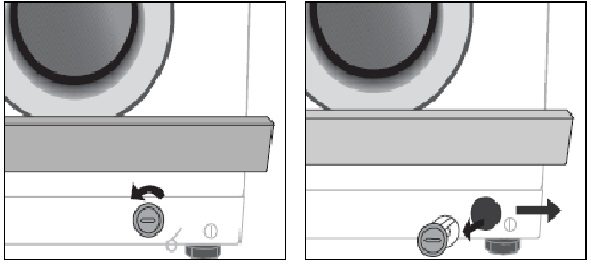
- The debris filter should be cleaned a couple of times a year. Its location is shown in the picture below. Unscrew the filter cap, drain the standing water, and then clean out all the dirt.
- Once a year, you should clean the inlet hose flow filter, which is located where the inlet hose connects to the washing machine body. To do this, turn off the water, unscrew the inlet hose, remove and clean the filter with pliers, and then replace everything.
- The inlet hose should also be inspected periodically. If cracks or more serious damage appear, it should be replaced promptly to prevent leaks.
Well, it seems we've covered everything important about using the Samsung Bio Compact S821 washing machine. If you need more detailed information, please refer to the instructions included with this publication. Good luck!
Interesting:


8 reader comments
Add a comment
Headings
Washing machine repair


For buyers


For users


Dishwasher


Thank you so much for such clear information. I inherited this washing machine and, as usual, it came without instructions. Thanks to you, I'm already washing my rompers!
So I still don’t understand how to set the washing time?
The machine doesn't spin after washing, what could it be?
We have the same problem. The water drains after 8 minutes. The drum spins back and forth endlessly. We have to stop the machine and take out the wet laundry.
So easy to wash, it's a pity it's not for 5 kg.
I have the same problem, I don’t know what to do?!
The machine asks for a second rinse, how do I turn it off?
How many kg is it designed for?