Replacing a washing machine pulley
 Some automatic washing machine problems may require pulley replacement. A washing machine pulley is a specialized part that doesn't break very often, but when it does, it can create a problem. Pulley failure isn't always immediately identifiable, especially without proper knowledge. In this article, we'll explain the problem in more detail to help prevent it from occurring in the future.
What is this part and where is it located?
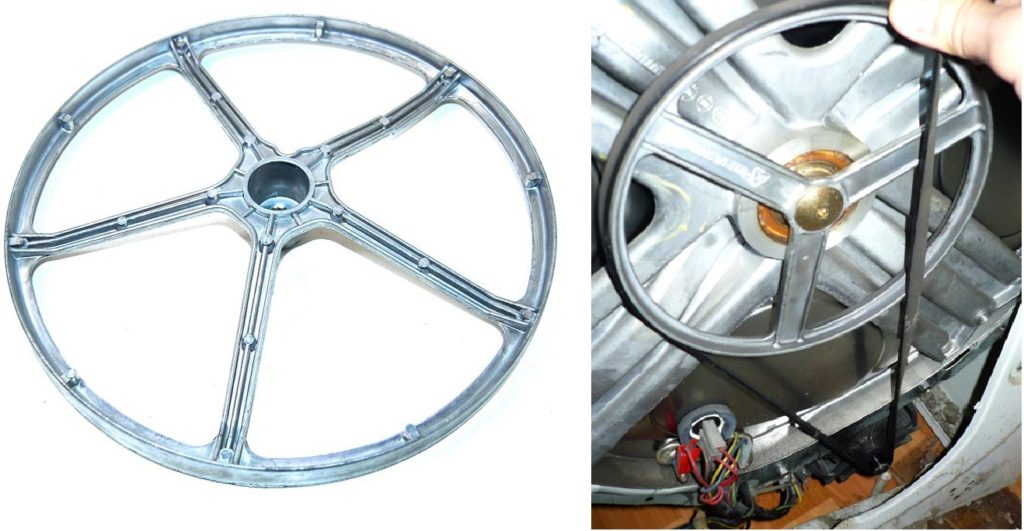
In layman's terms, a washing machine pulley is a fairly large, round wheel located behind the drum. A belt is attached to this wheel, transmitting the motor's power to the pulley, causing it to rotate and spin the drum containing the dirty laundry. The mechanism is quite simple, primitive, but at the same time quite reliable and effective until, of course, it breaks.
Accessing the pulley is fairly easy. Simply turn off the washing machine, remove it from its niche, and turn it around. To find the pulley, you'll either need to open a service hatch, which is often located at the rear of the machine specifically for belt repair and pulley replacement, or, if there's no hatch, remove the rear panel. Either way, just unscrew a few screws, and you're there. Remove the rear panel or hatch, and the pulley will be right in front of you.
Engine speed is transmitted to the pulley via a belt, meaning the belt is the mechanism's primary weak point. Many mechanics believe this, and they're right, but there's a catch. Frequent belt breaks and slippage can be the result of a faulty pulley, and sometimes only an experienced eye can spot this issue.
Please note: In very rare cases, the belt slips and breaks because of the engine, not the pulley.
How to detect a breakdown?
A sure sign that your washing machine pulley needs replacing is frequent belt problems. If the belt has slipped off several times, then stretched and failed, and you've replaced it and the problem persists, then the problem isn't with the belt, but with the pulley.
Cheap washing machines assembled in Russia and China, made from counterfeit parts, often have this problem. A slightly bent pulley is installed right at the factory and then, soon after, begins to annoy the owner. Sometimes the pulleys are so crudely manufactured that sharp metal burrs and edges can be seen in their grooves, causing the belt to fray within 5-6 washes.
Important! When removing the old belt from the washing machine's motor and pulley, inspect it carefully. Any wear, tears, or cracks should alert you.
If you experience frequent problems with the belt, or the drum rotates too slowly during washing and spinning, you need to check the condition of the pulley. You don't have to remove the pulley to do this. Follow these steps:
- remove the back wall of the washing machine;
- remove the belt, to do this, grab the belt with your left hand and turn the pulley with your right hand, the belt will come off;
- Take hold of the pulley with both hands and swing it from side to side;
- Carefully run your finger over the working surface of the pulley and check it for sharp edges and burrs;
- inspect the pulley for deformation.
If any defects are found, such as bent or sharp edges, the pulley should be replaced. Don't leave it as is, otherwise the belt will have to be replaced every two months, or even more often.
Replacement
To replace the part, you first need to carefully remove the old drum pulley. This can be quite difficult, as it's not simply mounted on the drum shaft but also secured with a bolt, which in turn isn't simply screwed in but sealed with sealant. But first things first.
- Disconnect the washing machine from the power supply, water supply and sewerage system.
- We move it to a clear space for easy work. If you have a shed or workshop, it's best to move it there.
- Take a Phillips screwdriver and unscrew the screws holding the rear wall or service hatch.
- We remove the back wall.
- Next, you need to remove the drive belt from the engine and pulley.
- We inspect the pulley and make sure there is no damage.
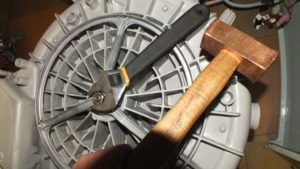
- We take a small wooden block and use it to clamp the pulley and crosspiece. This is necessary to ensure that the shaft and pulley do not rotate and interfere with unscrewing the bolt.
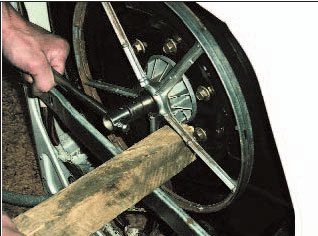
- Now take a blowtorch and heat the bolt slightly, but don't let it get red-hot. While the bolt is still warm, spray it with WD-40 or similar lubricant.
- We wait a little while until the lubricant comes into contact with the remains of the sealant, then we throw in the wrench and unscrew the bolt.
The bolt might not budge the first time, but don't despair. Take a hammer and gently tap the wrench. Over time, you should be able to break the bolt loose this way, but don't tap too hard to avoid damaging the edges.
 All that's left to do now is remove the drum pulley and continue the repair. The next step is to check the motor pulley. Very often, when problems arise with the drive belt, the cause lies in the motor pulley. Removing it is even more difficult than the drum pulley. It may also be necessary. change the motor brushesHow to remove the engine pulley?
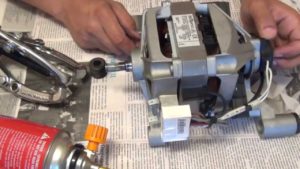
- First, unscrew and remove the washing machine motor, remembering to disconnect the wires from it.
- We take a special puller for pulleys and bearings.
- We clamp the washing machine motor pulley with a puller, creating maximum tension. You won't be able to immediately rip the pulley off the shaft, so don't break the puller; it costs money.
- Take a gas torch and carefully heat the pulley, trying not to heat the puller itself or the shaft.
- As the pulley heats up, tighten it until it slips. If the gas torch doesn't produce enough heat, use a blowtorch, but handle it with extreme caution.
We've removed the drum pulley and engine pulley, so now we need to install the new pulleys. Installing the drum pulley isn't difficult. Simply slide the new part onto the drum shaft, coat the bolt with sealant, and tighten it with a wrench. The engine pulley will require a bit of fiddling.
- We take a blowtorch and light it.
- We wait until the lamp warms up properly and begins to produce maximum flame temperature. To speed up the heating of the lamp nozzle, you can direct the flame of a gas burner at it.
- We clamp the new engine pulley with pliers and heat it with a blowtorch.
- We place the heated pulley on the engine shaft and then quickly, before it cools down, press it in place using a hammer and a metal rod.
Keep in mind that the impacts should be light to avoid damaging the engine. Hot pressing usually doesn't require much force. Once the pulley cools, it will fit securely on the shaft. That's it, all that's left to do is install the engine, then attach the drive belt and install the rear wall. The car is ready to test drive!
Interesting:


4 reader comments
Add a comment
Headings
Washing machine repair


For buyers


For users


Dishwasher


Thanks to the author for the tip—heating the gas tank pulley bolt. The bolt was stuck. I didn't heat it with a torch, as I didn't have one, but with a SKIL 1800-watt hair dryer. Before heating, I covered the plastic gas tank with corrugated cardboard, just in case. Then set the hair dryer to position 3 (approximately 570 degrees Celsius) and heated the bolt for about 2 minutes. Then, give it a gentle tap on the wrench, and—off it went.
Then it was the same as with you... the only difference was that my bolt was M12x30, countersunk 90°, with an internal 6-sided "8"
By the way, I also pressed both tank bearings with the bushing heated.
P.S. I noticed this crap. The end of the bushing facing the tank is heavily damaged by corrosion. Judging by its appearance, the bushing is made of a third-grade aluminum alloy—in other words, crap.
I use a hair dryer for microchips—it's not powerful enough, but I have a camp stove and a hammer blow—no one is indifferent! I got it unscrewed!)
Brilliant advice. But what if the pulley is plastic? Should I heat it with a soldering iron or a hair dryer? 🙂
Also interesting