Why does my LG washing machine fill with water and then drain it immediately?
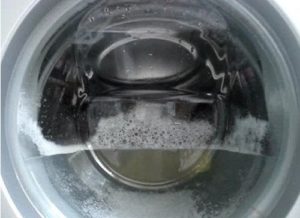 When a washing machine fills with water and immediately drains without washing, washing quality noticeably suffers. The extended cycle and constant noise from the washing machine are only the first half of the problem; the second is leaving dirty clothes behind and risking flooding. To restore your washing machine to its previous performance, you'll need to address the underlying issue and quickly fix it yourself.
What causes this phenomenon?
If the water intake does not stop without stopping the system, then the cause of the LG washing machine malfunction lies in the drainage system. Several malfunctions can lead to loss of control over the water level and its retention in the tank.Among them, the following breakdowns are most common:
- violations during installation and connection of the drain hose to the sewer;
- sewer system blockage;
- faulty waste liquid release valve;
- pressure switch failure;
- malfunctions in the control board.
As soon as it's noticed that the washing machine isn't retaining water in the drum, it's essential to immediately begin diagnostics and repairs. If you continue using it as before, in addition to the obvious increase in utility bills, you'll also face significant wear and tear on the washing machine's parts and the risk of flooding. Therefore, we quickly begin looking for the problem.
Checking the drain hose connection
The diagnostic process begins with the most common cause of incessant draining and ends with the most rare and widespread. The inspection begins with the drain hose, which is often damaged due to improper installation or careless movement of the machine. There are two ways to determine if the hose is improperly attached.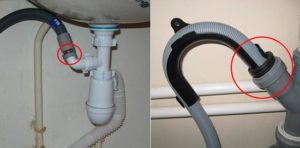
- Visual inspection. It's simple: according to the operating instructions, the hose is secured above the bottom of the washing machine's drum. For LG models, the minimum mark is approximately 0.5 meters above the floor. If this requirement is met, water will not leak out of the drum. Otherwise, the newly filled liquid will not be contained within the machine and will immediately flow down the drain. The pressure switch will respond to a leak by signaling a low water level and initiating a refill. And so on ad infinitum.
- Test wash. If the hose is unreachable, perform a simple test. Run a quick cycle and wait to see if the machine immediately begins draining. If it does, you'll have to turn the machine around and reposition the drain hose.
The LG washing machine comes with a plastic loop, designed by the manufacturer specifically for attaching the hose to the rear panel of the machine.
If the drain hose is fine, we continue with the diagnostics. Next up is checking the sewer pipe.
The sewer pipe is clogged
Another potential problem is a clogged common drain pipe. This often occurs when several residents flush at the same time. The riser overflows, the sewer pressure drops, and liquid from the drum is pushed into the sewer.
You can confirm your guess with a simple test: open the faucet in the toilet or kitchen and observe whether the water drains slowly. If the sewer system in the house is clogged, then similar problems will arise with the drain in any room.
The only solution is to clean the drain. This can be done yourself using specialized products or with the help of a local plumber. To avoid interrupting your laundry, we recommend using this trick: disconnect the drain hose from the drain and place the free end in the bathtub or sink. The water will begin to drain into the sink, temporarily resolving the problem. There's just one caveat: you'll need to thoroughly clean the ceramic tile after washing.
Problems with the water level sensor
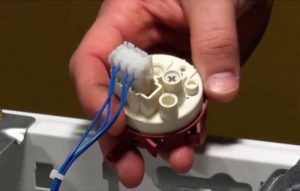 If continuous flushing starts suddenly, the pressure switch is likely at fault. It monitors the water level in the tank, sending signals to the control board to start and stop water intake. When a malfunction occurs, the sensor fails to detect the tank's fullness, leading to the maximum level being exceeded and an emergency "self-drain." This means the machine drains the water into the sewer, protecting the electronics from leakage. The following malfunctions can lead to pressure switch failure:
- oxidized contacts of the device;
- short circuit in the wiring;
- violation of the seal of the sensor membrane;
- damage or blockage of the pressure tube.
To check the operation of the pressure switch, it must be removed from the machine. Disconnect the washing machine from the power supply, remove the top cover Look for a round plastic cover at the back of the housing. Unscrew the fasteners and carefully inspect the part. If there are any signs of oxidation on the contacts, clean the ends with a knife. However, if there is obvious damage to the tube or a suspected short circuit in the wiring, replacement is necessary. Replacing the level sensor with a new one is simple and inexpensive.
Before disassembling the washing machine, it is necessary to completely de-energize the unit.
- We purchase a pressure switch that matches the serial number.
- We disconnect the long thin tube from the faulty sensor.
- We loosen the terminals, unscrew the two fixing screws and remove the sensor.
- We install a new pressure switch into the seat and secure it with screws.
- We connect the wiring through the terminals.
- We attach a thin hose into place.
After fixing the problem, run a quick test wash without any laundry. If water fills and doesn't drain, the problem is solved, and you can continue washing. Otherwise, continue troubleshooting.
Water inlet valve
If the inlet valve fails, the machine doesn't stop filling—it continuously fills the tank with water. The process repeats itself, and the automatic draining process occurs again. Only replacing the valve can resolve the issue.
- We select a valve and removable clamps that match the model serial number in advance.
- We disconnect the machine from the power supply.
- Remove the top cover from front-loading washing machines and the side cover if the model is top-loading.
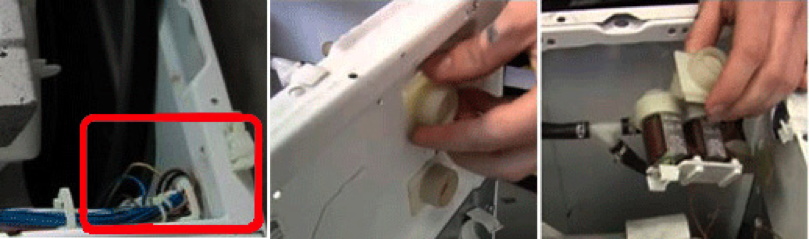
- We find the valve, which is located next to the existing hose.
- We free the device from pipes and wiring.
- We unscrew the screws holding the housing and remove the clamps.
- We take it out by turning the part slightly.
- We install the new valve in its original place.
That's it. All that's left is to secure the new part with clamps and connect the hoses and wiring. Finally, replace the lid and run a test wash.
Problem with electronics
Worse, the drain pump turns on due to a problem with the control board. A corresponding error code appears on the washing machine's display, allowing you to pinpoint the source of the problem. First, try resetting the system and restarting the wash cycle. If the problem with the kit-draining occurs again, it's best to call specialists; further tinkering with the electronic module on your own is dangerous, complicated, and risky.
In any case, action is necessary. Incessant water leakage is an alarming "symptom" that, without appropriate "treatment," can permanently damage the equipment.
Interesting:


2 reader comments
Add a comment
Headings
Washing machine repair


For buyers


For users


Dishwasher


Great tip! Thank you very much!
Everything is accurate and clear. Thank you very much!