My LG washing machine is not getting water.
 If your LG washing machine isn't filling with water, you won't be able to start your scheduled wash cycle. You'll have to forget about dirty laundry and troubleshoot the machine, as a dry drum can signal anything from a minor malfunction to a more serious issue. Our instructions will help you determine whether the problem is caused by the valve, pressure switch, door lock, or heating element.
Why does this happen?
There are several possible causes for water intake issues, ranging from a simple clogged hose to a faulty control board. Troubleshooting is made easier by the fact that certain problems occur more frequently in LG machines than others. These include the following:
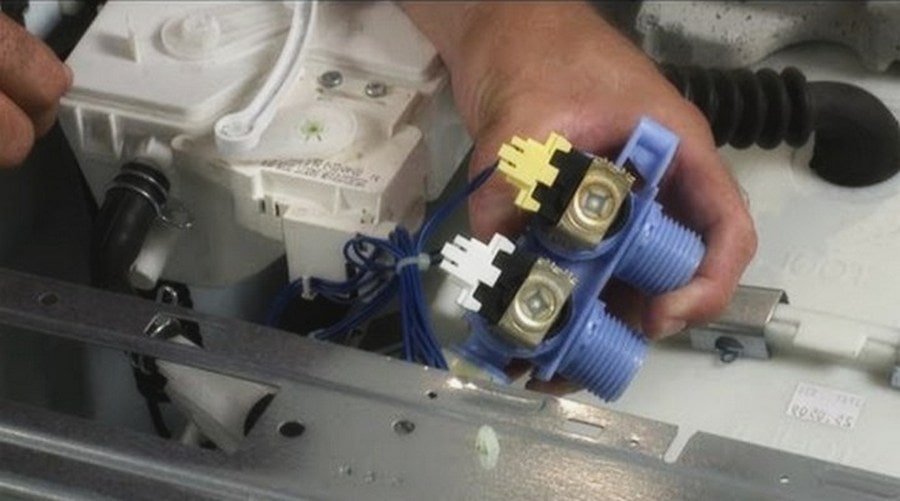
- A faulty water inlet valve. A clear sign of this problem is unwashed detergent in the tray, as water should flow into the detergent drawer first. To confirm this, check the part: apply 220 volts to the valve and listen. If you hear a click, there's a short circuit, and everything is fine. In this case, the drum will begin to fill, and the problem will be resolved. Otherwise, a replacement will be required.The valves are checked in pairs, and if there is no click, they are replaced using a slotted screwdriver.
- The water supply strainer is clogged. When clogged, the machine takes a long time to fill the tank, making an unpleasant buzzing sound.
- A non-functioning pressure switch. If the level sensor isn't sending signals to the control board correctly, for example, if it detects a full tank, the intake won't start. Therefore, remove the top cover, locate the round part with the tube extending downwards, and disconnect it from the "box." Then blow into the tube and listen for one or two clicks. It's likely that due to prolonged stagnation, the hose has become clogged with cobwebs, dust, or fabric fibers, which will clear up after "blowing" the clog.
- Control board problems. Burnt-out resistors on the washing machine's control unit often prevent proper operation. To fix this, you need to replace them or purchase a new module. However, we strongly advise against attempting to fix the electronics problem yourself—such work should only be performed by a service center technician.
In LG washing machines, the most common causes of problematic systems are problems with the inlet valve, clogged hoses, a broken pressure switch, and a failed pump.
It's also worth checking the wire running from the pressure switch to the drum. It often wears out prematurely and begins to leak air, disrupting the level sensor. Proper operation of the door lock system is also important, as receiving erroneous signals may cause the system to assume the door is open and prevent the wash cycle from filling with water.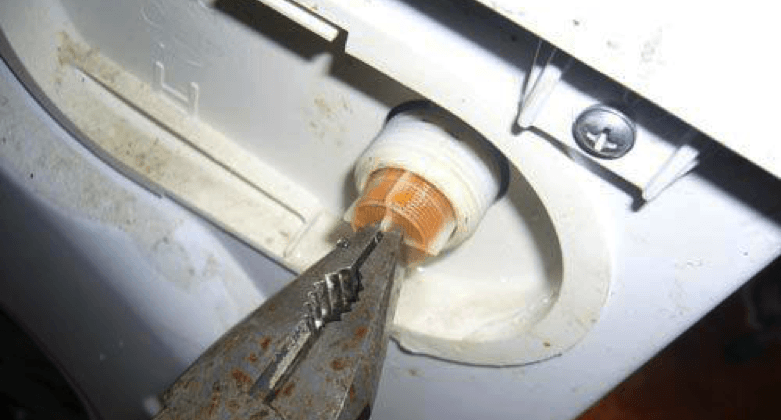
Another cause is a burnt-out pump. If the circuit board doesn't receive a signal from the pump to drain, the machine won't start the cycle or actually draw water. Fixing this yourself is unlikely, as it will require lengthy and extensive repairs. It's best to contact a professional immediately.
Initial actions
If you notice problems with the water supply to the tank, you need to take action. If the machine was purchased less than a year ago and is still under warranty, the answer to the question "what to do" is simple: contact a service center with your receipt and warranty card. Don't open the case yourself and try to fix the problem.
It is possible that there is no water in the tank due to simple carelessness: the hatch door is not closed tightly or the water supply is shut off.
Owners of older machines will have to take a different approach and pay for repairs out of pocket. Doing it yourself will be cheaper, but will require more time and effort. First, we need to identify the washing machine's weak point, so we'll check the above-mentioned system components in sequence, moving from simple to complex.
At the start, if you notice a missing set and a barely audible buzzing sound, you should do the following:
- check if the water supply tap is closed;
- an open tap must be closed;
- disconnect the inlet hose from the washing machine, lowering the end into a specially prepared container;
- Feel the inlet hose to eliminate any possible kinks or blockages.
If there's no improvement after successfully performing "first aid," check the inlet hose filter. More specifically, the filter inside it—a fine metal mesh. It often becomes clogged with scale and small debris.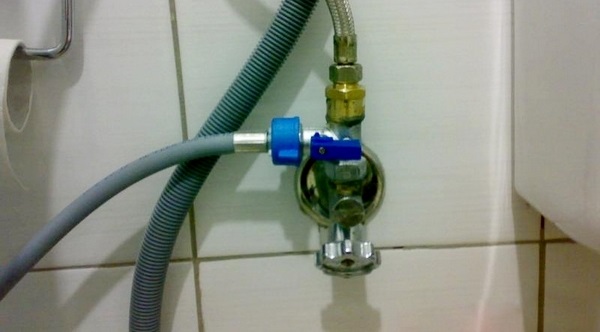
- Disconnect the hose from the housing.
- Inspect the internal mechanism of the valve and locate the mesh.
- Take a pair of pliers and grasp the special projection on the filter.
- Pull out the mesh (without twisting).
- Clean the filter with a needle or a strong stream of water.
- Put the part back in place.
Next comes the coarse filter. Typically, this mesh is installed after the faucet and is also prone to scale buildup. But here, the cleaning method is different: take two wrenches and, holding the joint with one, unscrew the bolt with the other. First, place a container under the pipe and turn on a strong stream of water. The flow will clear out the impurities, and all that's left to do is replace the nut.
Inlet valve or heating element
Most often, water doesn't flow into the tank due to faulty valves. The problem is that these parts can't be adjusted or blown out, so they need to be replaced.
When repairing the machine, it is necessary to turn off the water and disconnect the power supply to the machine.
- We turn off the water tap and disconnect the washing machine from the power supply.
- Disconnect the inlet hose from the valves located at the top of the rear cover and drain the water into a prepared container or sink.
- We remove the fasteners from the top panel of the case.
- Fix the location of the connectors on the reel on the camera and release the wiring.
- Using pliers, disconnect the hoses from the terminals, keeping in mind that liquid always accumulates in them.
- We release the valve retaining screw.
- We take out the inlet valve.
- We install a new valve in the seat and secure it with fasteners.
- We return the hoses and wiring.
- We check the reliability of the fixed elements.
- We install the lid on the washing machine and tighten it with bolts.
- We connect the inlet hose.
- We connect to the water supply and electricity, and then run a test wash to check.
A faulty heating element can also cause the machine to stop drawing water. If the scale layer cannot be removed manually or the multimeter indicates a breakdown, the heater will have to be replaced.We will provide instructions now.
- We unscrew the back panel of the machine body.
- We find the heating element at the bottom behind the drive belt.
- Using pliers, we pull the temperature sensor and ground wires out of the connectors.
It is recommended to record each step on paper or a photo to facilitate reassembly and avoid errors when connecting wires.
- We loosen the nut holding the heating element with a wrench.
- Carefully swing the heater up and down and remove it along with the cuff.
- We lubricate the rubber band with dishwashing gel and insert it into place.
- We install a new heating element in the vacated space.
- We connect the previously removed fasteners, wiring and temperature sensor to the part.
If the inspection reveals that the heating element and valves are in perfect working order, but water still isn't filling the drum properly, we should check the machine door. The door locking mechanism or door locking system is likely malfunctioning, and the control board isn't sending the command to fill the drum. Therefore, we disconnect the machine from the power supply and begin testing the locking mechanism, checking the contacts with a multimeter, and cleaning them.
Interesting:


Readers' comments
Headings
Washing machine repair


For buyers


For users


Dishwasher


Add a comment