Why doesn't my washing machine use conditioner?
 It's easy to notice that your washing machine isn't removing fabric softener from the dispenser compartment—your laundry will be devoid of its pleasant scent, and the dispenser will be left with untouched fabric softener. This situation can lead not only to a lack of fragrance and static in your laundry, but also to a serious worsening of the problem, even leading to complete machine failure. Before diagnosing your washing machine and calling a service center, it's worth assessing the extent of the problem yourself. Our detailed instructions will help you diagnose and troubleshoot the problem.
Possible causes of this failure
Don't neglect fabric softener left in the dispenser. A seemingly simple malfunction that doesn't interfere with a full wash cycle can signal serious problems with the machine or, over time, develop into a more serious malfunction. In any case, it is necessary to check all possible sources of the incident, starting from “easy” ones and ending with the most complex malfunctions. We will list the most probable and easily eliminated causes first.
- Weak water pressure. Most often, a washing machine's conditioner won't drain due to insufficient water pressure. In this case, the washing machine takes a long time to fill at the very beginning of a wash cycle, making an unusual rustling sound. It's likely that the water supply valve is only half open, or there are pressure issues throughout the entire water supply system. The latter is easy to check: turn on the water in another location and check the flow. If the problem is due to weak water supply, you'll need to contact your utility company.
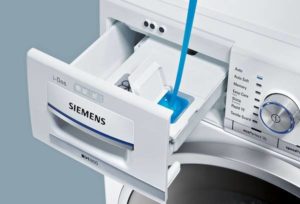
- Wrong compartment selection. Fabric softener is stored in a special compartment marked with a flower symbol. It's common to mistakenly pour fabric softener into the detergent compartment, which is used only for pre-wash. Check your machine's manual and check the correct compartments.
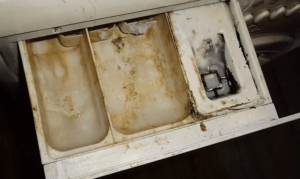
- Clogged dispenser. Residual conditioner can dry out, stick together, and eventually block access to the dispenser. Regular cleaning of the flush channels can solve this problem. It is recommended to repeat this procedure at least once every two months.
- Overuse of conditioner. Smart modern washing machines can monitor the amount of conditioner used, and gel residue in the drawer clearly indicates that the drawer is full.
Excess leads to clogging of the flush channel, so carefully measure the dose for each wash.
- Poor-quality conditioner. Pay attention to the quality and expiration date of the conditioner you're using. Expired or low-quality conditioners are undesirable not only because of their ineffective and dangerous ingredients, but also because of their unacceptable viscosity. They become too thick and sticky, making it difficult to rinse. Therefore, it's important to assess the condition of the gel before pouring it into the detergent dispenser and, if necessary, replace it or choose a higher-quality brand.
If there are no issues with the pressure, expiration date, or rinse aid quantity, and the tray has been thoroughly cleaned recently, we should continue our investigation. Possible causes include a faulty inlet valve. To more accurately determine the cause, we'll need to carefully examine the amount of rinse aid remaining and evaluate other factors and signs.
Pay attention to signs of a problem
Once water pressure issues and accidental error have been ruled out, there are only three options left: cleaning the inlet valve filter, partially repairing it, or completely replacing it. The machine itself will tell you which of these steps is needed. Just pay attention to the following signs:
- The conditioner and detergent are only partially rinsed out, and the machine takes a long time to fill the tank when starting the cycle. This is due to a clogged inlet filter mesh due to poor-quality, old water pipes and excessively hard water.
- The rinse aid isn't being rinsed out at all, and the machine can't fill with the required water, displaying an error and not starting the wash. A completely clogged filter or a broken valve can cause the fill to stop.
- All the detergent remains intact, water fills quickly, and the machine begins the cycle. This is where things get more complicated: the mechanism that dispenses water into the dispenser has broken. A nozzle, which rotates via a special spring-loaded cable, is responsible for "drawing" the conditioner. If the cable breaks or jams due to prolonged use, the spray flows into the wrong compartment or misses the water entirely.
Any of these problems requires immediate action. We outlined the solution above. You will have to clean the filter, replace the inlet channel, or repair the water supply mechanism to the dispensary.Detailed instructions for each case are provided below.
Cleaning the inlet valve filter
The most common reason why rinse aid isn't flushing is a clogged valve filter. To restore balance, it's necessary to thoroughly clean it of any scale deposits. Anyone can do this, as long as they follow a specific procedure.
- Disconnect the machine from the power supply and water supply.
- We disconnect the inlet hose from the body using our hands, pliers or wire cutters.
There will always be water left in the inlet hose, so be sure to have rags or a container ready to collect it.
- We find the plastic mesh filter, clamp it with the tool and pull it forward.
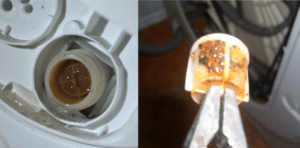
- Rinse under a strong stream of tap water. If there's a lot of scale buildup, soak the part for 30-60 minutes in a solution of citric acid and warm water (1 teaspoon per cup). Water temperature is important: boiling water can permanently damage the plastic, while cold water won't allow the citric acid to fully work.
Once the mesh is clean again, replace it and screw on the inlet hose. After all these steps, make sure there are no leaks at the connection. Next, test the machine: connect it to the power supply and water supply, run any program, open the drawer, and check to see if water flows into the drawer.
Valve replacement
 If the valve is faulty, you can't avoid replacing it. Doing this yourself isn't difficult, though it can be a bit of a hassle. First, you need to purchase a similar valve, using the washing machine's serial number as a guide, and then proceed with disassembly and installation. The instructions for what to do and in what order are as follows:
- We disconnect the machine from the electricity and turn off the tap on the water supply.
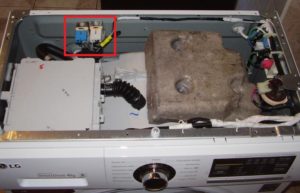
- To locate the valve, unscrew the two screws holding the top cover and remove the panel. Sometimes you'll need to slide the cover away from you to release the latches. Owners of top-loading machines will need to remove the corresponding side panel (use the location of the inlet hose as a guide).
It is strongly recommended to mark or photograph the location of the valve and all associated wires and pipes to avoid assembly errors.
- We free the part from the wiring and hoses. To do this, we loosen the reusable clamps with pliers or cut the disposable ones. Don't forget to purchase replacement retaining rings in advance.
- We disconnect the valve from the body by releasing the latches or unscrewing the retaining screws.
- Carefully remove the part, turning it slightly clockwise.
Next, if necessary, we'll diagnose the cable and nozzle and repair the water supply mechanism or install a new valve immediately. Installation is always done in reverse order: insert into the groove with a twist, connect the wires and hoses, secure with clamps, and close the panel. All that's left to do is run any wash cycle and check if the conditioner is being drawn in.
Interesting:


1 reader comment
Add a comment
Headings
Washing machine repair


For buyers


For users


Dishwasher


There are also other problems, such as air conditioner leaking from the tray and water remaining in the tray.