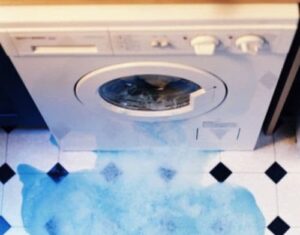
Water leaks from the washing machine during washing.
When your washing machine leaks from the bottom during a cycle, you need to act quickly. There are two options: call a specialist to diagnose the equipment or try to determine the cause of the leak yourself. Let's look at where to start checking your "home helper" and which components to inspect first.
We are looking for the leak location
If you notice that water is leaking during washing, be sure to immediately turn off the electrical appliance. It is important not to step into a puddle near a working machine, as this could cause an electric shock. If there is too much water on the floor and you cannot reach the washing machine's power cord, turn off the power supply using the control panel.
What to do next? Wipe up the water from the floor and inspect the machine from the front, back, and sides. You should also tilt the washing machine to inspect the bottom. For a more thorough inspection, it's best to remove the rear panel (for front-loading machines) or the side panel (for top-loading machines).
It is important to accurately determine the location of the leak - only by finding the cause of the problem can it be fixed.
For example, if the plastic tank of the washing machine is leaking, it will need to be replaced—a rather expensive repair. It's also possible the drain hose is the problem, and simply purchasing and installing a new hose will fix the issue. If water leaks from under the drum door during a wash cycle, the sealing cuff is likely damaged.
Therefore, it's important to locate the leak and then plan further repairs. A washing machine can leak due to:
violation of recommendations for the use of automatic machines;
use of low-quality powders, gels and conditioners;
factory defect;
damage to a separate unit or internal part of the machine.
You can usually fix a leak at home, on your own. Let's look at how to diagnose your "home helper" and what components to inspect first.
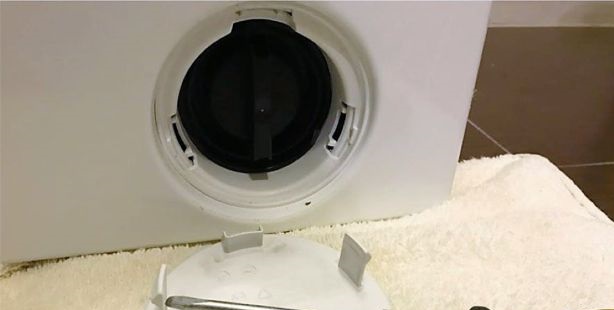
Through the filter or the base of the drain hose
A leak isn't always a sign of a malfunction. Sometimes a puddle can appear due to simple user carelessness. For example, you should check whether the waste filter cap is tightly screwed in and whether the emergency drain hose is properly plugged.
If you have recently cleaned the drain filter, make sure the waste bin "lid" is properly and securely in place.
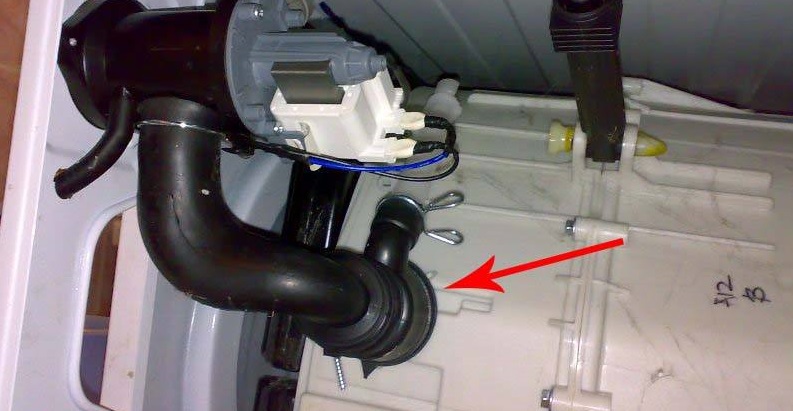
If the drain filter plug is screwed on correctly, inspect the area where the drain hose connects to the pump. To do this, look underneath the washing machine. This connection often starts leaking due to a loose clamp or cracks in the fitting. Usually, sealing the cracked area with a waterproof sealant is sufficient. A much more reliable solution is to replace the entire snail.
Powder box or tube
Even if a puddle forms under the washing machine, the source of the leak may be located much higher than the floor. Therefore, the powder compartment is the next step. Carefully inspect the detergent drawer; it is likely to be heavily soiled, causing overflow. When water encounters an obstacle on its way, it does not go inside, but flows out of the washing machine.
Checking the detergent drawer is very simple. Fill its compartments with water and wipe the bottom with a napkin to ensure it's dry. Then, observe the drawer—if it's really leaking, you'll see droplets appearing at the bottom.
The inlet valve can begin to malfunction even on washing machines that have been in use for 1-2 years. Some manufacturers try to cut costs by equipping their machines with substandard components. Therefore, even with careful use, the first malfunctions may appear after a short time.
If your washing machine starts leaking immediately after starting a cycle, the water inlet valve hose is likely to be to blame.
To diagnose the problem, you'll need to remove the machine's "cover." Locate the inlet valve and inspect the hose. The clamps may have loosened or cracks may have formed on the hose surface. You can replace the hose yourself.
Sometimes a leak is caused by damage to the drain hose connecting the tub and pump. To confirm this, look underneath the washing machine. If you see any leaks on the corrugated hose, you'll need to install a new, undamaged element. Sometimes, simply tightening the clamps at the joints is enough.
The cuff is torn, the tank is leaking
The worst case scenario is when the leak is caused by a crack in the tank. Sealant or a patch usually isn't an option; you'll have to buy a new tank. This repair will be quite expensive for the owner.
A tear in the plastic can occur if a sharp object, such as a bra underwire, a bobby pin, a screw, or a paper clip, gets caught in the space between the tub and the drum. Therefore, it's important to wash underwear in special bags and carefully check the pockets of items before loading them into the machine. Also, frequent washing of heavy shoes can cause tears.
When water leaks from under the hatch door, inspect the seal. If small cracks are visible on its surface, they can be treated with a special waterproof adhesive. If the defect is more severe, it can be repaired with a rubber patch. In extreme cases, the entire seal can be replaced—the part is inexpensive and fairly easy to install.
Users can prevent rapid wear of the rubber seal. To ensure the seal lasts as long as possible, it's important to carefully load and unload laundry and avoid overloading the machine. It's also important to ensure that no objects, such as coins, paper clips, or keys, are allowed to enter the machine, which could damage the seal.
We carry out repairs
If you decide to repair your washing machine yourself, proceed with caution. First, study the documentation that came with the machine. When your automatic washing machine is still under warranty, it is best to call the service center and call a specialist. If the warranty period has long expired, you can get "inside" yourself.
Now we'll describe in detail what to do in each specific case. The procedure will vary depending on the location of the leak. First, let's look at what to do if water is leaking from below.
Unplug the appliance. Be careful when unplugging the cord, avoiding contact with water. This precaution will help prevent electric shock. If you can't unplug the appliance without stepping in a puddle, turn off the power at the circuit breaker.
Turn off the valve that supplies water.
Drain the water from the washing machine using the emergency drain or waste filter. To do this, remove the lower panel or open the service door.
Open the hatch and take the laundry out of the drum.
Determine the cause of the failure and begin troubleshooting. For example, if the hoses are damaged, replace them or lubricate them with waterproof glue. If the clamps are loose, tighten them more tightly. If the problem is a leaky gasket, purchase and install a new seal.
After the repair, run an empty cycle. Observe the machine during the test wash. This will help ensure that the cause of the leak has indeed been fixed.
If water is leaking from the upper left corner, it's most likely the dispenser. Remove and inspect the powder compartment. If there's a thick layer of deposits on the walls, scrape it off. If the drawer is cracked, you'll need to buy a new one.
A leak coming from the left corner could also be caused by excessive water pressure. In this case, simply close the inlet valve, thereby slowing the flow of water into the washing machine. If the leaks are coming from under the drum door, the problem is almost certainly the seal. Check for cracks in the seal and make sure it hasn't dried out. Minor damage can be covered with water-repellent glue or masked with special patches.
If the sealing rubber has lost its elasticity or has extensive damage, it is better to immediately install a new cuff.
If the washing machine leaks while filling the tank, be sure to check the inlet valve hose. To do this, remove the machine's housing cover. If any defects are detected, it's best to install new hoses immediately.
Sometimes a leak at the beginning of a cycle is caused by the filler hose. Remove the top panel of the washing machine and inspect the connection points for drips. If you notice any leaks, remove the hose, clean the connection area of any remaining sealant, wipe it dry, reapply a special adhesive to the base of the hose, and reinstall it, securing it with clamps.
If the problem is a damaged tank, you'll need to disassemble the entire washing machine. Removing the entire unit from the machine alone will be difficult, so you'll need to call a helper. If the crack is significant, the entire plastic tank must be replaced. Minor defects can be sealed with a special sealant.
Sometimes a washing machine starts leaking during the spin cycle. In this case, it's highly likely that the seal is damaged and the bearing assembly is worn out. To access these components, you'll need to disassemble the machine's drum.
During the repair, you'll need to remove the top, rear, and front panels of the body, remove the instrument cluster, and disconnect all wiring, pipes, sensors, and other components from the fuel tank. Replacing the seal and bearings is considered quite complex. Therefore, it's best for complete novices to seek professional help.
 When your washing machine leaks from the bottom during a cycle, you need to act quickly. There are two options: call a specialist to diagnose the equipment or try to determine the cause of the leak yourself. Let's look at where to start checking your "home helper" and which components to inspect first.
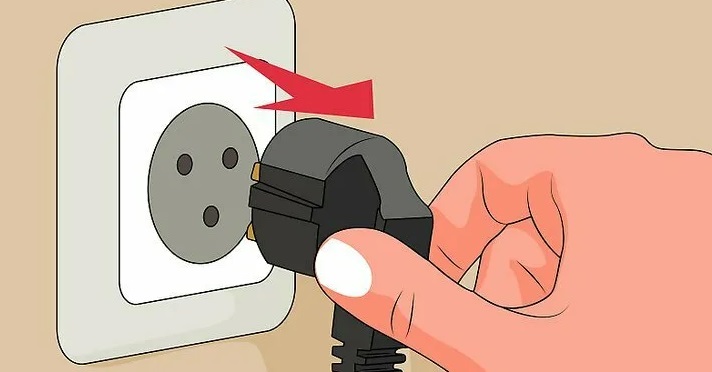


Add a comment