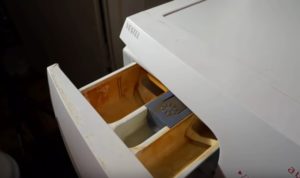
There is water left in the conditioner compartment of the washing machine.
 If you notice water remaining in the detergent dispenser after a wash, don't put off diagnosing your washing machine; it needs to be done as soon as possible. This problem can occur with any appliance, regardless of brand or model. Stagnant water in the conditioner compartment indicates a malfunction in the system. Let's look at why liquid isn't draining from the dispenser and what might be causing it.
What should be checked?
You can diagnose the system yourself if you know what details to pay attention to first. There can be several reasons for fluid accumulation in the compartment.
- What is the water pressure at which the system is supplied? The water pressure in the water supply system may be very low, resulting in weak water pressure. You can detect insufficient water pressure by listening to the washing machine. If the machine takes an unusually long time to fill with water and makes a rustling sound, this indicates either insufficient water pressure or an inlet valve that is not fully open.
- Is the fabric softener dispenser properly filled? Perhaps, in a rush, you mixed up the sections and simply poured the product into the wrong compartment.

- Check the air conditioner's drain line for a blockage. Rinse aid particles settle on the walls of the drain line, causing the drain opening to become increasingly smaller. This eventually leads to water collecting in the section.
- Is the fabric softener dosage correct? Some users believe that adding too much will make clothes even softer and more fragrant. In fact, using too much will have the opposite effect: the fabric softener will dry out, clog the channel, and simply not be absorbed.
- Are you using a high-quality fabric softener? Fabric softener that's too viscous or sticky can also cause a clog in the drain hose.
All of the above factors can lead to water remaining in the washing machine. By checking the water pressure supplied to the system, whether the inlet valve is functioning properly, whether the air conditioner drain hose is clogged, and whether too much rinse aid is being poured into the dispenser, you can eliminate the cause of the problem.
We check and clean the filter mesh
What should you do if you need to clean the inlet filter of your washing machine? This procedure is actually very simple and doesn't require any preparation or specialized knowledge. If you follow the step-by-step instructions below, you can clean it in just 10 minutes. The procedure is as follows: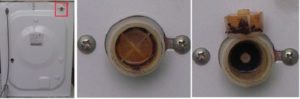
- turn off the power to the washing machine, turn off the water supply tap to the washing machine;
- Disconnect the inlet hose from the housing. Keep in mind that the tube contains some water, so it's a good idea to place a dry cloth on the floor;
- find the filter and use pliers to remove it from the fill valve hole;
- Clean the filter mesh thoroughly with water. For a more thorough cleaning, you can soak the element in water with citric acid added;
- After the filter mesh has dried, put it back in place.
Reassembling the washing machine is done in reverse order. Attach the inlet hose to the machine body and open the shutoff valve to ensure free water flow into the system. Inspect the hose connection to the machine to ensure there are no leaks. Then, plug the washing machine in and run a wash cycle to ensure water is filling the drum freely. A dirty filter element may be the reason water remains in the conditioner compartment after a wash cycle.
If the fill valve is broken
In some cases, water won't drain from the detergent dispenser due to a faulty inlet valve. You can replace the part and repair the washing machine yourself. First, find the location of the component in question. In front-loading washing machines, the filling valve is located at the top of the unit, while in top-loading machines, it is located at the bottom. The algorithm of actions when replacing a part will be as follows: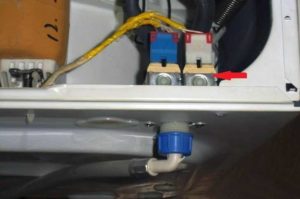
- Disconnect the machine from the power supply, close the shut-off valve, and disconnect the inlet hose from the valve;
- Ensure free access to the part. To do this, remove the top cover of the housing for front-facing models, and the side panel for vertical-facing models. To remove the part, simply unscrew the bolts holding the panels in place;
- Disconnect the supply wiring and all pipes from the fill valve;
- Remove the valve from the housing. The element may be screwed in place or secured with plastic clips. To remove the element, you'll need to unscrew the bolts or loosen the clips.
- Turn the fill valve and remove it from the system.
To ensure all wires and hoses are correctly connected to the new part, it's best to take a photo of the initial wiring diagram before disassembling. This will prevent you from making mistakes during subsequent reassembly.
Next, install the working valve, secure it in the housing, connect the wires and hoses, and replace the housing cover—in other words, follow the same steps as disassembly, but in reverse order. Once assembly is complete, plug the machine into a power outlet and run a wash cycle to test the machine's functionality.
Interesting:


Readers' comments
Headings
Washing machine repair


For buyers


For users


Dishwasher


Add a comment