The water in my Zanussi washing machine won't heat up.
 When a Zanussi washing machine fails to heat water, many users immediately try replacing the heating element. While this usually resolves the issue, other issues can also be the cause. Let's look at which components of the machine should be checked to resolve the problem of washing in icy water.
We are looking for a broken element
It's easy to notice that there's no heating. Firstly, condensation accumulates on the machine door—a clear sign that the glass is being washed with cold water. Secondly, the washing process isn't as good—stains still remain on the fabric after the cycle.
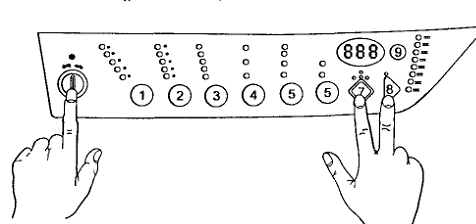
Usually, the automatic machine continues to operate in normal mode, despite the inability to heat up. Sometimes the washing machine freezes at the beginning of the cycle and displays an error code. E61 or E62. It is better to solve the problem as soon as possible.
The easiest option is to take the machine to a service center for diagnostics and repair. However, this method entails additional costs. You can also try to fix the problem yourself; to do this, you need to identify the range of possible faults.
The reason why the water does not heat up during washing may be:
- failed heating element;
- open circuit in the heating element circuit;
- damage in the thermostat circuit or failure of the temperature sensor itself;
- clogging or malfunction of the pressure switch;
- malfunction of the main electronic module;
- failed firmware.
It's very difficult to determine what's wrong with your machine based solely on the symptoms. Therefore, you'll need to perform a standard automatic transmission diagnostic. Let's figure out how to perform the test correctly.
Checking the heating element
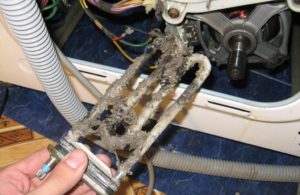
Of course, the first thing you need to do is inspect the heating element. It's located at the back of the machine, directly under the tank. Accessing the tubular heating element is easy. Simply split the housing in half. To do this:
- Find the screw at the bottom, on the right side panel—it's hidden behind a special plug. Unscrew the screw. Repeat the procedure for the left panel of the case;
- Unscrew a couple of screws securing the top of the machine. Remove the cover and set it aside;
- Unhook the drain hose. It is attached to the rear panel;
- Disconnect the housing element (it's shaped like a semicircle, with a hole through which the power cord passes) from the back panel. To do this, bend back the special tab.
- unscrew the two bolts located at the top of the right and left panels;
- Move the back of the case away from the front.
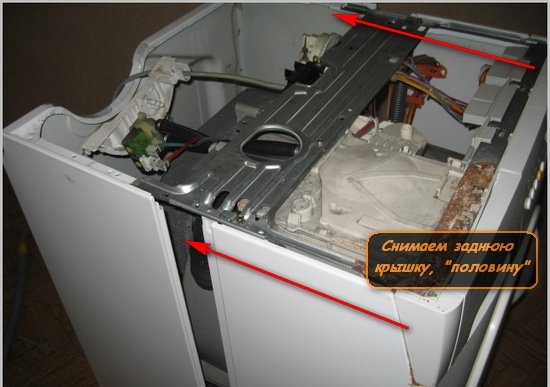
This is how the case is disassembled. In total, you only need to remove 8 bolts.
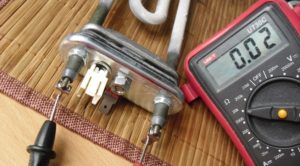
To diagnose the heating element, you will need a special device – a multimeter.
After removing the back panel, you can see the inside of the machine. The tank is immediately noticeable—the heating element is located underneath. Take a photo of the wiring diagram for the heating element and temperature sensor to avoid mistakes when restoring the circuit later.
The further algorithm of actions is as follows:
- disconnect the wiring from the heating element and thermostat;
- start the multimeter, switch it to resistance measurement mode;
- Apply the tester probes to the contacts of the tubular heater;
- evaluate the values on the device display.
If the multimeter screen displays a value between 26 and 28 ohms, the heating element is working properly. A one on the display indicates an internal open circuit, and a zero indicates a short circuit. If the display shows a "1" or "0," the tubular heater will need to be replaced.
If the multimeter shows normal readings, you should check the heating element for breakdown. Set the tester to buzzer mode and touch the probe to the element's terminal. If the device beeps, you'll need to replace the heating element.
 If the lack of heating is caused by a faulty heating element, it will need to be replaced. To remove the tubular heater from its "nest," follow these steps:
- treat the rubber seal with WD-40 spray;
- wait 15-20 minutes;
- remove the temperature sensor;
- loosen the central nut, remove the fixing bolt;
- Gently rock the element and remove it from the housing.
The replacement heating element is selected strictly according to the serial number stamped on the part body.
It's best to remove the heater and take it to the store. A specialist will select a similar heating element suitable for your specific Zanussi model.
Before installing a new part, it's important to clean the mounting area of any accumulated dirt and limescale. It's also a good idea to insert your hand into the "socket" to check for any foreign objects lodged between the tub and the drum. Then, you can install the heating element and connect the wiring, referring to the photos taken earlier.
A sensor that monitors the amount of water
Oddly enough, sometimes the water doesn't heat up during a wash cycle because of the pressure switch. This part can be found under the top cover of the machine, on the right. The water level sensor resembles a washer, and a long hose runs from it into the drum.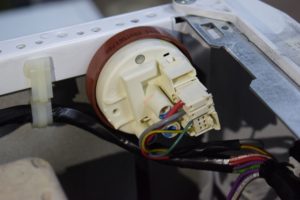
To check the pressure switch, you need to:
- prepare a tube whose diameter will correspond to the size of the sensor fitting;
- disconnect the long hose by removing the clamp;
- insert a tube into this hose and blow into it;
- Listen carefully. If you hear 2-3 clicks, the pressure switch contacts are working.
This is only the first step in diagnostics. Next, you need to inspect the level sensor, ensuring there are no cracks, burn marks, or other damage on the washer or hose. Afterward, be sure to check the hose for clogs.
Next, the most important thing is to check the pressure switch with a multimeter. The algorithm will be as follows:
- Study the sensor's wiring diagram. The contact descriptions are provided in the instructions;
- switch the tester to resistance determination mode;
- attach the multimeter probes to the level sensor contacts;
- Check the numbers on the device's display. If the initial value changes, the pressure switch is working properly.
If you've identified a fault, don't try to repair the pressure switch; it's easier to buy a new one. To remove a faulty level sensor, loosen the clamps, remove the connector with the wiring, and remove the washer. The working part is installed in the reverse order.
If the heating element, thermistor, and pressure switch all pass the test, the problem is likely due to a damaged control board. Messing with the machine's internals without the necessary knowledge and experience is not recommended. It's best to leave this type of repair to a professional.
Interesting:


1 reader comment
Add a comment
Headings
Washing machine repair


For buyers


For users


Dishwasher


Great, everything is accessible and clear.