The need to remove the drum may arise due to a malfunction in the washing machine. In most cases, the bearings fail, and replacing them requires some manipulation of the drum. It will also need to be removed if foreign objects get caught between the drum and the tub, or if the tub itself is damaged. Removing the drum doesn't require calling a repairman. You can remove the drum from your Indesit washing machine yourself, without assistance.
Let's prepare thoroughly for work
Almost every home or apartment has a toolbox containing a multi-purpose tool kit used occasionally for small jobs around the house. This includes tools such as a hammer, screwdrivers with bits of various sizes and types, a cordless drill, pliers, side cutters, and Allen keys. In addition to these tools, a hacksaw is a must-have.
Don't purchase replacement parts in advance of disassembling the washing machine, as you may mislabel them. It's much more efficient and practical to remove them first and then purchase replacements.
Having selected all the tools necessary for the job, you should start preparing the machine. The upcoming repair process will take quite a bit of time, so it's best to set up a fully equipped workspace where nothing will interfere with the necessary work. It is best to move the washing machine to a garage or other spacious area that will provide the most comfortable conditions for repairs.
If you can't move the washing machine to a free, unoccupied space, clear a few square meters of floor space, lay a drop cloth on the floor, and move the machine and tools to the designated area. Once the work area is fully prepared, you can begin the renovation process.
The first stage of disassembly
Before disassembling your Indesit washing machine, disconnect it from the power supply. Then, drain any remaining water that may remain in the bottom of the tank after washing. To do this, place a suitable container under the machine body and carefully drain the water, removing the debris filter first. The removed filter should be thoroughly rinsed, dried, and set aside. Replace it only after completing all work.
Important! When disconnecting wires or small parts, be sure to take photographs of the process. This will help you reassemble the washing machine correctly after the repair is complete.
So, to remove the drum from the Indesit washing machine, follow the following sequence of actions.
Remove the top cover by unscrewing the bolts located on the back of the washing machine. A simple tip will make removal easier: first slide the cover back, then pull it up.
Remove all screws from the back of the case. Remove the cover and set it aside.
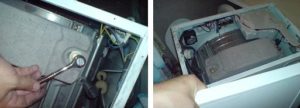
You'll see the outer part of the drum. You'll also see the machine's drive mechanism, specifically the pulley with the drive belt and motor. Disconnect the belt immediately. If you see rusty streaks coming from the center of the tank, you can confidently assume the seal is broken and the bearings are failing.
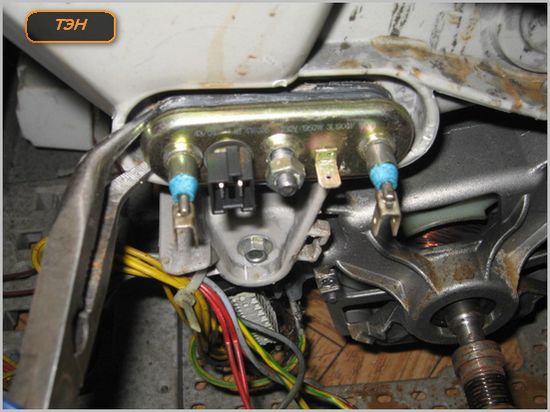
Proceed to disconnect all cables and wires that are attached to the drum. We are talking about power supply of the heating element (TEN), temperature sensor. Be sure to unscrew the bolts used to secure the washing machine motor.
Unscrew the heater fastening nut, then, using gentle rocking movements, remove the part.
Remove the counterweight. It's located on top of the unit and will be visible after removing the top cover. This component is quite large and is necessary to prevent the machine from bouncing during the spin cycle. To remove this component, use a suitable Allen key and unscrew all the parts used to secure the counterweight.
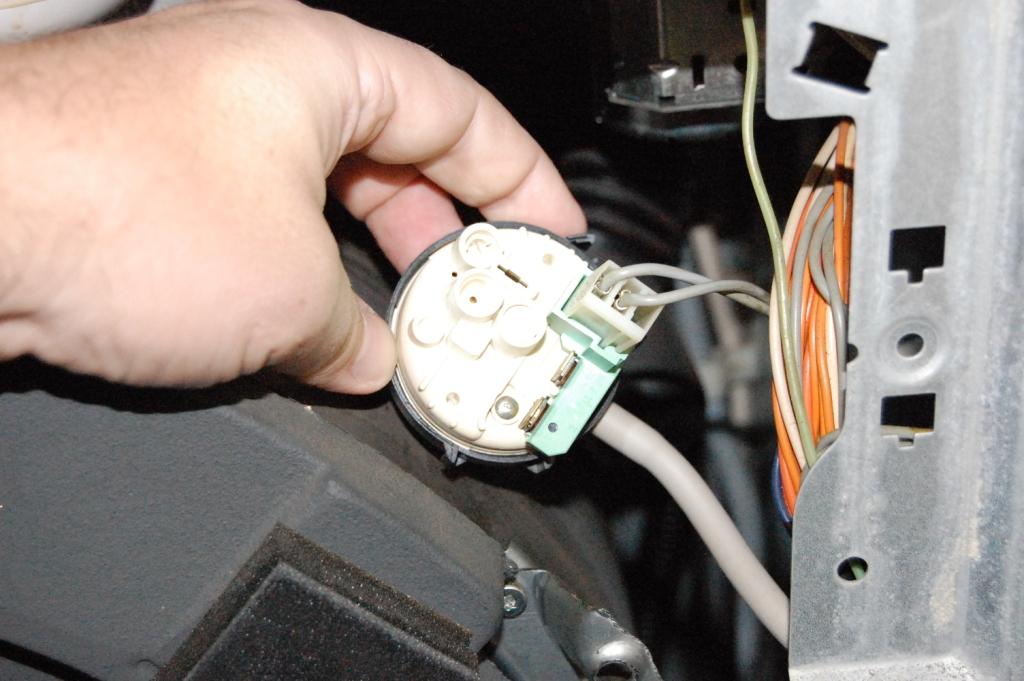
Disconnect the wires and hose leading to the pressure switch. Then carefully remove the part from the device.
Remove the detergent dispenser tray. Then, loosen the hose clamps facing the detergent drawer, remove them, and lift out the dispenser bin.
Slowly lower the washing machine onto its right side and look underneath. If there's no bottom, great; if there is, you'll have to unscrew it. Remove the screws located on either side of the dust filter. Then push the filter housing into the machine's body.
Remove the connector with the wiring from the pump. After this, you'll need to loosen the clamps and remove all the hoses from the pump surface. Once this is complete, you can remove the pump itself.
Carefully remove the machine's motor by lowering the part slightly back and pulling it down.
Unscrew the shock absorbers supporting the reservoir from below.
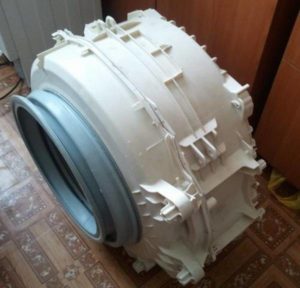
This completes the first stage of disassembling the washing machine. As a result, you'll be able to free the tank and drum, gaining easy access. You can proceed to the next stage.
The second stage of disassembly
Next, return the Indesit machine to its upright position and place it on its feet. This must be done very carefully, as the tank and drum are now attached to the body by only two springs. If the control module is in the way of removing the drum, remove it. To do this, disconnect the wiring, unscrew the module's mounting bolts, and remove the component, making sure to remove the latches that hold it in place.
To remove the tub and drum assembly, you'll need help. Using four hands, lift the mechanism off the shock absorbers and pull the assembly out through the top of the machine.
It seems like you're already at the finish line, but you're not. One of the most difficult tasks remains: removing the drum from the tank. The problem lies in the fact that the tanks in Indesit washing machines are non-detachable. However, even such an inconvenience as a non-detachable tank can't stop us from fixing the washing machine.
It's not hard to guess why the manufacturer uses one-piece drum housings. Firstly, it saves on production costs. Secondly, using a non-detachable part is advantageous for the manufacturer, since if one of its components breaks, the consumer is more likely to buy a new appliance than to pay for repairs equivalent to the purchase price.
But using a little trick, you can cope with the task and remove the drum from the non-separable tank. To do this, the body must be carefully sawed, all necessary manipulations must be carried out and then glued back with a special compound.Here is a step-by-step description of this process:
Carefully inspect the plastic tank, locating the factory weld. Mark the location of the upcoming cut. You can make the necessary holes using a drill with a very thin bit;
Using a hacksaw, carefully cut the tank body along the marks. Separate the cut portion from the drum;
Turn the assembly over, revealing the wheel that connects all the parts together. Remove it, allowing you to release the drum from the tank.
replace all faulty parts;
Assemble the disassembled case halves. For this, you'll need silicone sealant. Use it to join the two cut halves together. It's also recommended to reinforce this structure with screws.
The bulk of the work is complete; now all you have to do is reassemble the system in reverse order. Carefully secure all removed parts and connect the wiring and sensors correctly. The photos you took during the process will help you with this. While this process is certainly labor-intensive, by following the instructions above and performing the repairs yourself, you'll save a significant amount of money on maintenance.
 The need to remove the drum may arise due to a malfunction in the washing machine. In most cases, the bearings fail, and replacing them requires some manipulation of the drum. It will also need to be removed if foreign objects get caught between the drum and the tub, or if the tub itself is damaged. Removing the drum doesn't require calling a repairman. You can remove the drum from your Indesit washing machine yourself, without assistance.
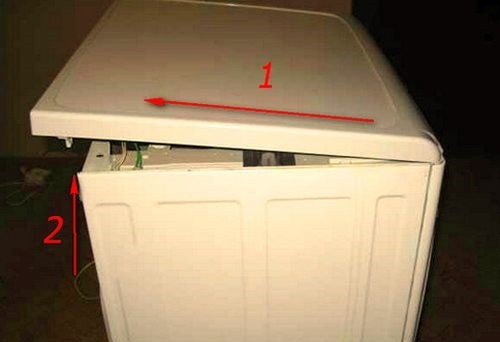
 Next, return the Indesit machine to its upright position and place it on its feet. This must be done very carefully, as the tank and drum are now attached to the body by only two springs. If the control module is in the way of removing the drum, remove it. To do this, disconnect the wiring, unscrew the module's mounting bolts, and remove the component, making sure to remove the latches that hold it in place.
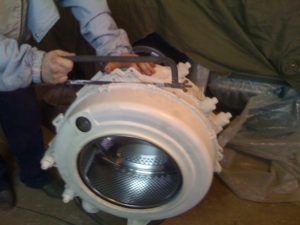 But using a little trick, you can cope with the task and remove the drum from the non-separable tank. To do this, the body must be carefully sawed, all necessary manipulations must be carried out and then glued back with a special compound.Here is a step-by-step description of this process:


Add a comment