How to remove the drum of a Bosch washing machine?
The need to remove the drum of a Bosch washing machine most often arises due to problems with the bearing assembly. Replacing the bearings or adjusting the shaft requires almost complete disassembly of the machine, removing the counterweights, shock absorbers, tub, and many other key components. It's important to proceed carefully and consistently, otherwise you risk damaging parts and worsening the situation. We suggest you explore how to disassemble a Bosch. We'll provide a list of the necessary tools and step-by-step instructions.
Prepare thoroughly first
Disassembling a washing machine will go smoothly and without surprises if you proceed consistently and prepare for the procedure in advance. Preparation involves several steps. First, find a suitable location for the repair—at least 4 square meters, well-lit and ventilated. For example, a garage, workshop, or hallway. We make sure to arrange the room, cover the floor with oilcloth and a rag, since the work will be dirty and wet.
In addition to preparing the site, it is necessary:
read the instructions for the machine, as well as the attached electrical diagram;
collect the required tools and materials;
prepare the washing machine for disassembly;
remember safety precautions.
Before disassembling the washing machine, you must study the manufacturer's instructions and other accompanying documentation.
After reading the instructions, you can gather your tools. First on the list is a screwdriver, or if you don't have one, a Phillips-head and flat-head screwdriver. Next, find a set of wrenches, a hammer, an Allen key, pliers, a multimeter, an impact wrench, and a chisel or chisel. You'll also need a felt-tip pen, WD-40 cleaner, sealant, and silicone grease. To drain the machine, you'll need a rag and a suitable container.
To facilitate reassembly, it is recommended to film or photograph the disassembly process. This will make it easier to follow your steps and return all parts to their designated locations. Particular attention should be paid to the wiring, as reconnection must be made strictly to the specified terminals and positions.
We reach the main node
Even a novice technician can access the drum of a Bosch washing machine independently, as long as they proceed carefully and strictly according to the instructions. The first step in disassembling involves removing all components that come into contact with the drum: from the pressure switch and motor to the shock absorbers and wiring. To make the job faster and easier, it's recommended to follow the given sequence.
Disconnect the circuit breaker from the utilities. In simple terms, unplug the power cord from the outlet and turn off the water.
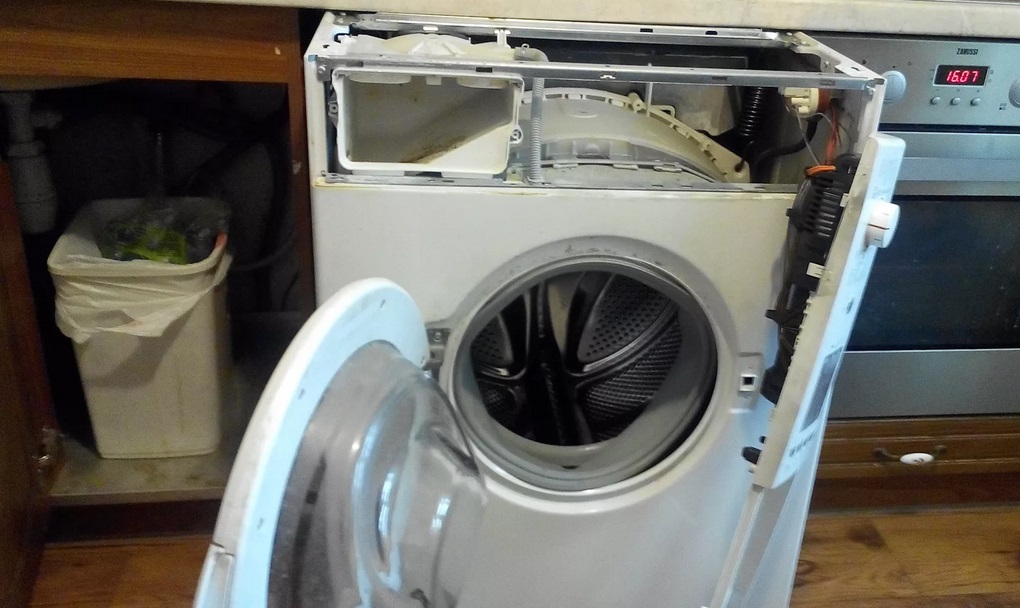
Remove the top cover. Simply unscrew the screws holding the top cover on the back panel, then push and lift it up, releasing the latches.
Unhook the instrument panel. The circuit board is held in place by several fasteners, which need to be loosened. The first pair of fasteners can be found behind the powder receptacle, and the others are located around the perimeter of the module. There's no need to completely disconnect the component: simply place it on top of the machine or hang it on the hook provided on the side.
Drain the remaining water from the washing machine. To do this, locate the access door in the lower right corner, pry it open with a flat-head screwdriver, and remove it from the body. Then, place a container under the waste filter, line it with rags, unscrew the plug, and collect the drained liquid. For ease of access, you can tilt the washing machine forward.
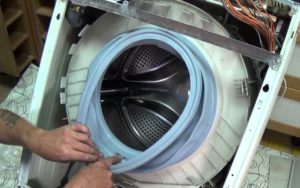
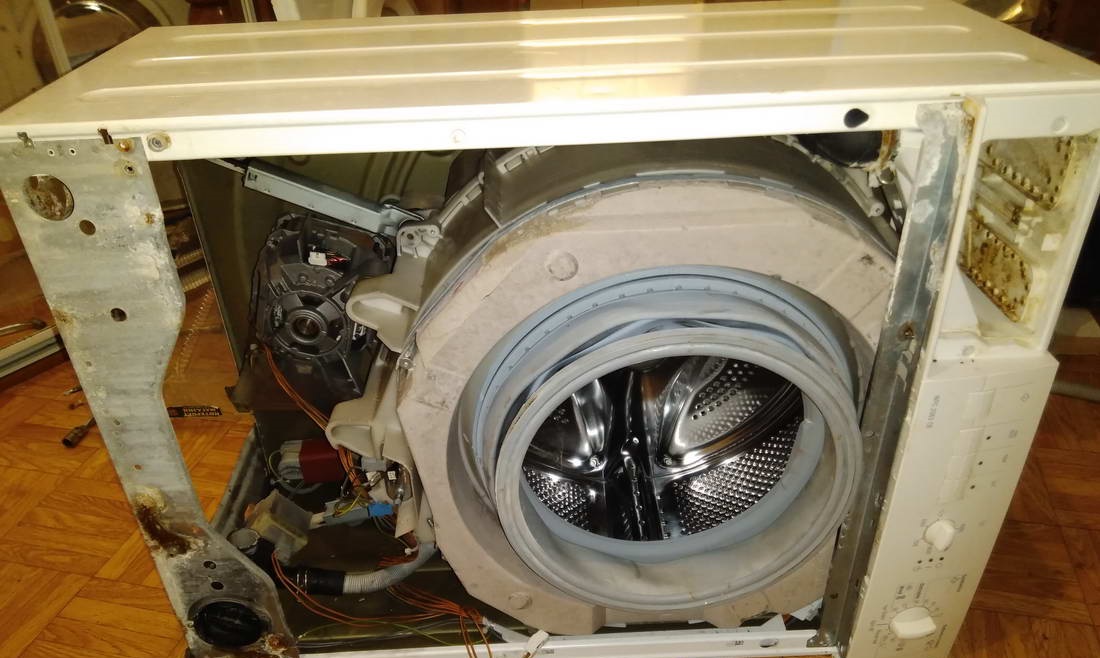
Release the end panel. To remove the front panel from a Bosch, you first need to remove the hatch door. Specifically, locate the clamp on the seal, pry it up with a tool, loosen it, and then insert the rubber band into the drum. Next, unscrew all the screws around the perimeter of the front panel, pull it toward you, and move it away from the body a few centimeters. A gap of 2-3 cm is enough to disconnect the wiring from the door lock and remove the lock. The entire end panel comes off after that.
Remove small components. You'll need to disconnect all wiring connected to the tank, as well as the heating element, pump, inlet valve, and water level sensor. Be sure to disconnect the hose connecting the drum to the detergent drawer. It is important to carry out all manipulations as carefully as possible, as there is a high risk of damaging parts.
Remove the counterweights. All Bosch models have two concrete blocks under the top cover that help dampen vibrations emanating from the drum. To remove them, unscrew the central bolts and swing them around. Be aware, however, that concrete is very heavy—it's best to enlist someone's help.
Remove the shock absorbers. Unscrew the struts securing the tank and the upper springs.
It is better to remove the tank and counterweights with an assistant: these elements are very heavy.
The empty tank can be removed from the housing. Grasp the drum by its edges, lift it, and pull it toward you. Be prepared for the tank to be very heavy.
The removed tank must be placed on a pre-prepared, dry surface with the cross-piece facing upward. Then, remove the retaining bolt from the motor and release the engine.
Disassembling the washing machine is an opportunity to fully check its functionality. It's recommended to thoroughly inspect each removed component and test it with a multimeter. Don't forget about the cleaning process: rinse all dirty parts, including the heating element, hoses, pump, detergent drawer, and drain filter, under running water to remove any soap scum and debris.
We extract and parse the desired element
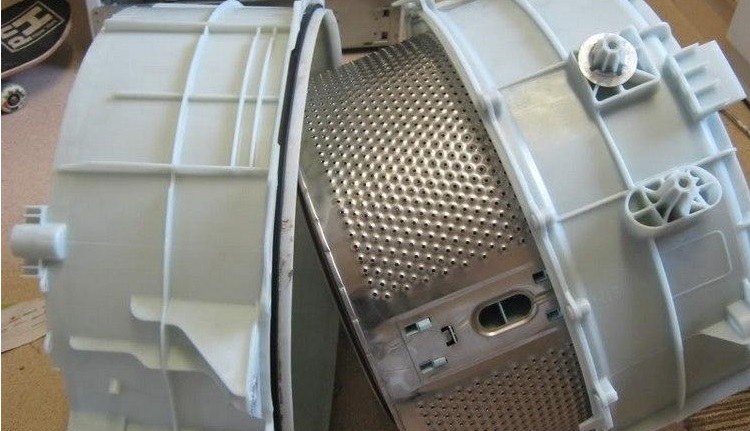
Disassembly of the machine is completed by removing the drum. Naturally, the tank cannot be split in half with bare hands – the structure is reliably sealed against depressurization. To avoid damaging the "casing," it is necessary to verify the material and connection method of the tank reservoir.
Most Bosch washing machines come with detachable plastic tanks, making them easier to separate. To split the tank in half, simply loosen the clamps or unscrew the bolts around the perimeter. In the first case, we use a screwdriver or a knife; in the second, we take out a screwdriver.
The sequence then is as follows:
remove the lower half of the tank;
we dismantle the pulley;
We insert a bolt into place of the pulley and knock out the shaft.
If the shaft doesn't budge, generously lubricate the joint with WD-40 and repeat the procedure after 15 minutes. Afterward, the drum will leave the tank and be ready for subsequent bearing repair or other planned maintenance.
 The need to remove the drum of a Bosch washing machine most often arises due to problems with the bearing assembly. Replacing the bearings or adjusting the shaft requires almost complete disassembly of the machine, removing the counterweights, shock absorbers, tub, and many other key components. It's important to proceed carefully and consistently, otherwise you risk damaging parts and worsening the situation. We suggest you explore how to disassemble a Bosch. We'll provide a list of the necessary tools and step-by-step instructions.
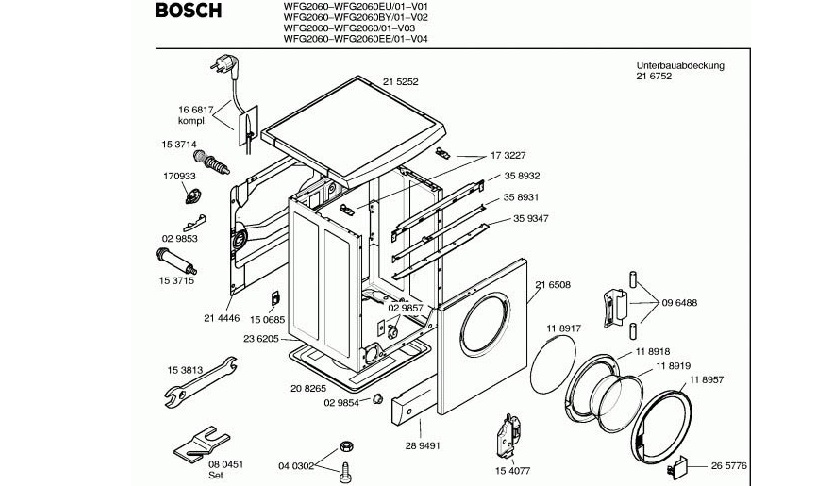


Add a comment