How to remove the drum from a Zanussi washing machine?
 Removing the drum from a washing machine is a fairly labor-intensive task. You'll need to disassemble the machine's housing, remove the counterweights, disconnect the wiring, and disconnect the motor and other components. The process must be performed sequentially to avoid damaging the equipment. Let's look at how to properly remove the drum of a Zanussi washing machine and what tools you'll need.
Preparatory stage
Don't rush into disassembling the washing machine with a screwdriver. To ensure a smooth repair, it's important to follow the steps in order. First of all, you should prepare your workplace.
If the machine is installed in a cramped bathroom, be sure to move it to a larger, well-ventilated area with good lighting. Ideally, disassemble the machine in the garage. A free space of 4-5 square meters is sufficient to ensure unobstructed work. It's best to cover the floor with plastic sheeting and throw some old rags on top, as the work ahead will be quite messy.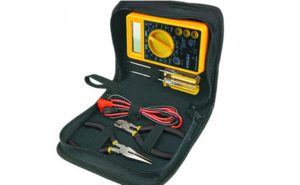
In addition to preparing the site, you should:
- carefully study the instructions for the Zanussi washing machine and other accompanying documentation;
- familiarize yourself with the wiring connection diagram (description is in the user manual);
- collect tools that will be useful in your work;
- recall the basic safety rules.
Before moving the machine to a convenient location, do not forget to disconnect it from the house utilities and turn off the water supply tap.
The following tools will be useful during the process of disassembling and removing the drum:
- screwdriver;
- Phillips and slotted screwdrivers;
- set of wrenches;
- small hammer;
- 8 mm Allen key;
- pliers.
In addition to tools, you will also need other “helpers”:
- multimeter (to immediately check the serviceability of the heating element, pump, engine);
- marker or felt-tip pen;
- WD-40 aerosol;
- grease for seals and bearings;
- moisture-resistant silicone sealant;
- a basin and a dry cloth (to drain water from the system).
If you're a newbie and repairing a washing machine for the first time, it's a good idea to take photos of key disassembly steps. This will make it easier to return all the components to their proper places later. It is very important to connect the wiring correctly - the contacts must be connected strictly to the specified connectors.
We remove the tank-drum assembly
Finally, having prepared the area and all the necessary tools, you can begin work. Make sure the Zanussi washing machine is disconnected from the power supply and the water supply. The following steps are recommended:
- Drain excess water from the system. To do this, place a basin under the machine, unscrew the waste filter, and collect all the draining liquid in a container;
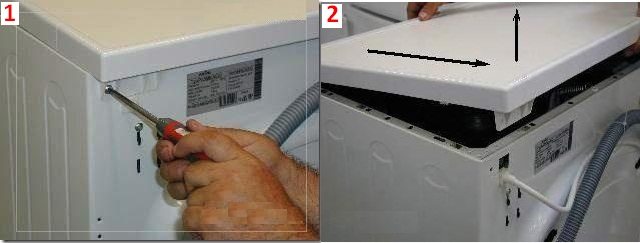
- go around the back of the machine, remove the housing cover by unscrewing a couple of bolts holding the “top” (first, move the cover towards the hatch, and then lift it up);
- unscrew the bolts securing the rear panel of the case, remove the wall;
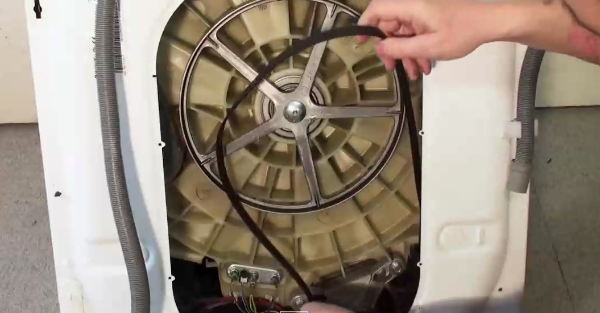
- remove the drive belt from the pulley;
- disconnect the pipe from the pressure switch and the tube connecting the dispenser and the tank;
- Disconnect the wires from the washing machine's drum. These are the heating element and thermistor contacts;
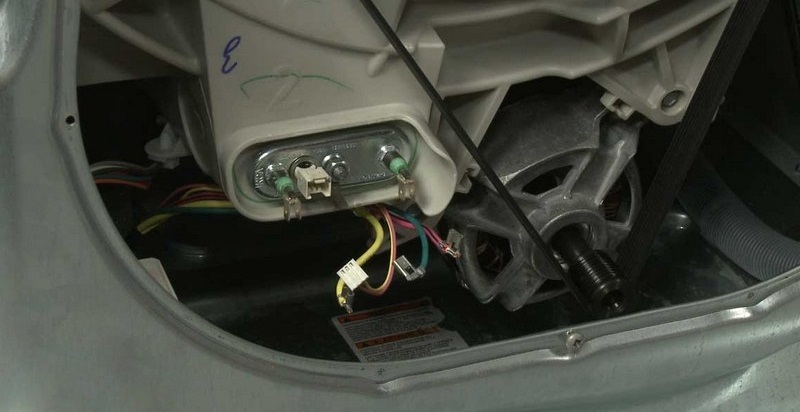
- Remove the bolts that hold the engine to the tank. Remove the engine;
- carefully pull the drain pipe out of the tank;
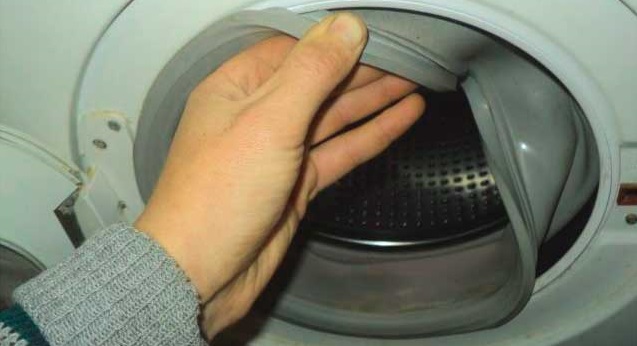
- Open the hatch door and loosen the clamp securing the sealing cuff. Remove the ring from the machine;
- tuck the rubber seal inside the drum;
- Use a screwdriver to loosen the upper hooks that hold the tank in place;
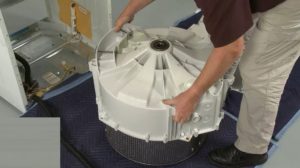
- Remove the drum-tank assembly from the washing machine body.
Washing machine repair technicians recommend taking this opportunity to check the functionality of the washing machine's main components. Using a multimeter, you can immediately diagnose the heating element, pressure switch, electric motor, and pump. It's also a good idea to clean the insides of the machine to remove any scale and dirt.
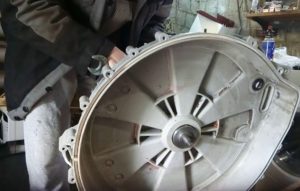
The drum itself is "hidden" within the tank. To perform necessary repairs, such as replacing bearings and seals, you'll need to access the plastic container. Let's figure out how to do this correctly.
How to split a tank in half?
The disassembled drum-tub assembly should be placed on a flat, hard surface. Next, you'll need to separate the drum. Modern Zanussi washing machines are equipped with a detachable plastic drum, so separating it into two parts shouldn't be a problem.
The halves of the tank are securely fastened together with screws located around the circumference.
 To access the inside of the tank, remove all the bolts one by one using a screwdriver. Then, all that's left to do is remove the top half of the tank to access the drum. The course of further work will depend on the purpose—for example, whether you need to knock out and replace bearings or remove an object stuck between the metal and plastic tank.
Once the repair is complete, all that remains is to properly reassemble the tank. First, the tank halves are joined together. It is advisable not only to fasten them with screws, but also to treat the connecting seam with silicone sealant, due to which the structure will be stronger.
Next, the machine itself is assembled. The tank is hung on hooks, the remaining components are secured in place, and the hoses, wiring, and sensors are connected. Be sure to refer to the photos taken during disassembly.
Once the frame is fully assembled, run a test wash with an empty drum. Monitor the machine throughout the cycle. If the machine successfully completes the program, the job is done. If the machine freezes or leaks, it means something is connected incorrectly, and you'll have to disassemble the machine again to fix the problem.
Interesting:


Readers' comments
Headings
Washing machine repair


For buyers


For users


Dishwasher


Add a comment