How to remove the lid of a Zanussi washing machine?
 Do-it-yourself home appliance repairs always require partial or complete disassembly. In any case, you'll need to remove the top cover of your Zanussi washing machine to gain easy access to the components. Otherwise, you won't be able to reach problem areas. Disassembling Zanussi washing machines is complicated by the machine's unique design. We suggest you first learn all the intricacies and nuances before getting started.
Removing the lid of a front-loading washing machine
You cannot immediately begin to dismantle the top cover. First, you need to prepare the machine for the procedure - disconnect it from the power supply and other utilities, unscrew the drain and fill hoses, and move the body to the center of the room. Then we take a screwdriver in our hand and get to work.
Before any repair work, remember the electrical safety rules.
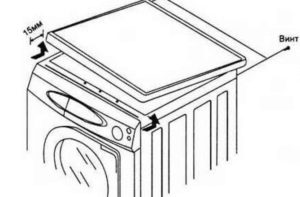
On front-loading machines, the sequence for removing the “top” is as follows:
- go to the back of Zanussi;
- find the plastic lid lugs screwed to the back;
- unscrew two bolts from the lugs;
- stand in front of the machine and grab the top cover;
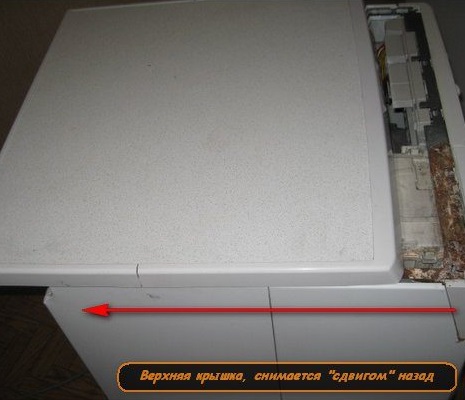
- push the cover away from you with force until the panel moves 1-2 cm with a characteristic click;
- lift the panel up and put it aside.
That's it! The lid has been successfully removed. These instructions will remove the top panel on all Zanussi front-loading models.
If the cover doesn't budge, won't budge, or won't lift, it's jammed. In this case, don't try to pry it open with a screwdriver or knife, as you could damage the machine's body. Instead, try loosening the element, tapping the panel with a mallet, or spraying WD-40 into the cracks. Afterward, the top should easily slide out of its grooves.
Removing the top panel of a top-loading washing machine
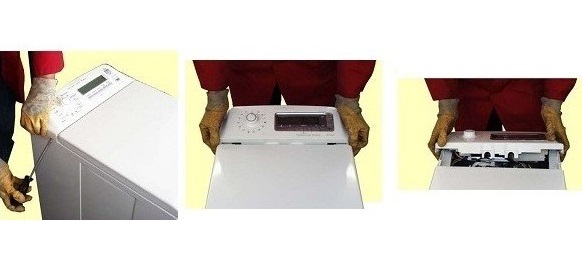
On Zanussi top-loading models, the lid is removed differently due to the design. The procedure remains simple and quick, but the sequence of steps is completely different. Start by disconnecting the appliance from the power supply and preparing the work area, then follow these instructions:
- go to the right side wall of the building;
- unscrew three bolts on each side of the panel;
- Pull out the side panel by unlatching the latches on top and remove its side;
- find the "canopy" with a rubber cover on the right side under the top cover;
- remove the cover;
- take a snap ring plier;
- Use a puller to separate the sides of the retainer, while simultaneously pulling the cover upwards;
- repeat the procedure with the puller on the other side;
- put the lid aside.
Before starting repairs, it is recommended to study the manufacturer's instructions and the electrical diagram of the machine.
That's it—the cover will come off its housing, allowing for further repairs. It's important to proceed with extreme caution to avoid damaging the plastic clips. Otherwise, you'll have to spend money on new components, including replacing the top panel.
What is the purpose of removing the lid?
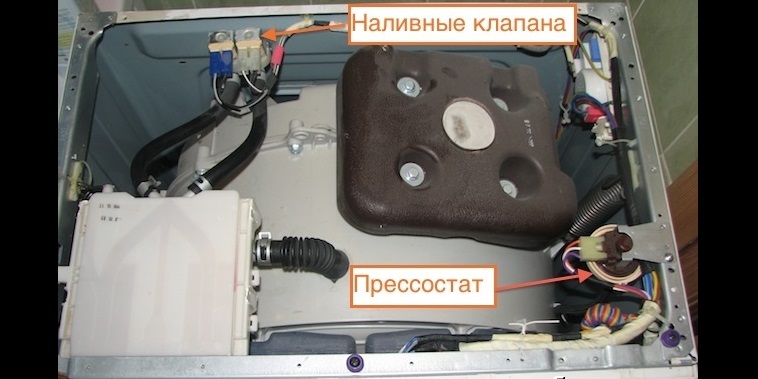
Removing the top cover of a Zanussi is an almost mandatory procedure during repairs. This is the only way the technician can access certain components of the washing machine, inspect them, or replace them with serviceable ones. For example, the top provides access to the inlet valve, detergent drawer, pressure switch, counterweight, and tub retaining springs. Let's examine the purpose of each component in more detail.
- Inlet valve. This device is responsible for filling the tank with water. If you experience problems with filling, underfilling, or overfilling, it's important to test the mechanism. It's located under the top cover near the rear panel, where the inlet hose meets the body. To ensure that the sensor is working properly, it is necessary to ring the valve coil and check the wiring and pipes connected to it. The device is also changed from the top.
Only by removing the top cover can you gain access to the inlet valve, pressure switch, counterweights and pipes leading to the powder receiver.
- Detergent drawer. If the detergent drawer isn't draining well or water is stagnant, remove the cover and check to see if the hoses leading to the element are clogged. Simply look inside the housing, disconnect the hose by loosening the clamp, and clean or replace it if necessary.
- Pressure switch. Hidden under the top cover is a level sensor that controls water intake. If the drum isn't filling, is filling too slowly, or is threatening to flood, the pressure switch needs to be checked immediately. Testing and replacing the device is simple: simply unscrew the retaining bolts, release the wiring, blow out the fluid, remove it, and install a new one.
- Counterweights. They're rarely checked, but they require removing the cover.
It's important to note that no comprehensive repair can be completed without removing the top cover. To remove the tank and drum from the housing, the first step is to remove the top cover. Only then can you loosen the clamping bar, slide the back panel back, unhook the springs, and perform several other important tasks.
Disassembling a Zanussi, like any other washing machine, almost always begins with removing the top cover. This is especially true when performing a comprehensive inspection of the machine's internal components.
Interesting:


Readers' comments
Headings
Washing machine repair


For buyers


For users


Dishwasher


Add a comment