How to make a juicer from a washing machine
 Making a juicer from a used washing machine isn't exactly a new idea. Back in the late 1980s, DIYers were publishing designs for high-performance juicers in popular technical journals, crafted from Soviet-era Riga, Oka, and Vyatka machines. We decided to continue this tradition and offer our ideas for using a modern washing machine, specifically, making a juicer from its parts with minimal modifications.
Why make a juice extractor?
It's a good question: why waste a ton of time converting a used washing machine into a juicer when you can easily buy a powerful one at the store for relatively little money? The answer lies in human nature.
Some people make these things for fun, so that they can keep them in their garage or at their dacha and show off their ingenuity and “golden hands” to their friends. And some people make such things with their own hands simply because they enjoy the process of working with hardware and electronics. This is how homemade concrete mixer from a washing machine, sandpaper, and God knows what else. Whatever your motivation, the goal is worthy, and we'll do our best to help you achieve it.
FYI! Making a juicer out of a front-loading washing machine is no more difficult than making one out of any other machine.
What materials will be needed and how to prepare them?
To make a juicer from a front-loading automatic machine with our own hands, we need 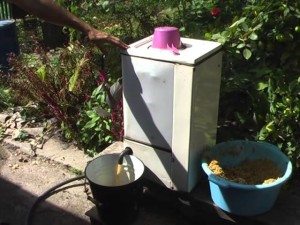 We'll need a used washing machine and a few spare parts. We'll remove any excess parts from the washing machine body right away. The pump, pressure switch, inlet valve, drain filter, block and control panel are all unnecessary parts; we won’t need them. You can also remove the bottom and back panel of the washing machine. In addition, we'll need two additional shock-absorbing springs to compensate for horizontal centrifugal force.
We'll also need two thin strips of metal mesh, 30 cm long and 6 cm wide, a large number of 3 mm bolts and nuts, a juice container, a new drain pipe, and tin and rubber plugs. The following tools will be needed:
- drill;
- Bulgarian;
- welding;
- screwdrivers;
- various wrenches;
- thin awl or drill;
- pliers;
- hammer;
- metal scissors.
Important! This design utilizes as many components as possible from an old washing machine, so the juicer will ultimately be very inexpensive.
The idea is to lay the washing machine on its back, place blocks in the corners, and secure them so the juicer/machine doesn't slip off during operation. We'll leave the door, seal, drum, motor, and drive mechanism in place, but remove the rest. The motor will have to be connected separately, since we've also removed the control unit. Next, we need to prepare the parts for the future juicer.
- We remove the drive belt from the pulley.
- We unscrew the shock absorbers and all other elements that interfere with removing the tank.
- We remove the hatch cuff (to do this, you need to loosen the clamp).
- We take out the tank together with the drum.
- If the tank is collapsible, we unscrew it; if it is not collapsible, we cut it along the seam with a grinder.
- There's no need to disassemble the drive mechanism or remove the drum. Our task is to clean the bottom of the tank of debris and dirt, as well as clean the outer walls of the drum of the same dirt. After mechanical cleaning, it is better to additionally treat the bottom and walls of the tank, as well as the drum, with vinegar.
- The tank is now clean; there should be no debris or unnecessary parts like the heating element, thermistor, or other sensors. All unnecessary holes should be sealed with sheet metal and rubber patches. We'll leave only the drain hole, to which we'll need to screw the new drain hose.
Please note! It's preferable to use old front-loading washing machines with stainless steel tubs for DIY conversions. Machines with plastic tubs are less reliable, but they can still be used.
- We weld all the holes in the drum shut; they're too big for us. We remove the rib punches, but leave the mountings for them; they'll help chop vegetables and fruits.
- We make hundreds of small holes, 1 mm in diameter, in the walls of the drum along the entire perimeter.
- Reassemble the tank. If it wasn't disassemblable, you'll need to drill 15-20 holes across the seam, seal the seam with sealant, and then bolt the two halves together.
- We install the tank together with the shock absorbers and the hatch cuff in place – preparation is complete.
Assembling the structure
After carefully preparing the parts ourselves, assembling the finished device is a breeze. First, let's modify the washing machine drum to become a fully functional juicer container.
- We take pre-prepared strips of metal mesh and insert them around the drum between the rib-punch fastenings and onto the back wall.
- We secure them to the drum wall with screws for strength. The mesh will act as a vegetable grater.
- Additionally, a rib punch attachment will help break up the vegetables in the drum. Bend it out and sharpen the edges. Now, the fruit receiver is ready.
Now we need to improve the design so that the device lasts as long as possible. We attach additional springs to the tank and the wall of the washing machine in order to dampen the vibration of the tank from the action of centrifugal force horizontally. This is necessary because we'll be operating the juicer with the hatch facing upward. Now we need to "give life" to the drive mechanism that rotates the drum, namely, connect the motor to the power supply. Watch the video below to see how.
Place your homemade juicer with the hatch facing up and perform a test run. The drum should rotate freely at full speed without any knocking or other unusual sounds. It's also important that the juicer rests securely on wooden supports to prevent it from falling over while operating with the fruit collector full. Place a juice container under the drain spout, open the hatch, pour the fruit into the container, and start the juicer.
Be careful! Never fill the container with fruits or vegetables. Not only will they not be chopped and the juice won't come out right, but overloading them can damage the juicer's drive mechanism, especially the bearings.
 What happens to the fruit? Rotating at 800-1000 rpm, the fruit collector, also known as the drum, crushes the fruit into a pulp. The pulp is kneaded in the fruit collector, and the juice, along with some of the pulp, is forced out by centrifugal force through openings in the side and back walls of the drum and deposited in the tank. The juice then flows down the sides of the tank, through the drain, and through a nozzle into the container. This is how a homemade juicer works.
What's the optimal amount of fruit and vegetables to place in the drum for effective processing? The answer is simple: the denser the fruit, the less you need to put in the container. For example, hard apples are poured halfway into the drum, that is, until they fill the fruit receptacle halfway. Carrots are very hard, so they need to be poured into a quarter of the receptacle, while berries like currants or cherries can be poured into three-quarters of the receptacle—the principle is clear.
In conclusion, as you can see, making a juicer from a front-loading automatic washing machine isn't too difficult. The washing machine requires minimal modifications; you'll only need to make a few design adjustments, and you can start processing dozens of kilograms of produce from your garden.
Interesting:


Readers' comments
Headings
Washing machine repair


For buyers


For users


Dishwasher


Add a comment