Samsung washing machine lifespan
 These days, many people confuse the service life of a Samsung washing machine with the manufacturer's warranty period. These concepts may seem similar, but they are actually completely different. The service life is the estimated time the equipment should operate, assuming all operating instructions are followed. The warranty period, on the other hand, is the time during which the manufacturer guarantees free service and repairs if the product breaks through no fault of the buyer. Let's look at the numbers to see how long, on average, the South Korean brand's appliances last.
How long do Samsung washing machines last?
On average, experts estimate the service life of Samsung washing machines to be approximately 8-10 years. But more importantly, this figure can be shorter or longer, depending directly on user behavior. This includes how frequently the appliance is used, the quality of household chemicals used, the hardness of tap water, the absence of manufacturing defects, and the specific assembly of the model.
According to GOST 8051-83 standards, the average service life of a washing machine should be at least 15 years, but not every device can boast of this.
Of course, the most important factor that influences the service life is how the user uses the “home assistant”. If the owner of the device constantly violates standard operating rules, does not monitor the overload of the washing machine drum, and does not maintain the unit after each working cycle, then the machine will break down much sooner.
Extend the service life
If you properly maintain your washing machine, regularly perform basic home diagnostics, and schedule timely repairs, its service life can exceed even the 15 years specified by the GOST standard. First and foremost, follow the first rule of using a washing machine: leave it open after each cycle to prevent unpleasant odors and mold from developing inside. Also, remember to thoroughly wipe the door glass, detergent dispenser, rubber door seal, and drum surface after each wash. As for more serious maintenance, which should be performed at least once a quarter, we recommend the following:
- First, disconnect the machine from all communications;
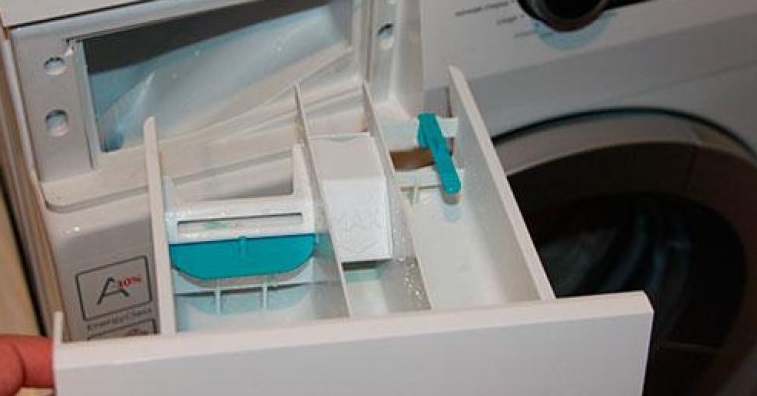
- Remove the detergent drawer and rinse it thoroughly in hot, soapy water. If the part is stained or moldy, soak it briefly in a vinegar solution and then scrub it with a brush or sponge.
- Disconnect the inlet hose from the washing machine, then remove the filter mesh, which should be washed in hot water to remove scale and all dirt;
- Access the drain filter, which is located in the lower right corner of the washing machine, hidden by a decorative panel. Before disassembling, place a water container under the washing machine and cover the floor with rags or towels. This is necessary because after you unscrew the drain filter plug, all the water from the system will quickly drain onto the floor. Rinse the filter and the walls of the hole where it is located.
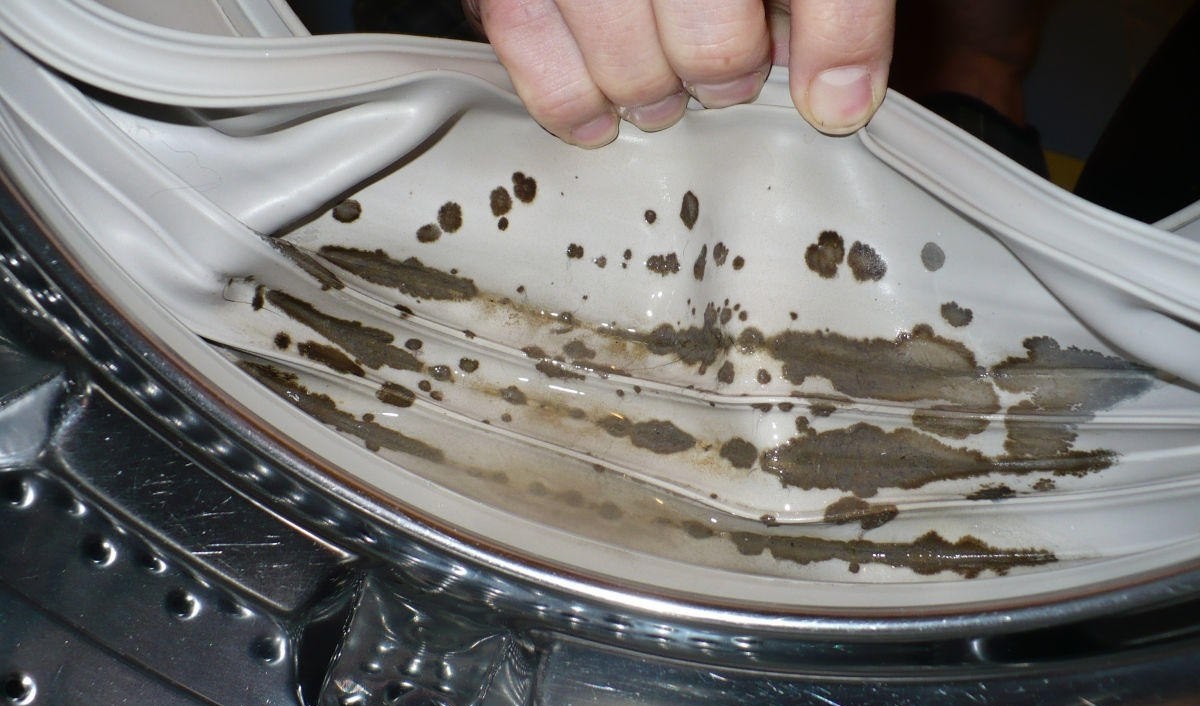
- Carefully inspect the drum seal for cracks and mold. If you find any damage, the element will need to be replaced.
- Spin the drum manually – it should rotate without any obvious obstructions, but with a slight tension. It's very important to listen to the sounds the container makes during the process – if there's a creaking or grinding sound, there may be a serious problem with the drum;
- Remove the drain hose and feel it to make sure there are no cracks or blockages inside.
At first glance, the list may seem quite extensive, but all the steps need to be completed every few months. Believe me, this diagnostic won't take much of your time.
Notice problems in time
If your "home assistant" has been serving you for several years, it should be looked after much more carefully. This is because it's during this time that things often go wrong, and it's much easier to prevent them than to repair them later. Always listen for suspicious extraneous sounds and excessive vibration.If these anomalies occur, you'll need to partially disassemble the equipment and inspect a number of its key components. Follow the instructions carefully.
- Disconnect the equipment from all utilities - unplug the power cord, turn off the water supply, and disconnect the drain and inlet hoses.
- Ensure free access to all sides of the washing machine.
- Remove the top cover of the device by first unscrewing the bolts holding it in place.
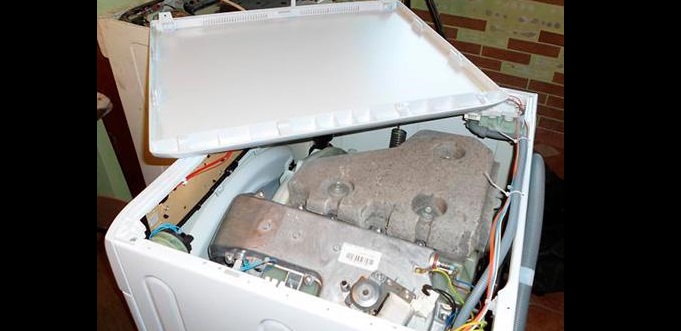
- Similarly, detach the back panel of the device.
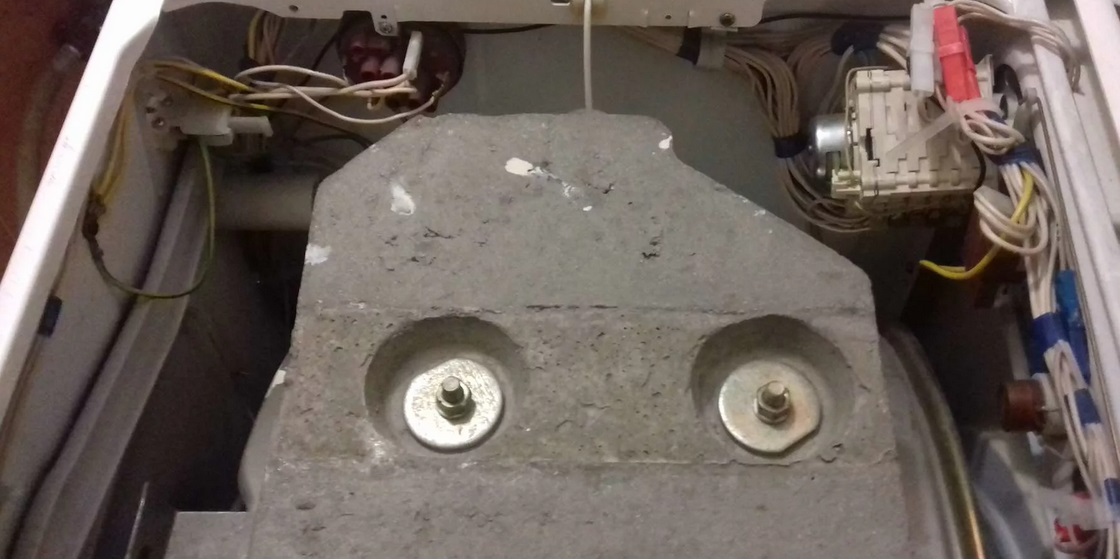
- Inspect the counterweights, which look like massive concrete blocks that provide stability to the machine during washing and spinning. These stones should be intact, without chips or cracks, otherwise they will need to be replaced. Additionally, check how securely the blocks are bolted in place and reinforce them if necessary.
- Check the drive belt tension; it shouldn't slip. If it does, wash it, dry it, and coat it with pine rosin.
- Inspect the dampers located at the bottom of the machine and if everything is in order, coat the springs with graphite grease.
- Remove the heating element by disconnecting the wiring and loosening the central nut. If it is coated with scale due to hard tap water, soak the heating element in a vinegar solution and then brush off any deposits.
Don't be lazy and take a photo of the wire connections to the heating element so that you have an example of the correct wiring at hand later.
- Check the integrity of the wires and sensors and replace any damaged ones, if any.
- Check that the fill valve and the tubes that run from the dispenser to the tank are dry.
This concludes the quarterly inspection. It's much better to spend a little time once a quarter on at-home diagnostics than to repair or replace damaged components later.
Interesting:


Readers' comments
Headings
Washing machine repair


For buyers


For users


Dishwasher


Add a comment