Features of installing a washing machine in the toilet
 Approximately a third of the country's residents live in very cramped living conditions: a small kitchen, a separate bathroom and toilet of minimal size, and small living rooms or rooms. Where should a washing machine be placed in such conditions? In the kitchen, where there's already limited space, or perhaps in the bathroom? One original idea involves placing the washing machine above the toilet. However, this placement has many nuances, which we'll discuss in this article.
Preparing a place for the machine
A washing machine in a bathroom above the toilet is, in fact, a necessary measure. Experts agree that placing a washing machine in a toilet is only necessary if there is no way to place it in the bathroom or kitchen. Why is that?
- Installing a heavy washing machine in the very narrow space of a Khrushchev-era toilet is quite problematic.
- Preparing a reliable shelf for a car above the toilet also presents some difficulties.
- Using a washing machine in the toilet also has its drawbacks; just imagine doing your business right next to a spinning, vibrating washing machine.
- And finally, what to do with a washing machine installed in the bathroom if it suddenly breaks down? Even a minor breakdown will require removing the washing machine from the shelf, fixing it, and then replacing it—a job for a weightlifter.
But let's not dwell on the sad stuff. If you've decided to install this "iron assistant," it's because you had your reasons. Let's get started preparing the installation site. First, you need to determine the dimensions. Measure the back wall of your toilet; we'll need at least 66 cm of clear space in width and 85 cm in height. Be sure to take into account the location of sewer and water pipes.
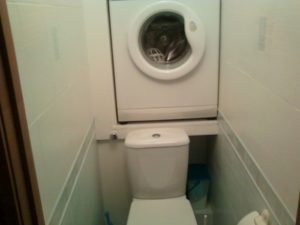
 It's preferable to install narrow washing machines over a cistern, as standard-depth washing machines often protrude significantly, seemingly overhanging the toilet. It's unlikely that anyone would want to have to "bend like a panther" to relieve themselves in their own home or bother with moving the toilet forward, although the latter option is entirely possible.
Now that we've measured the width, depth, and height, and determined the location for the washing machine, let's begin constructing the supporting structure of our shelf. Our experts recommend making the supporting structure from 40mm metal angle iron. A wooden structure won't support a heavy, vibrating washing machine. Here's what to do:
- We cut the fortieth corner three times by 60 cm, twice by 45 cm (provided that the washing machine is not 60 cm wide) and twice by 55 cm.
- We screw a 60 cm piece of corner to the wall at a level slightly above the toilet cistern, and we screw another identical piece to the wall parallel to the first, 45 cm lower.
- We weld two short 45 cm corners perpendicularly to the first screwed corner, and then connect them with a 60 cm corner piece – this creates a frame.
- We reinforce the frame with supports made of 55 cm corners, welded diagonally from the lower wall corner to the corners of the frame.
FYI! We received a heavy-duty steel shelf capable of supporting five times the weight of the average washing machine.
Connecting to communications
 Let's put the structure aside for now and get to work on installing the utilities for the future washing machine. Let's start with the electrical system. The washing machine must be connected to a high-quality, moisture-resistant outlet; almost no one has such outlets in their bathroom, so our task is to install one.
We extend a well-insulated, three-core, 2.5 mm copper wire from the electrical panel, screw a waterproof socket into a convenient location, enclose the wire in a conduit, and connect it to the socket through a circuit breaker. We test the socket's operation. Next, we'll connect to the cold water supply. Follow these steps:
- we turn off the cold water using the valve installed on the riser;
- we cut the metal-plastic pipe and install a jumper in the form of a tee tap in this place;
- We screw the washing machine's inlet hose to the tee tap and leave everything as is for the time being.
Now you need to take care of creating a connection to the sewerage system. Connecting the washing machine to the sewer system As described in detail in the article of the same name on our website, all technical requirements for this process must be met. Furthermore, care must be taken to ensure the sewer pipe outlet is at a sufficient height to prevent a siphon effect.
Please note! A siphon effect occurs when the drain hose is incorrectly connected, causing waste from the sewer system to flow into the washing machine.
Now that the utilities are in place, we can finish up our shelf and mount the washing machine on it. First, let's take care of safety by welding a 5 cm wide metal strip to the front of our shelf, in case the washing machine "jumps forward" during operation. Then you can decorate the shelf however you like. One option is to cover it with drywall, plaster it, and paint it—the choice is yours. Don't worry about the finishing material bouncing off due to vibration; the structure is quite rigid, so such problems are unlikely.
The main work is done. Now you need to gather your strength and "hook" the washing machine onto the shelf and connect it to the water, sewer, and electricity. This is very difficult and inconvenient. The washing machine can weigh 80 kg and needs two people to lift it, and in a narrow toilet it’s hard to turn around even alone, but as they say, “a master’s craft fears a master’s craft.”
After placing the machine on the rack, we attach the pre-prepared water inlet hose and drain hose to it, and plug it into the outlet. Time to run a test wash – the job is complete.
What to do if the machine breaks down?
 Everyone understands that any washing machine doesn't last forever. If the washing machine sitting on the shelf in the bathroom develops a breakdown that requires disassembly, you'll first have to unplug the machine, then remove it from the shelf, repair it, and put it back. Our technicians have experience with such procedures, so they recommend... To make it easier to move the machine, bring it into the toilet sideways and also lift it onto the shelf sideways. It’s much easier to turn it over on the shelf and place it towards you than to “screw it around backwards.”
In conclusion, no matter how appealing the idea of installing a washing machine above the toilet may seem, consider it only as a last resort, when all other options have been ruled out. This installation method has many drawbacks, although it significantly saves valuable space in your apartment or house.
Interesting:


Readers' comments
Headings
Washing machine repair


For buyers


For users


Dishwasher


Add a comment