How to make a drilling machine from a washing machine motor?
 A broken washing machine can be given a second life by crafting a useful household item from its components. For example, it's easy to make a drilling machine from a washing machine motor. The key is to have the motor in working order and the technician with the time, inclination, and necessary consumables. Step-by-step instructions with detailed descriptions and recommendations are below.
Let's gather everything we need
A drilling machine is not a cheap pleasure. To build it from scratch, an electric motor alone is not enough: you will have to additionally find or purchase a lot of materials and tools. So, in addition to the engine and drive belt from the washing machine, the following consumables will be required:
- bearings;
- a power cord of sufficient cross-section with a socket;
- round pipe;
- threaded rods;
- drill chuck;
- springs;
- metal profiles for the base;
- nuts and washers;
- thick rectangular pipe (for the rack).
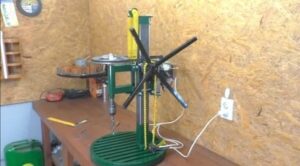
A working motor from an old washing machine can be used to make a fully functional drilling machine.
As for tools, to build a DIY machine, you'll need an angle grinder, a welder, a screwdriver, a vise, and a drill. Thread-cutting tools, such as a tap, a die, and a die stock, are often needed. A tape measure and a marker will also come in handy. For the finishing touches, you'll also need paint for metal surfaces.
Machine base and stand
This homemade drilling machine, made from a washing machine, consists of a base with a stand, a sliding carriage, an axle with a chuck, and a feed mechanism. First, assemble the base, onto which the remaining components will be secured. The instructions for making it are as follows: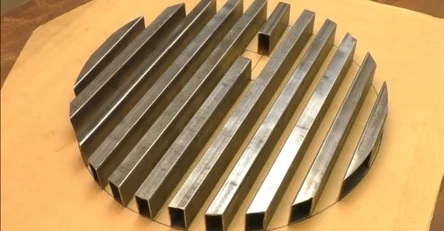
- draw a circle or rectangle, depending on the chosen shape of the base;
- we cut pieces of pipes for the base;
- we bend the profile pipe, uniting the base (to give it shape, the profile is cut with a grinder in several places);
- We weld all the elements.
When using welding, remember safety precautions!
The next step is to create the stand. This is a rectangular section welded vertically to the base. The "leg" is reinforced with a metal triangle or other suitable "corner." Remember that before use, the metal must be thoroughly cleaned of corrosion and dirt, and checked for defects and unevenness.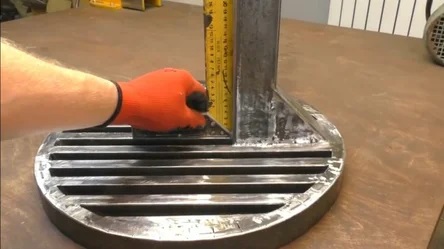
Carriage and axis with chuck
The key component of the machine is the carriage, which moves along the column, tightens, and eliminates play. It is made of profiles, a threaded rod, and several bearings. The latter act as wheels. The carriage is assembled as follows:
- we cut the profile into four even pieces;
- we retreat 1-2 cm from the ends of each segment and drill holes;
- We tighten the structure with nuts and washers, giving it a rectangular shape.
The resulting carriage is secured to the stand by tightening the retaining fasteners. This should ensure that the bearings are pressed tightly against the profile. This will help prevent play.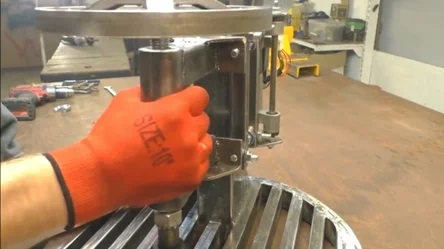
Next, we cut the electric motor mounts from a steel plate. It's important that the holes in the components are oval. This makes it easier to move the motor and, consequently, tighten the drive belt. Then we begin adjusting the driven axle with the drill chuck:
- we make a base for the axle by pressing bearings into a section of tube;
- we insert the threaded rod into the section and fix it by tightening a pair of nuts on both sides;
- We weld the profile to the rod using washers and grind the weld seams with a grinder;
- We weld the resulting bushing to the carriage (be sure to do so at an angle of 90 degrees);
- we fix the pulley on the axle;
- We install a drill chuck on the axis.
After installing all the elements, we check the quality and reliability of the fasteners.We place the corner against different sides of the structure and ensure that the drill is positioned strictly perpendicular to the base. Otherwise, it will be difficult to work on the machine.
Bicycle sprocket knot
A block with bicycle sprockets can be used as a feeder unit. A suitable axle must be made to allow the gears to rotate freely. The rod is then welded to the plate, which is then welded to the carriage. A handle made of profiles is separately attached to the sprocket.
The metal parts used to manufacture the machine must be straightened and cleaned!
The next step is to create a clamp from a profile and a rod, which is securely attached to the base of the machine. Now you can tighten the bicycle chain. It's recommended to "tweak" the pulley to select the most suitable sprocket. It's important that the drive is taut, doesn't slip, and rotates easily and comfortably. Finally, paint the piece.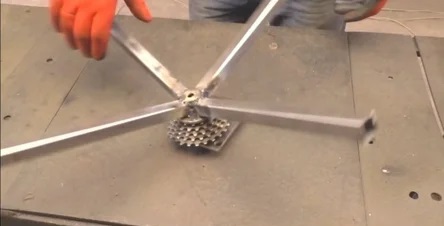
Machine capabilities
A homemade machine with a drive and electric motor from a washing machine is a powerful and easy-to-use device. Due to the belt drive, the engine speed is reduced and the speed is increased. As a result, the tool quickly and easily drills even thick steel with drills of any diameter.
Once you've assembled and painted the DIY kit, you can begin testing it. The equipment is launched as follows:
- remember safety precautions (the drilling machine is extremely dangerous, so we securely fasten it to the work surface and use personal protective equipment);
- connect the machine to the power supply;
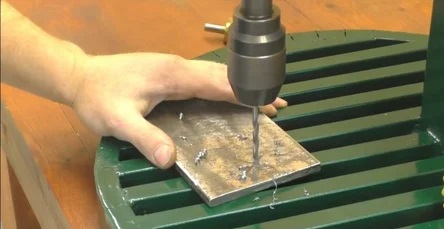
- we install a drill of the required section;
- we place the sheet of metal that needs to be drilled under the drill;
- we drill the required number of holes.
The result will please the craftsman: the torque will be sufficient for drilling even thick steel. Moreover, there are no restrictions on the drill bits used – even larger diameter heads can be installed in the chuck. If the electric motor's RPM is low, it's easy to improve the design: attach an additional, smaller pulley to the driven axle. The machine will accelerate and handle metal of any thickness.
Interesting:


Readers' comments
Headings
Washing machine repair


For buyers


For users


Dishwasher


Add a comment