Water is leaking from the detergent drawer in my Samsung washing machine.
 A trickle of water running down the front panel of your washing machine is a bad sign. It's most likely water leaking from the detergent drawer in your Samsung washing machine, and ignoring such a leak is highly recommended. It's best to pay attention to the symptoms and try to fix the problem yourself. Typically, you can fix the detergent drawer without the help of a service center technician.
What broke?
Before starting repairs, it's worth finding out why the powder hopper is leaking. Knowing the nature and extent of the problem will help you pinpoint the cause and develop a plan of action. First of all, pay attention to the service life of your Samsung washing machine: in new models, leaks indicate a manufacturing defect, while in older models, they indicate worn-out parts. If the cause is worn parts, then we'll look at the location of the leak. Typically, a washing machine leaks in one of the following places:
- along the perimeter of the tray, or more precisely, from above or below;
- where the dispensary meets the vending machine facade;
- through a crack at the end (when one of the compartments, the main one, for conditioner or for pre-wash, is damaged);
- through a loose or torn pipe (perhaps the clamp has become loose and the hose is leaking water).
The bunker leaks due to a manufacturing defect, worn parts and careless handling.
Leaks are often caused by the washing machine owner's fault. When attempting to remove the detergent drawer for cleaning, the user fails to understand how it's secured and instead yanks the part until it "comes to an end." This ultimately damages the drawer body or the locking elements. The use of harsh detergents, which, due to their strong abrasives, corrode the plastic and deform the drawer, also leads to problems.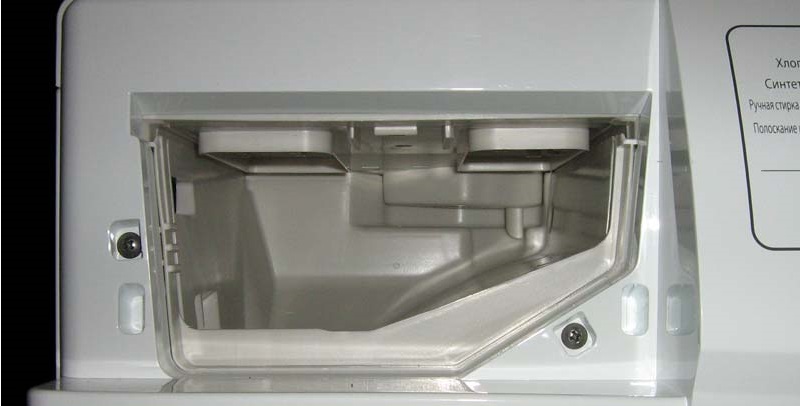
We will collect tools and components
You can't fix a leak with your bare hands. You'll need a set of tools. Fortunately, the list is fairly short and easy to assemble. Here's what you'll need:
- "positive" and "minus" screwdrivers;
- pliers;
- file;
- hacksaw for metal.
As for materials, silicone or automotive sealant will be required to repair the dispensary. In advanced cases, a new replacement tray will also be necessary. However, don't immediately buy a replacement—it's best to first verify the original is faulty.
How to fix it?
As soon as you notice dripping water at the end of your Samsung washing machine while filling, you should force the cycle to stop. If you can't immediately locate the leak, don't worry – the cause will be identified and fixed during disassembly. The main thing is to proceed with extreme caution and follow the instructions.
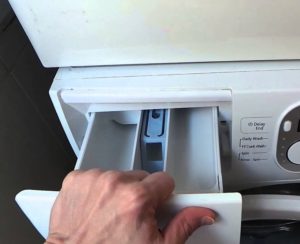
First, open the powder receptacle and, pressing on the central compartment, remove the hopper from its seat. Then, carefully inspect the dispenser body for cracks, chips, and other suspicious holes or damage. Pay attention to any blockages immediately. If the walls of the tray are covered with a thick layer of scale, then cleaning is necessary. It's likely that dried detergent is trapping water in the "box," causing an overflow and leak through the housing. If there's no apparent cause for the leak, we'll continue our diagnostics. Here's what to do next.
- Using a plus screwdriver, loosen the screws holding the tray.
- We unscrew the screws securing the cover from the back wall and, pushing the “top” away from us, we put it aside.
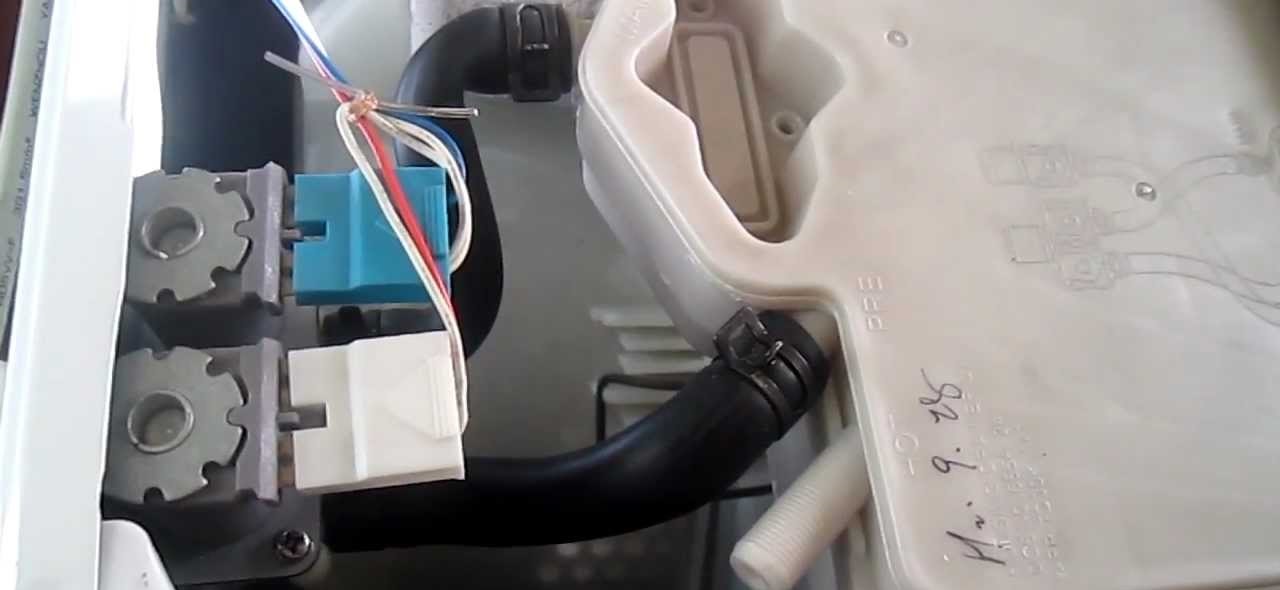
- We find four pipes connected to the dispensary. Two of them are immediately visible, as they are used for water intake and are located near the rear wall of the bin. The third is used for air conditioning and is attached to the right side panel. The fourth is a thick corrugated pipe located on the left, which is why it often rubs against the counterweight.
- Using pliers, release the clamps on the pipes and disconnect the rubber bands from the tubes.
- We take out the powder receptacle.
- We inspect all removed parts.
Now we can begin the actual repair. The first step is to clean the dispenser and all components of scale and dried-on detergents. Next, we pay attention to the thick corrugated pipe, which often wears against the counterweight and requires replacement. There's no point in trying to patch it—it's better not to skimp and order a replacement from a service center. Ideally, the concrete responsible for the hole should be sealed with a layer of polyethylene or soft plastic to minimize future damage. Additionally, the problem area should be filled with sealant.
It's recommended to seal all joints in the powder receptacle itself with sealant. Use a negative screwdriver to open the clamps and apply adhesive to the seams.
To prevent a recurrence of the leak, experts recommend adjusting the washing machine. Use a spirit level and, after adjusting the feet, ensure the machine is as level as possible. It is important to eliminate the slight forward tilt, which accelerates the flow of water and puts the equipment in a dangerous position.
Reassemble the machine according to the instructions above in reverse order. Be sure to run a test wash and check if the leak has been resolved. If the leak reappears, call a professional.
Interesting:


5 reader comments
Add a comment
Headings
Washing machine repair


For buyers


For users


Dishwasher


The hopper is intact, the pipes are fine. Upon disassembly, a blockage was discovered in the drum body itself, specifically where the drain corrugated pipe from the hopper to the drum attaches. The blockage is inside the drum compartment where the corrugated pipe attaches. There's something soft inside, like a filter, but I'm not sure what it is. How do I replace this "something" and what is it called?
I'm also looking for an answer, but I can't find it anywhere. Neither the diagrams nor the video mention any part that seals the intake manifold outlet.
Apparently it's the same story, I'll take it apart now. I'm guessing it's not the part, but the blockage itself. I'll report back after I open it.
…Andrey, to get to the junction of the corrugation and the drum, do you have to remove the entire drum, break it into halves and…?
No, it’s not necessary, it’s connected to the top with a pipe.