My Haier washing machine is leaking from the bottom.
 A typical problem with Haier washing machines is leaking. Sometimes this leak is barely noticeable, while other times it can be obvious and dangerous. One thing is clear: you shouldn't use a leaky washing machine. It's essential to identify the problem and fix it as soon as possible. Let's figure out where to start.
Source of the leak
If you notice a leak coming from the bottom of your Haier washing machine, act immediately. Turn off the power immediately. If there's a puddle underneath the appliance, unplug the power cord carefully, avoiding contact with the water to avoid electric shock.
Try to remember exactly when the washing machine started leaking – this will make diagnostics easier.
To find the source of the leak, carefully inspect the machine. If drops are dripping from under the door, the seal may be leaking. If water is leaking from the top left, the culprit could be the detergent drawer.
If the machine is leaking from the bottom, it could be due to a cracked hose or a damaged tank. It's important to inspect it carefully, paying attention to every detail. If necessary, remove the back or side wall of the washing machine for a more complete and accurate diagnosis.
The repair process will depend on the source of the leak. If the cause is a seal or a cracked powder receptacle, you can replace them yourself. If the leak is due to a damaged tank, you may need professional help.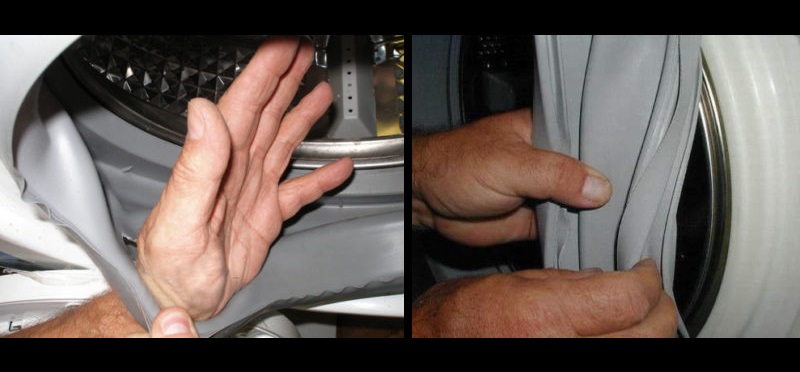
Typically, Haier automatic machines leak due to:
- failure of users to comply with the rules for operating household appliances;
- use of low-quality detergents;
- factory defect;
- breakdown of some element of the washing machine.
What should you do once the machine has been disconnected from the power supply and inspected? If there are no visible signs of a problem, you'll need to check each component one by one. It's recommended to start with the simplest and move on to the most complex, such as the dust filter.
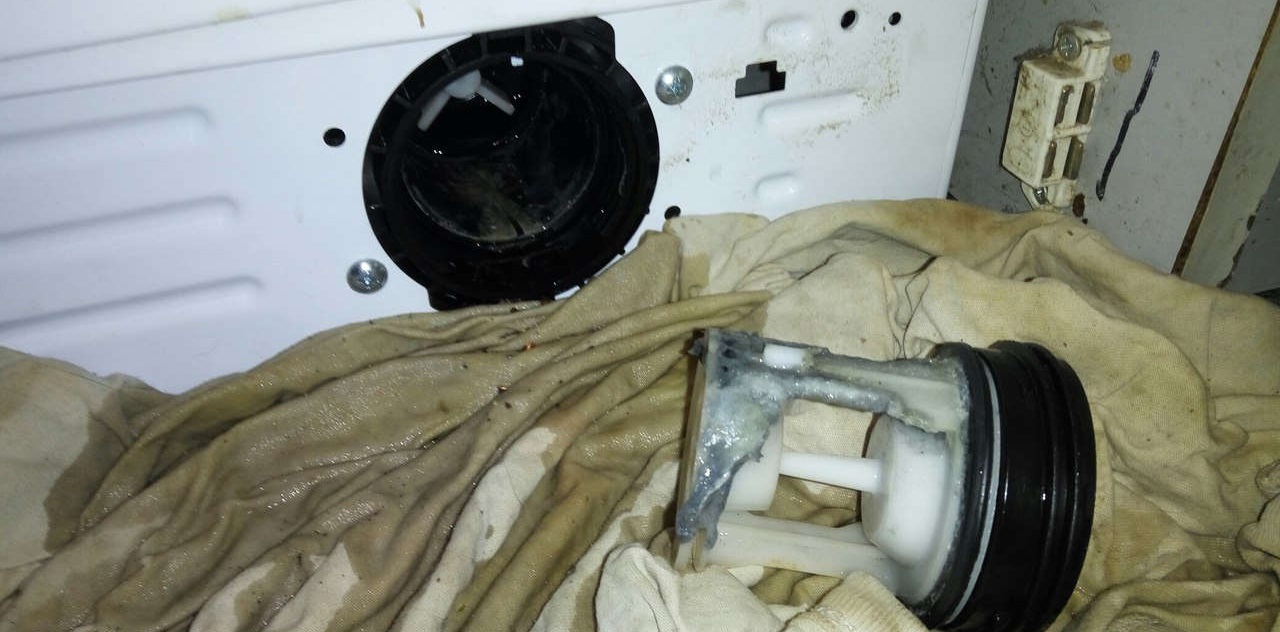
Filter element or drain hose
A "lake" under the machine doesn't always indicate a broken component. Sometimes it's caused by simple user error. If you cleaned the debris filter a couple of days ago, make sure you installed it correctly. Check to see if the emergency drain hose is properly reinstalled. It's quite possible that improperly secured components caused the leak.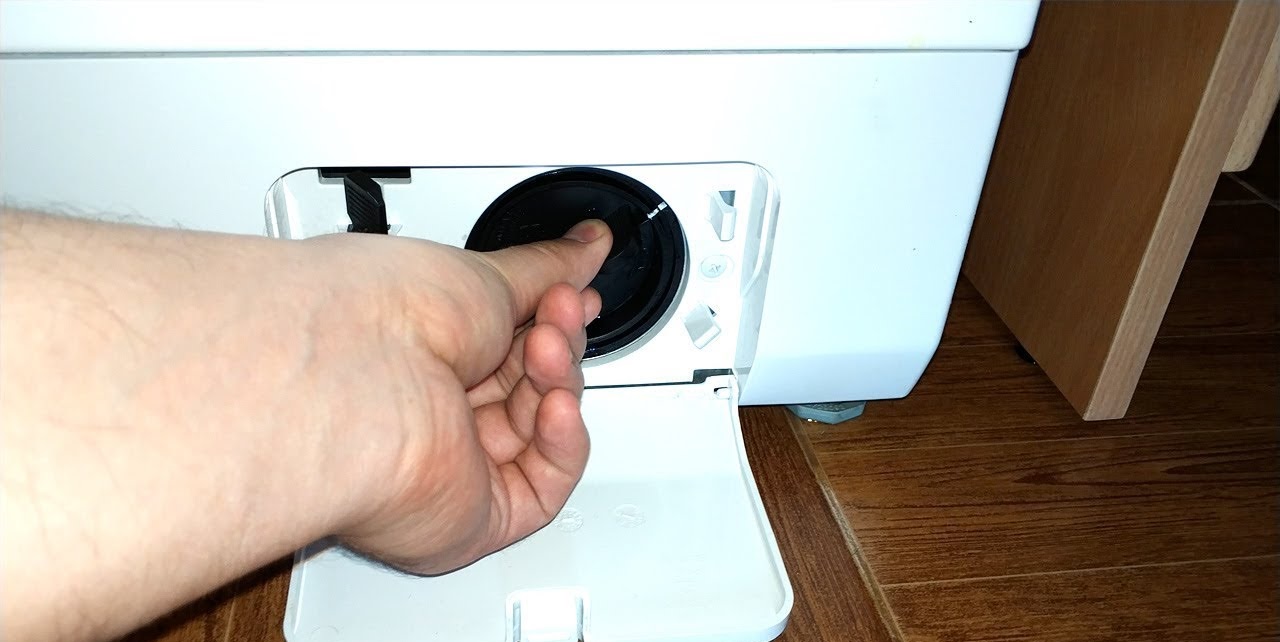
If the "waste container" is in perfect condition, check under the car. The clamp securing the hose to the pump may have come loose, or the fitting may be cracked. The solution is simple: either tighten the fasteners or seal the cracks with waterproof sealant. If possible, it's best to replace the snail immediately.
Powder box or tube
Even if water is collecting underneath the washing machine, the source of the leak may be above. Therefore, inspect the detergent drawer. If a lot of detergent has accumulated on the walls of the dispenser, it can cause an overflow. Water gets stuck in the drawer, can't pass into the drum, and splashes out.
A cracked powder drawer can also leak liquid. Remove the drawer from the housing and inspect it for defects. Then wipe the bottom dry and fill the container with water. If drops start to appear at the bottom, the drawer is damaged.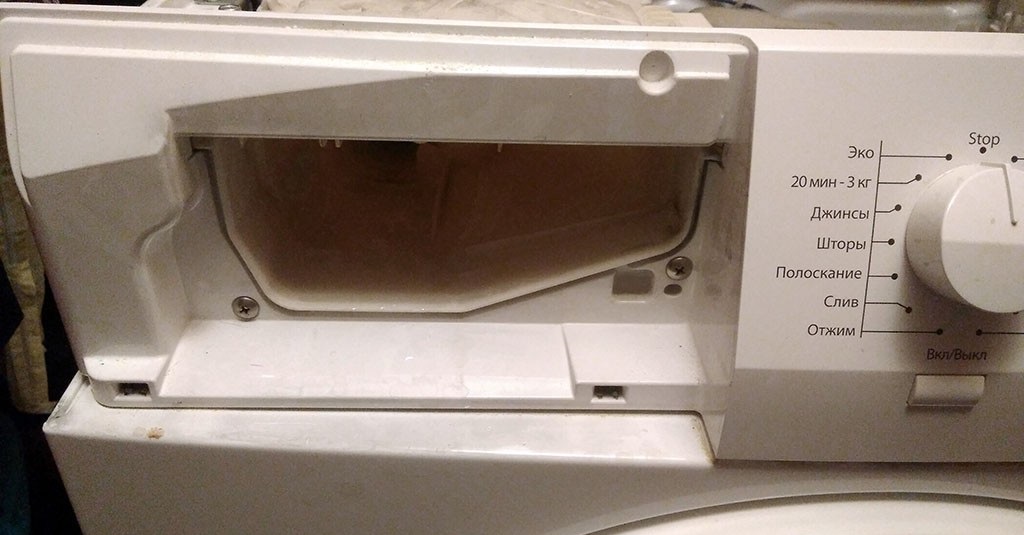
Another component that can cause a leak is the filler neck. It often fails even on new Haier washing machines, within a year or two of purchase. This is due to poor-quality components used in the machine's manufacture.
When the machine leaks at the stage of water intake into the system, focus your attention on the powder receptacle and the filler pipe.
The inlet hose could also be the culprit. Firstly, cracks appear on its surface over time, allowing moisture to leak through. Secondly, sometimes the clamps where the hose attaches to the body become loose, allowing water to leak out.
In some cases, the problem lies in the drain hose that runs from the drum to the pump. To confirm this, look under the washing machine. If the hose is wet on the outside, it will need to be replaced.
Often the machine leaks in the places where the hoses are attached to the washing machine components. Experts recommend treating the areas where pipes connect to other parts with a moisture-resistant sealant. This will help prevent leaks.
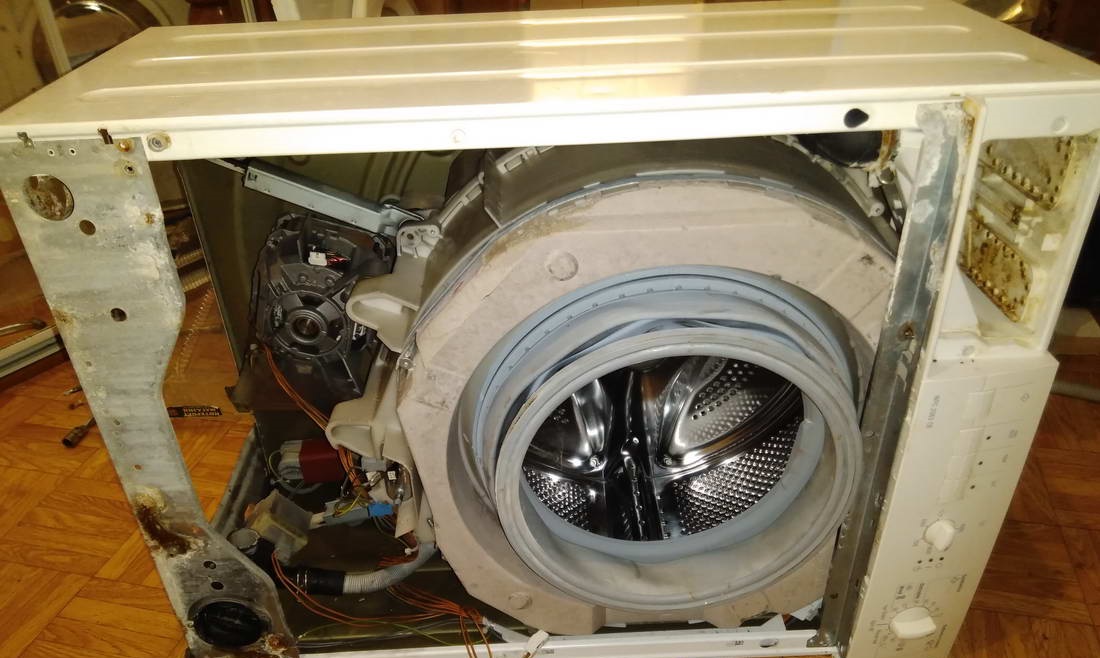
Cuff or main container
The most frustrating thing to happen to a Haier washing machine is a cracked drum. Usually, it's impossible to patch such a hole, requiring a new, expensive unit. This defect can be caused by a foreign, sharp object (like a nail, hairpin, or bra underwire) getting into the system, or by washing shoes too frequently. A plastic container can also leak due to a manufacturing defect.
To inspect the drum, you'll need to disassemble the machine, removing the top and back panels. Sometimes, the front panel may need to be removed. Replacing the unit is a fairly complex job, best left to a professional.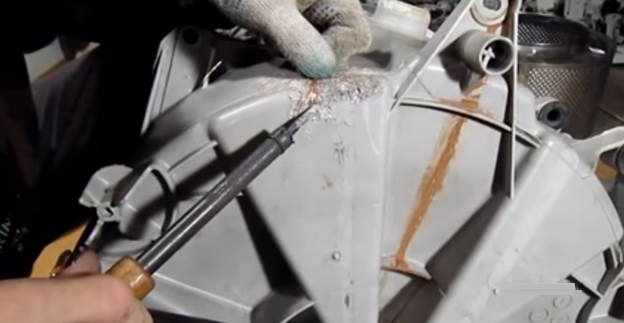
If a trickle of fluid is leaking from under the hatch door, it means the rubber seal has become damaged. If the defect is minor, it's acceptable to seal the crack with sealant or patch it. If possible, it's best to replace the seal immediately.
To prevent damage to the seal, load and remove laundry carefully. Avoid placing sharp objects (nails, keys, or pins) in the laundry, as they could pierce the seal.
How to find a problem and fix it yourself?
If your automatic washing machine is new and still under warranty, it's best not to attempt repairs yourself. Call a service center—technicians will diagnose the problem and determine the cause. If your free service period has expired, you can try repairing the washing machine yourself.
What to do if you discover a leak? Immediately unplug the machine, but avoid stepping in the water. If you can't unplug the power cord without coming into contact with the liquid, turn off the lights in the room by turning off the circuit breaker on the panel.
The further algorithm of actions is as follows:
- close the shut-off valve;
- disconnect the washing machine from the water supply;
- If the machine has not had time to drain the water from the tank, do it yourself, through the emergency pipe or the waste filter;
- open the washing machine door and remove the clothes from the drum;
- proceed with diagnostics.
Further action will depend on the cause of the leak. If a hose or pipe is cracked, it's best to replace it. If spare parts are unavailable, a patch or sealant with a water-resistant sealant is acceptable.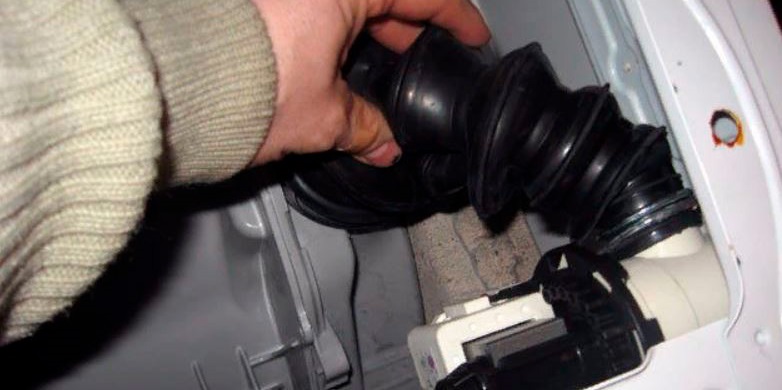
If the appliance is leaking on the left, top, it's likely the detergent dispenser. Remove the dispenser from the housing and inspect it. Sometimes, a lot of limescale buildup can accumulate on the walls of the drawer, which will need to be washed off. Sometimes, the holes in the detergent drawer become clogged, which also needs to be cleaned.
If the dispenser is damaged, you'll need to buy a new one. A powder receptacle is selected for a specific washing machine model. Sometimes a leak is caused by excessive water pressure, and closing the inlet valve is enough to stop it.
A stream of water leaking from under the hatch door usually indicates wear on the drum seal. Inspect the seal; if there are cracks or creases on the surface, it's best to replace it immediately. To remove the seal, you'll need to remove the two clamps that hold it in place.
If there's just one small crack in the gasket, a patch may be sufficient. It's also acceptable to seal the defect with a water-resistant sealant. Replacing the rubber seal is only necessary if it's severely damaged.
If the appliance begins leaking immediately after starting a cycle, check the inlet valve. To inspect the element, you'll need to remove the top panel of the housing. If you notice any damage, replace the element immediately; repairing it is not practical.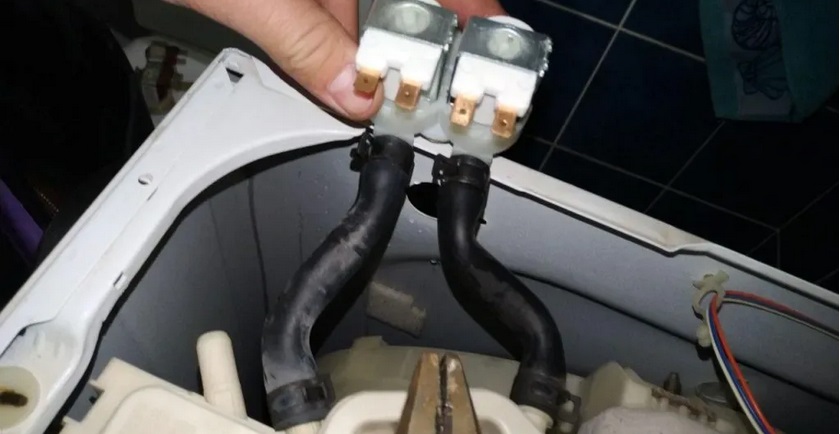
Sometimes a leak is caused by a leaky inlet hose or a loose fitting. Inspect the area where the hose attaches to the washing machine. If you see any leaks there, you should:
- disconnect the inlet hose from the washing machine;
- wipe the area dry;
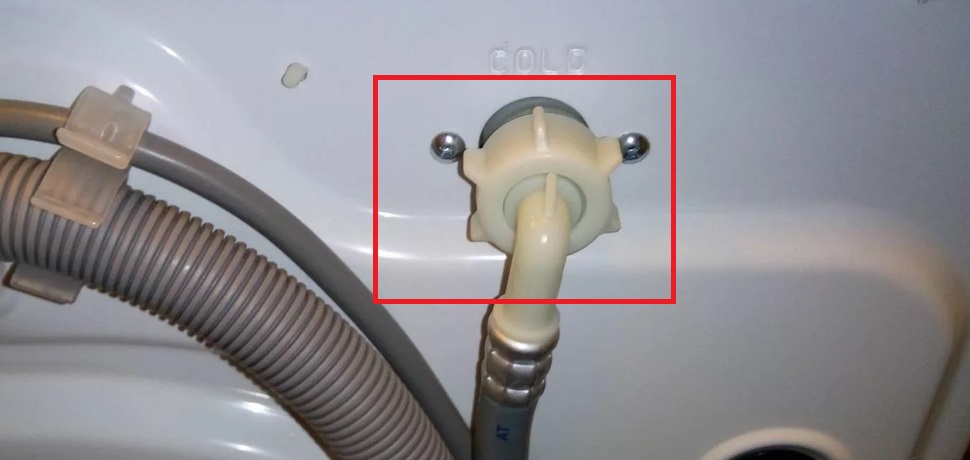
- clean off any glue that is present at the attachment point;
- dry the joint area;
- lubricate the end of the pipe with waterproof sealant or glue;
- connect the hose back to its original place.
Sometimes a leak is caused by simple wear or damage to the inlet hose. In this case, the part needs to be replaced. Taping or re-taping the hose is not recommended; this is unsafe, as water flows through it under high pressure.
When a cracked tank is the culprit, you'll have to completely disassemble the washing machine. To remove the tank, you'll need:
- remove the top cover of the case;
- remove the powder receptacle;
- unscrew the bolts holding the control panel and move it to the side;
- remove the screws securing the rear wall, remove the panel;
- remove the front wall of the case;

- remove all elements that interfere with the removal of the tank one by one: drive belt, pressure switch, counterweights, heating element, motor, drain pipe, etc.;
- Having dealt with the shock absorbers, remove the tank from the car.
During disassembly, it is recommended to take photographs or draw diagrams of the wiring connections to the elements to avoid confusion during reassembly.
If the crack in a plastic tank is small, it can be sealed with a soldering iron. You can look up how to perform this type of repair online. If the hole is larger, it's best to replace the entire unit.
If a leak occurs during the spin cycle, the seal and drum bearings are likely damaged. To access these components, you'll have to split the drum of the washing machine in half. These parts are not repairable; old ones must be removed and new ones installed.
Interesting:


Readers' comments
Headings
Washing machine repair


For buyers


For users


Dishwasher


Add a comment