DIY Ultrasonic Washing Machine
 A few years ago, advertisements promoting ultrasonic washing machines were everywhere. And they were purchased much more frequently. Now the euphoria has faded, and fewer and fewer people are interested in using ultrasonic washing machines. Nevertheless, DIYers are still interested in how these machines work and want to assemble them, so we have no choice but to offer them all the information they need in this article.
Why do we need such a washing machine?
Some ordinary people will ask: What is an ultrasonic washing machine?We've already answered this question in another publication on our website, so we won't return to it again. It's worth noting, however, that an ultrasonic washing machine is a fairly simple device that can be easily assembled at home by any handyman with basic electronics knowledge.
An ultrasonic washing machine can be assembled from readily available materials; often, you don't even need to buy any semiconductor components, and the circuit is very simple.
 Many remember how inefficient such a washing machine is, and how much our grandparents complained about it when they bought it cheap. Why bother assembling such a washing machine yourself when you can easily buy one at a thrift store for a couple of dollars and then use it as much as you like, as long as your nerves are strong?
By reasoning this way, we incorrectly evaluate the motivation of the experienced DIYer. It's often interesting to simply learn how a device works and then assemble it yourself, no matter what happens next. Often, after successfully completing a task, the do-it-yourselfer throws the assembled device away, never even thinking about using it. We also built a homemade ultrasonic washing machine for the sake of principle, not because we all dream of washing clothes with it. So, we're happy to share our experience with you, no matter what your goals are in building this device.
What will you need?
An ultrasonic washing machine is a simple electronic device, but its assembly requires some basic equipment: a multimeter, a soldering iron, a micro drill for drilling holes for semiconductor components, a screwdriver, an awl, and a hair dryer. You'll also need some materials, which may require some digging around in your shed, storage room, or garage. You'll need:
- piezoelectric element or simply piezoelectric element;
- power supply without transformer;
- pulse generating module;
- a small plastic box approximately 4x4 cm;
- Moment glue;
- a tube of silicone sealant;
- solder;
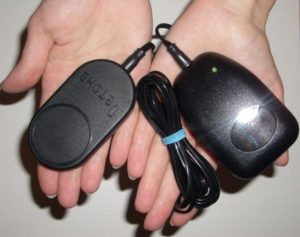
- phone charger;
- a board from an electronic alarm clock, telephone or Chinese radio.
In our case, we will take an old phone charger Siemens and a board from a Chinese electronic alarm clock, as well as a plastic case from a burnt-out doorbell. The remaining details are on the list.
We used the circuit board from an electronic alarm clock because it could be converted into an ultrasonic washing machine with minimal modification. The circuit diagram for the ultrasonic washing machine and the circuit diagram for the Chinese electronic alarm clock are very similar.
We are making a device
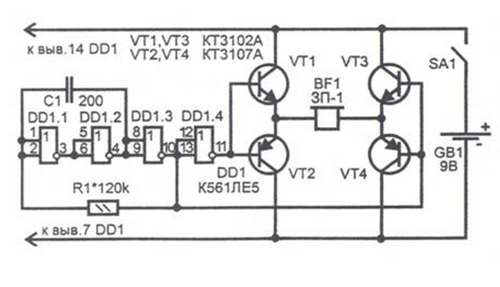
Before we begin assembling our own ultrasonic washing machine, let's familiarize ourselves with its schematic. As we've already noted, it's not complicated; essentially, all you need to do is assemble the parts from a phone charger and an electronic alarm clock.
 As you might have guessed, we'll only be desoldering the piezoelectric element from the electronic alarm clock's circuit board. We'll perform the following steps:
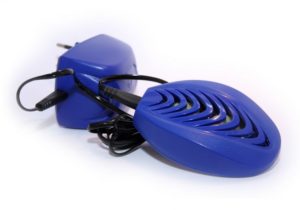
- we open the body of the burnt doorbell and throw out all the insides;
- We securely glue the piezoelectric element to the inside of the housing;
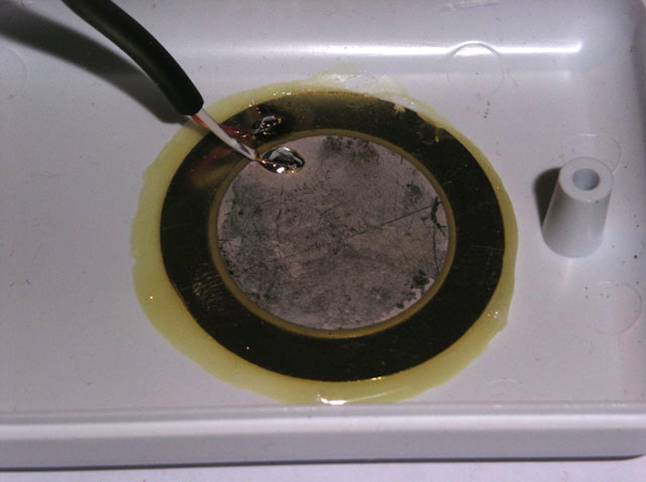
- We solder the wires to this element with our own hands as shown in the figure below; in this case, it is not necessary to observe the polarity;
- we take the wire outside the housing and secure it at the base of this housing;
- We fill the inside of the box with sealant, along with the glued piezoelectric element. Don't skimp on the sealant, as it's necessary to ensure reliable waterproofing, as the box will need to be immersed in water;
- We dry the sealant with a hairdryer and then screw the box on.
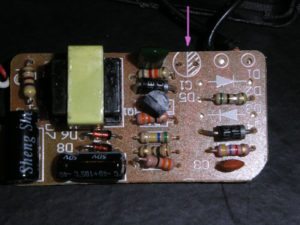
Next, we'll modify the power supply as indicated in the diagram. We'll remove its board, locate the rectifier diodes, and the 400V capacitor. We'll remove the capacitor. We'll solder three IN4007 diodes onto the board. We'll solder the wires coming from the box containing the piezoelectric element to the transformer's secondary winding. The wires need to be well insulated. Assembling the charger housing.
Well, the homemade ultrasonic washing machine is ready. A plus of this design is that it works flawlessly even in high-humidity conditions. We won't discuss the device's efficiency, but we can confidently say that it works. Good luck!
Interesting:


Readers' comments
Headings
Washing machine repair


For buyers


For users


Dishwasher


Add a comment